
|
Register or Log In To remove these advertisements. |
|
|
|
|||||||
 |
|
|
Thread Tools | Display Modes |
 10-22-2012, 10:34 AM
|
#1 |
|
Registered User
Join Date: Apr 2011
Location: Edmond, Ks
Posts: 595
|
1962 GMC 305V6 4WD Slow DD Build - Cecilia (Pic Heavy)
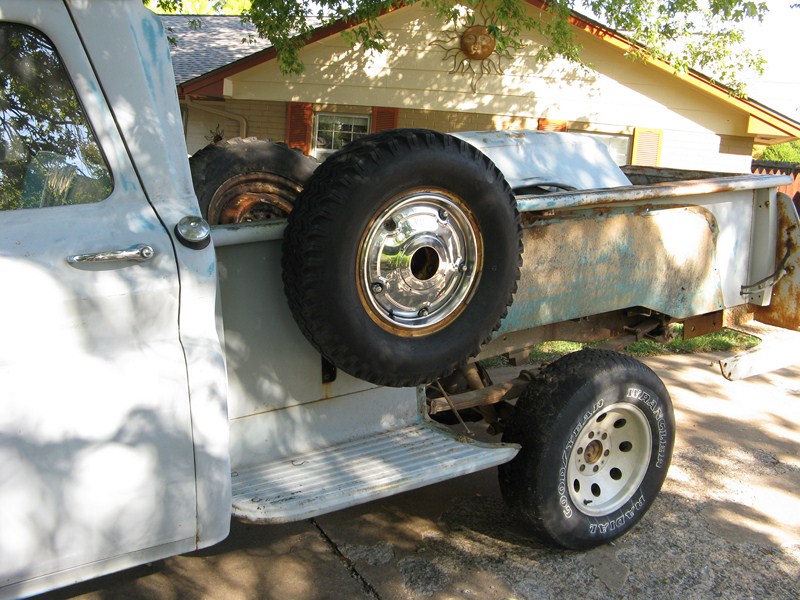
Here we go guys - and my kids will be here so please remember that in the comments and keep them G rated - This is Cecilia. She is named after the old Simon and Garfunkel song that I only knew the chorus to at the time.
Don't google it. The rest of the song isn't really for all audiences  "Cecilia, you're breaking my heart! You're shakin' my confidence daily!" 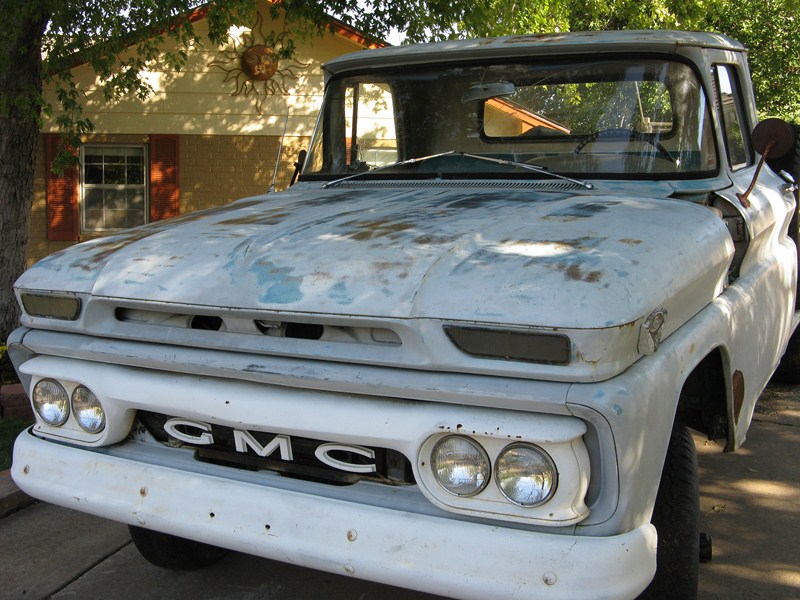 The name came to me as I was trying to get her started and the song kept playing through my head. And it kinda fits. We've been trying it out for a while now. It "feels" right. Previous owner said everything was original except for a little mud in the corners and the turn signal, which broke on him and he couldn't find a replacement. It has an alternator too, but I didn't have the heart to tell the old timer that they came with generators. And I don't mind, thought I'd kinda like to have a generator some day. These pix are a bit newer because she has her fenders off. They were removed prior to transport. I'll have pix of that soon. I like to do "step by step" documentation so it'll kinda be like that i guess. 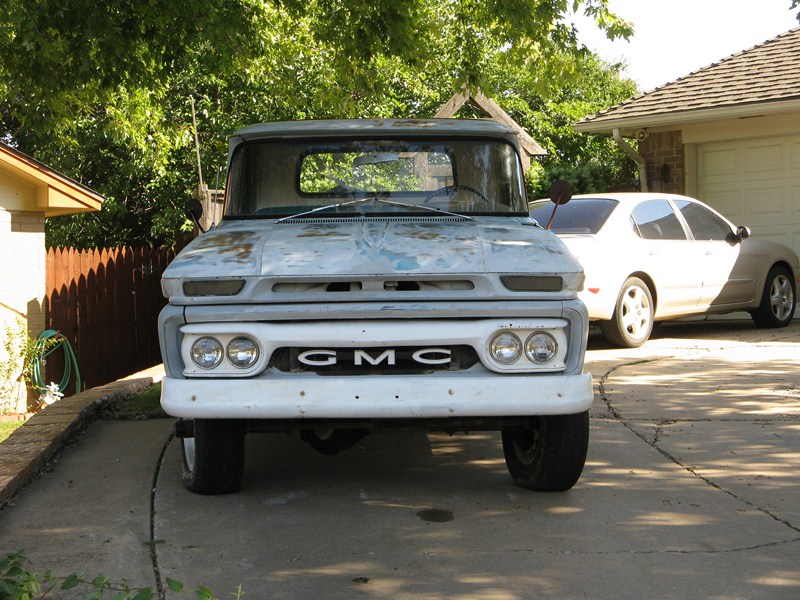 My youngest driving 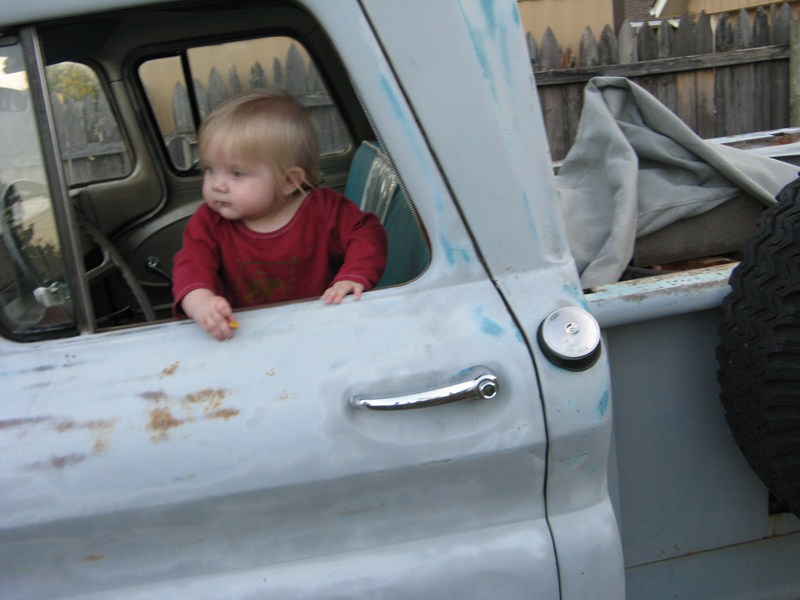 The seat is a style I haven't seen before, though it looks like it has been clipped to the springs since heck was a pup 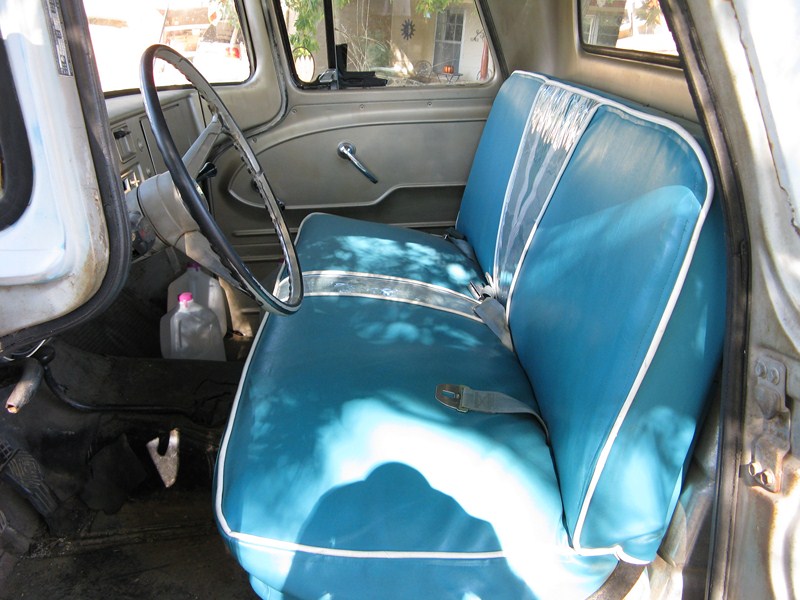 Kids making memories and butt-prints  Kids driving and playing "What's this lever/button/knob do?"  Eating apples in the bed. Something about "Cecilia" makes the kids hungry. In the first week we've had snacks on her five times, lunch three times, and dinner twice. Wife wasn't home  This is one of my best little helpers and the most ardent supporter of my buying Cecilia. I think she's angling for an inheritance. 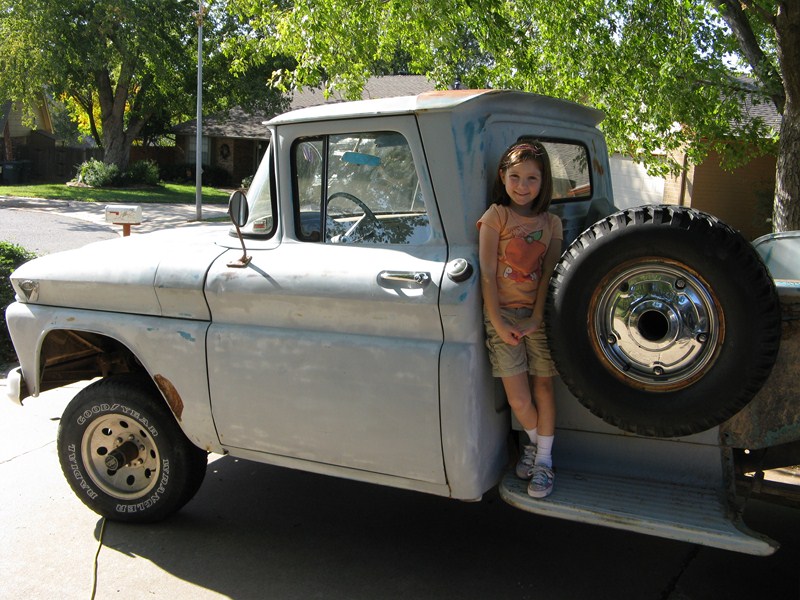 My plan right now is just to get her up and running well. Today was bolting the cowling corner back on, airing the tires and moving her to the backyard so I can work in private. I'd like to paint her back to the original color too but any talk of paint and the kids get all weepy eyed. They're patina fans and I haven't even talked to them about "patinas". They just like the look. We'll see how that goes. I also want to add PS because she's a longstepper and she turns on a half dollar. Whew! This might end up going anywhere by the time it's over. Flames and a flux capaciter anyone?  With my hip being what it is my oldest helper volunteered to air all four tires for me so i don't have to get up and down. And she hates getting dirty. She's a peach. 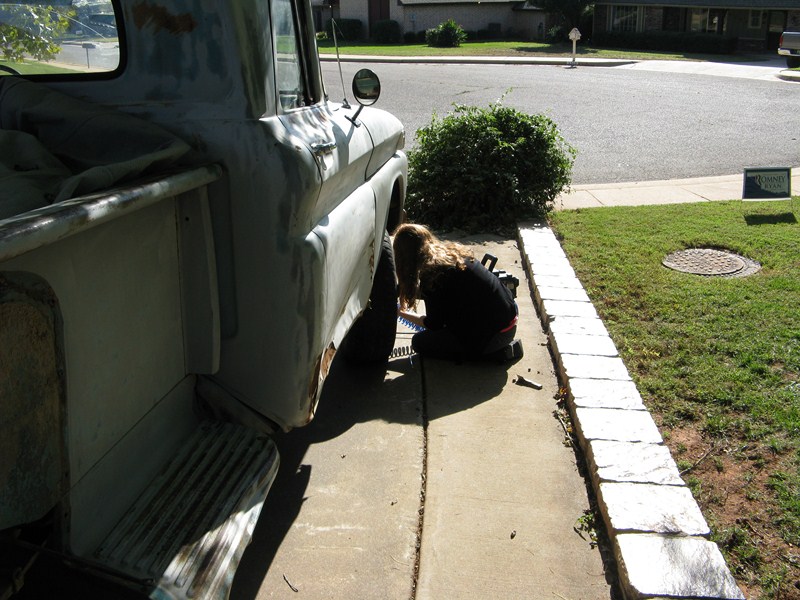 This weekend is a carb rebuild and a general cleaning. Perhaps some brillo on that crappy rattle can primer. Next weekend I'll replace that passenger window and work on getting the original AM radio with the letters GMC on it running. If you're working on these old trucks and haven't sampled the same music the guys that built it were listening to...well, you're missing out!  Funny story, right now while we tinker with her we're piping an old record out the window, "K-Tel's Looney Tunes, 24 Great Hilarious Songs"  Our Playlist: Code:
"They're Coming to Take Me Away" by Jerry Samuels aka Napoleon XIV "Along Came Jones by The Coasters "Hello Mudduh, Hello Fadduh!" by Alan Sherman "The Bird's the Word" by The Rivingtons "Kookie, Kookie (Lend Me Your Comb)" by Edward Byrnes "The Witch Doctor" by David Seville "Baby Sittn' Boogie" by Buzz Clifford "Transfusion" by Nervous Norvus "Little Eeefin Annie" by Joe Perkins "Haunted House" by Jumpin Gene Simons "My Boomerang Won't Come Back", by Charlie Drake "The Streak" by Ray Stevens "Rubber Duckie" by Harv Norman "Tip-Toe Through The Tulips With Me" by Tiny Tim "Charlie Brown" by The Coasters "Ape Call" by Nervous Norvus "Shaving Cream" by The Hustlers "Papa-Oom-Mow-Mow" by The Rivingtons "My Old Man's a Dustman" by Lonnie Donegan "Little Red Riding Hood" by Sam The Sham & The Pharoahs "Dinner With Drac" by John Zacherie "I Love Onions" by Susan Christie "Mother-in-Law" by Ernie K-Doe "Chipmonk Song" by David Seville and The Chipmunks We did finally get her running enough to move to the back (shown above) but I ran outta gas midway through the gate. It's a good thing these great old trucks can bump forward with the starter if necessary. The gas tank was covered by the fence. 5 gallons of pure gas (no ethanol) later and she was running-ish again. At least enough to backed her into her new home. 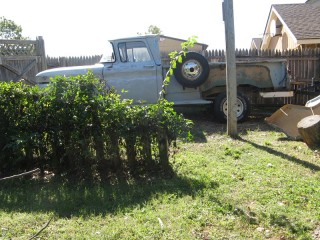
__________________
Step by steps: Remove primer to reveal original paint Rebuild a carburetor See My Build - Cecilia! Some people are like slinkys. Not worth much but funny as heck when pushed down stairs. Last edited by FetchMeAPepsi; 10-22-2012 at 10:51 AM. |

|

|
|
10-22-2012, 12:09 PM
|
#2 |
|
Registered User
Join Date: Apr 2011
Location: Edmond, Ks
Posts: 595
|
Re: 1962 GMC 305V6 4WD Slow DD Build - Cecilia (Pic Heavy)
More pix -
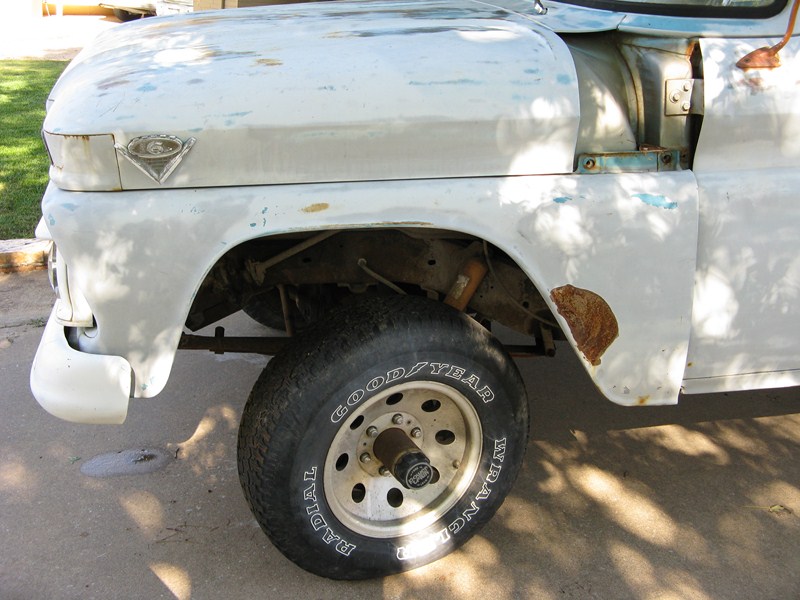  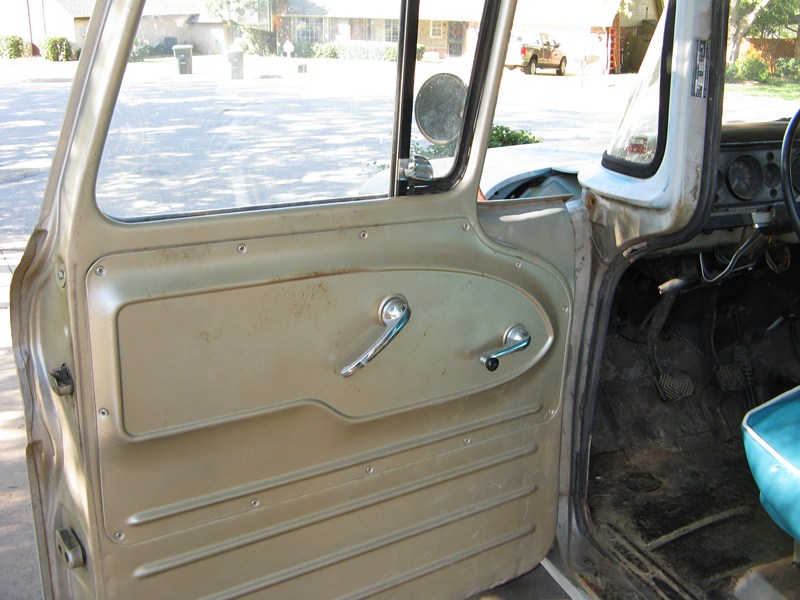 Dual original visors  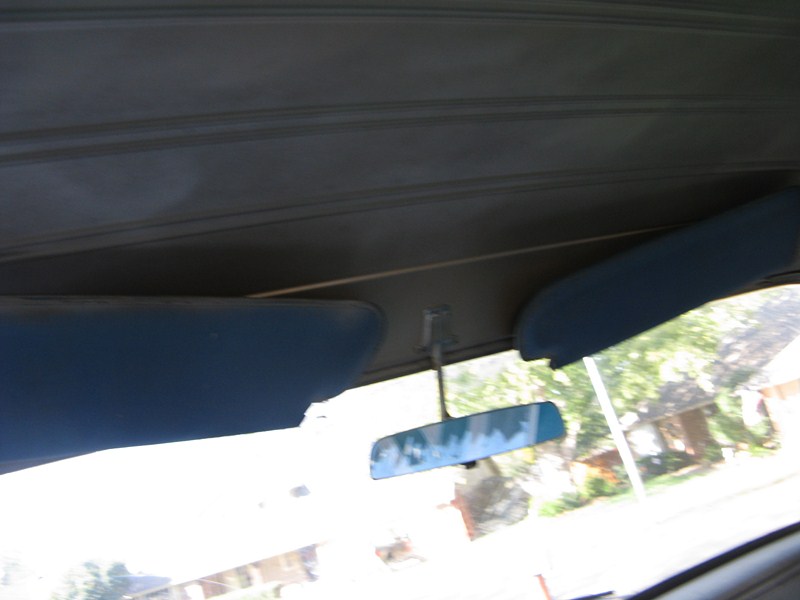  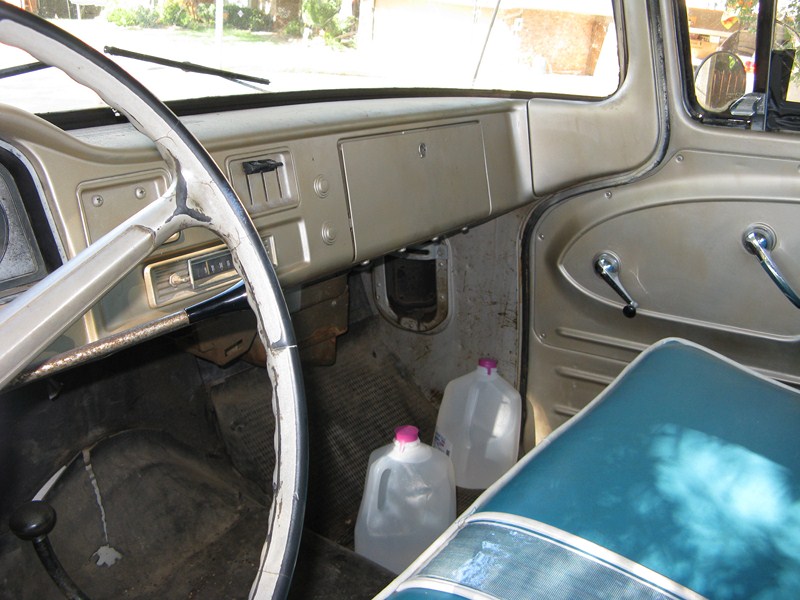 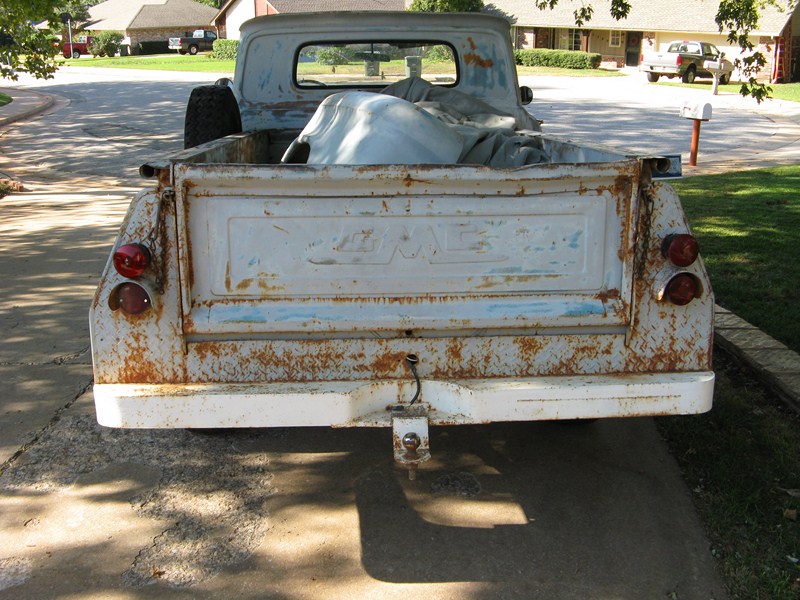 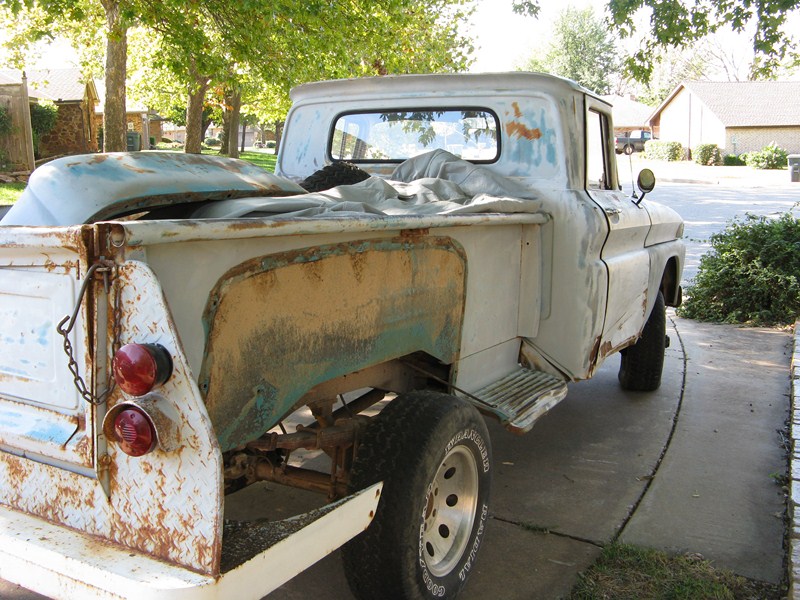 And the damaged pass side. I'm going to bang around on it some, but am not entirely against buying a replacement. 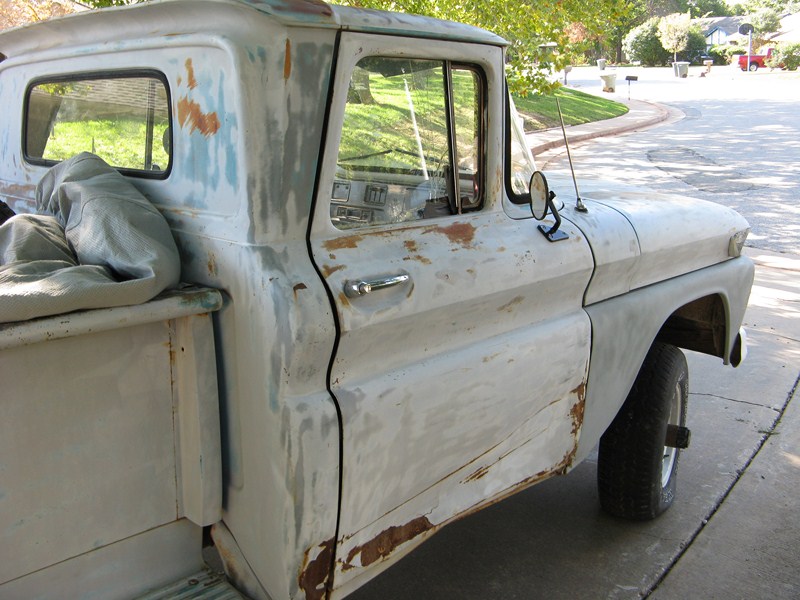
__________________
Step by steps: Remove primer to reveal original paint Rebuild a carburetor See My Build - Cecilia! Some people are like slinkys. Not worth much but funny as heck when pushed down stairs. Last edited by FetchMeAPepsi; 10-22-2012 at 12:35 PM. |
|
|
|
|
10-22-2012, 12:45 PM
|
#3 |
|
Registered User
Join Date: Apr 2011
Location: Edmond, Ks
Posts: 595
|
Re: 1962 GMC 305V6 4WD Slow DD Build - Cecilia (Pic Heavy)
Click links to see larger pix.
I'm very lucky to have these little curtain climbers. This is a great opportunity to get them outside with their dad. My future wrench turner trying the seat out  Lunch on the tailgate with my son. It doesn't get any better than this. 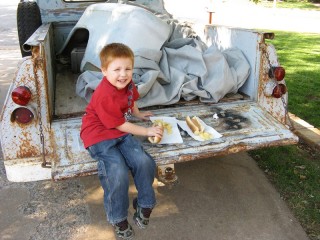 My son and my "powder puff mechanic" taking turns. The seat is like a trampoline due to it's age. 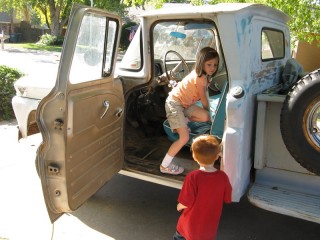 My powder puff mechanic posing with my busted up old tailgate. 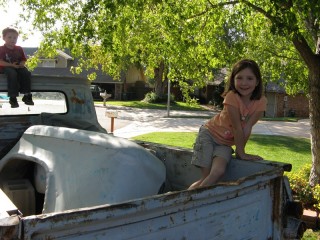 My oldest trying out the wheel. "What's this other pedal for?" Ha ha 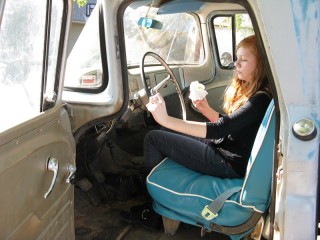 And finally the carnivorous Cecilia and my powder puff mechanic being a ham. 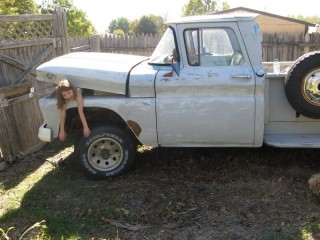
__________________
Step by steps: Remove primer to reveal original paint Rebuild a carburetor See My Build - Cecilia! Some people are like slinkys. Not worth much but funny as heck when pushed down stairs. |
|
|
|
|
10-22-2012, 01:33 PM
|
#4 |
|
Registered User
Join Date: Sep 2011
Location: Tacoma, WA
Posts: 2,425
|
Re: 1962 GMC 305V6 4WD Slow DD Build - Cecilia (Pic Heavy)
Hello and
 to the boards!! to the boards!!Looks like you have a heck of a build crew there, congrats and good luck, you are lucky to have such a posse !!! I still have some old K-Tell albums too, have you thought of transferring those to digital? "Transfusion" by Nervous Norvus ...... ......... have not heard the song in many years, I think it is on one of my albums back home in storage, but this line from the song I think always best describes my approach to driving:"Hey man dig that, was that a red stop sign?" Good times. I look forward to watching your build unfold
__________________
Michael McMurphy My 66 Stepside My 64 Tow Truck My 66 Tempest Table Of Contents Added to Page1 |
|
|
|
|
10-22-2012, 08:18 PM
|
#5 |
|
Registered User
Join Date: Dec 2006
Location: SLC, UT
Posts: 706
|
Re: 1962 GMC 305V6 4WD Slow DD Build - Cecilia (Pic Heavy)
I love it. It's a GMC, its a stepper, and its 4X4. I'll be rooting for you.
|
|
|
|
|
10-22-2012, 11:10 PM
|
#6 | ||
|
Registered User
Join Date: Apr 2011
Location: Edmond, Ks
Posts: 595
|
Re: 1962 GMC 305V6 4WD Slow DD Build - Cecilia (Pic Heavy)
Quote:
That's exactly what I did! My "powder puff mechanic" has been listening to them on her Ipod all afternoon. That song has cracked me up since about 1979, along with "Ape call (doodlie-aba)" and "My old man's a dustman". We have "Goofy Greats" too, but it's not as funny. Still a good group of songs. Too bad you can't find them on CD. I think the younger gen is missing out on alot of historical goodies. Quote:
IKR? I feel very lucky to even have found her, let alone drag her home for $500 bux. I hope to be able to take her in the mud a little once she's running reliably. I'm no root-dogger, but I'd like to do a little light play in the mud with the kids. I'll have carb rebuild stuff coming up soon.
__________________
Step by steps: Remove primer to reveal original paint Rebuild a carburetor See My Build - Cecilia! Some people are like slinkys. Not worth much but funny as heck when pushed down stairs. |
||
|
|
|
|
10-27-2012, 05:36 PM
|
#7 |
|
Registered User
Join Date: Apr 2011
Location: Edmond, Ks
Posts: 595
|
Re: 1962 GMC 305V6 4WD Slow DD Build - Cecilia (Pic Heavy)
I like to keep records and how-tos so that's how most of my updates will be formatted. Hopefully it helps someone, if not it'll help me if and when I start another project.
And it helps to troubleshoot my many, many mistakes when I know the road I've been down. So without further adeu, a carb rebuild is in order for my baby Cecilia.
__________________
Step by steps: Remove primer to reveal original paint Rebuild a carburetor See My Build - Cecilia! Some people are like slinkys. Not worth much but funny as heck when pushed down stairs. |
|
|
|
|
10-27-2012, 05:38 PM
|
#8 |
|
Registered User
Join Date: Apr 2011
Location: Edmond, Ks
Posts: 595
|
Re: 1962 GMC 305V6 4WD Slow DD Build - Cecilia (Pic Heavy)
Cecilia's going to be a daily driver one day so the first job on the table is making her more reliable. Right now she runs like a one legged duck on a whack-a-mole table. I started with a carb (carburetor) rebuild. I'm sure it's the wrong thing to do. Most of the things I choose to do are probably wrong. I've learned to live with it
 My carb is still the original Stromberg WW model. I plan to upgrade to a Holley 4410c 500 CFM eventually, but I want to have everything else running smoothly before that happens. So I bought a GP Sorenson Carb Kit from Autozone for $37.99. The part number is 96-574. The carb kit does NOT come with a float, in fact the computer told the little guy at Autozone that this carb doesn't need a float. He was like, "Ok, now this computer is just flat out lying to me." Points for the parts guy having a sense of humor I got my kit home and waited until the weekend when I'd have someone watching my youngest and I could draft my main helper for photography duty. Saturday it was bacon, eggs, biscuits and gravy, pain killers for the hip, and then off to Cecilia with my child number 2 in tow. For this project I needed: (sorry for the metric, someone stole my standard wrenches just a week ago. A pox on their house!)
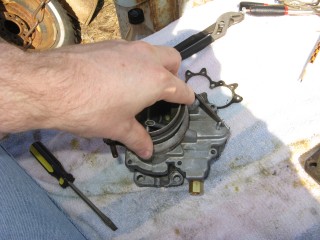
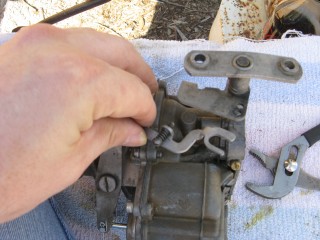
Click any of these images to see a larger version. 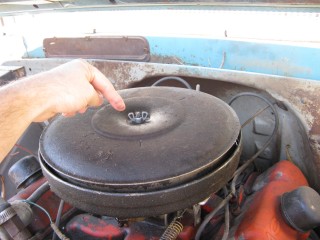 I always just set the nut on top of the air cleaner so I don't lose it. This won't work if you don't put the air cleaner in a safe place though. Watch for gremlins stealing those wingnuts. They're like candy to them.  Then just lift the entire air cleaner away. OOOh, Ahhhh! 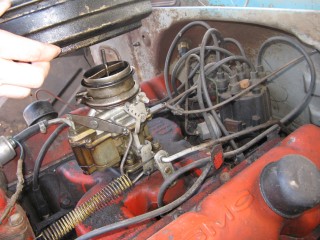 Next we remove the gas line. If your large brass connection isn't very tight then you'll need to use two wrenches to remove the smaller brass fitting, with one holding the large fitting stationary while the small one turns. I'm using a 15mm and a 13mm shown here. There *could* be a screen in here so be careful. Mind did not have one. Gremlins, I tell you. 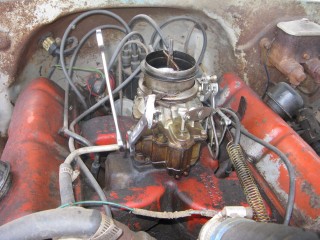 Now unhook the large spring. I don't know all of the official terms for everything so we'll call this the Large Throttle Spring Of Doom. Be careful because it is under tension. Tension is what gives it a hunger for blood. 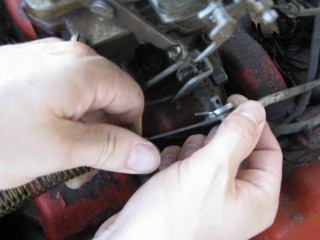 Then pull free the linkage (metal bar) that the Large Throttle Spring Of Doom was hooked into. 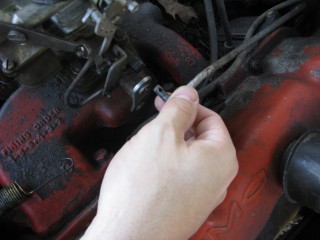 At this point I reached around the back of the carb to remove the brass fitting that runs to the vacuum advance. Here I'm using a 12 open ended wrench. 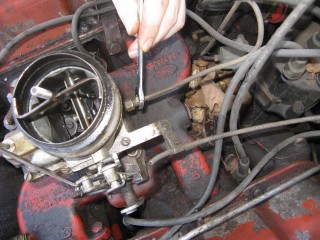 Now come back to the throttle linkage. Unscrew the top screw just a couple of turns. This screw holds the wire that's poked through underneath it. We're just wanting it to let go of the wire, we're not trying to remove the screw. 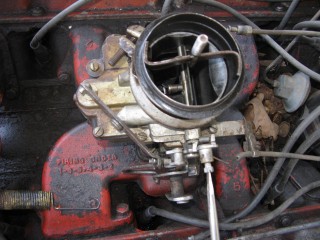 There's another screw that we need to loosen directly behind the one we just did. There's a nut on the back end of it (indicated by my ugly finger) so don't unscrew it too much or you'll be chasing it down a spark plug hole. Just unscrew it a couple of turns and disconnect the cable by pulling it out to the side. 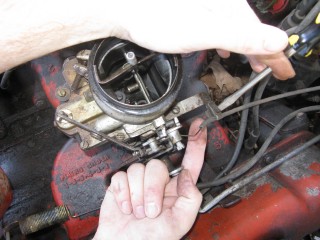 Here's me pulling it to the side. I bet you're glad you saw this. You're so well informed. 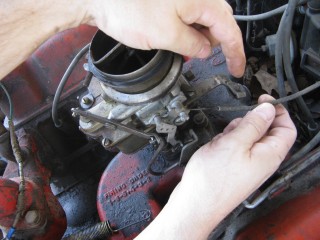 Now pull the little wire free from the top. It MAY be bent around to help hold it in place. If so just unbend it. It doesn't need to be bent if your screw is tightened properly anyway. Leave it straight. Straight is how God intended. 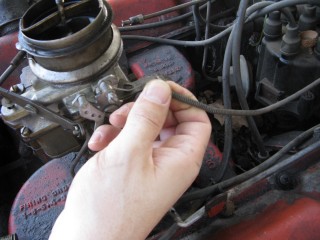 Congrats! At this point we've removed all of the "stuff" hooked to the carburetor! Pat yourself on the back - well, no. Your hand is filthy. What's wrong with you? Born in a barn? Ask someone else to pat you on the back. That will also give you the opportunity to tell them how manly and tough you are for making it this far. Ohhh Yeahhh!!  Ok, back to work, Superman. You've only got four nuts left and you're in the clear! I'm using a 15mm wrench to remove these. DO NOT DROP THE NUTS. They're very difficult to fish out of the spark plug holes. Where Gremlins live. And they bite. Remove the nut located here: 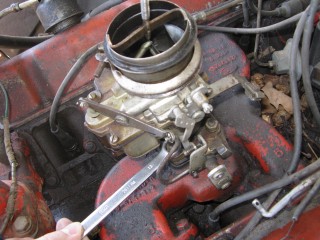 And here (don't mind my Photographer in the background): 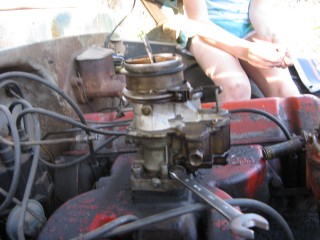 Then here: 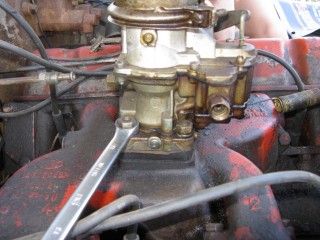 And finally here, under all that spaghetti we just took loose. 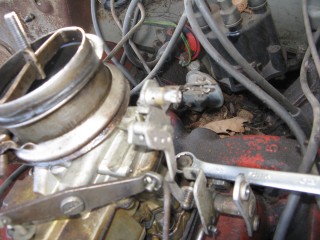 My carb had lock washers, but only on the front two bolts. Again, do NOT DROP THESE or you'll have a heck of a time fishing for them in spark plug holes. Don't believe me? Go ahead Mr. Know it all. Drop one. I double DOG dare ya! 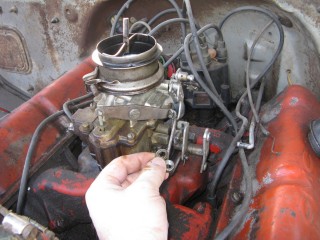 Now just lift the entire carb up and off! You'll be left with this.  Eww. That's anticlimactic. Here's what it looks like with the bottom plate removed. You can see how tall the lip is without the plate. Now is a good time to poke a clean(ish) rag in the intake hole so you don't drop crud down there and ruin your engine. 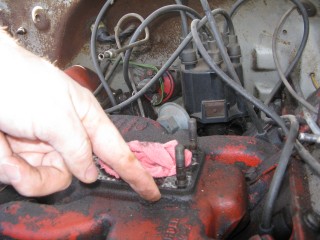 My bottom plate had this really cool homemade gasket on it. It was made from what I assume was the box that the previous carb repair kit came in. It looked about like a cereal box only much thinner. They just tore off a piece and mashed it on the bolts. There were little bits of superthin cardboard everywhere. 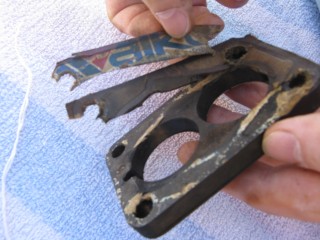 I pulled off most of the cardboard but several pieces were pretty stuck. They'll come off in the dip though. With the carb removed and placed on these very manly pink and turquoise towels that my wife donated to my project, we'll get back to the dissassembly by straightening and removing the cotter pin shown at the top of the remaining linkage. Sort of...My photographer had a hard time fixing the shot in the bright sunlight. 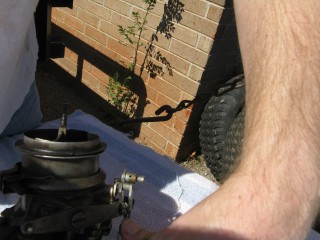 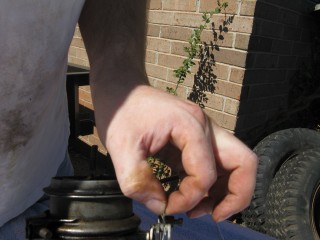 These cotter pins were very thin so bending them with a thumbnail was no trouble. Now we remove the lower cotter pin. 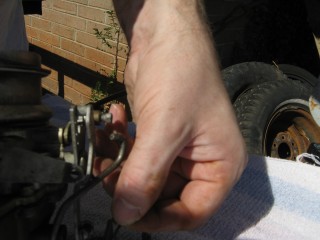 Remove the final bit of linkage. 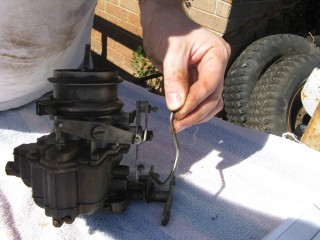 Now we remove the riser off of the "air horn", which is a fancy way of saying the top tube off of the carb. This screw has a nut on the other end, but it's clamped in there. You shouldn't be able to lose it, but don't try really hard just in case. 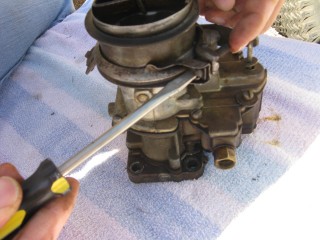 Now just remove the riser by pulling it straight up. 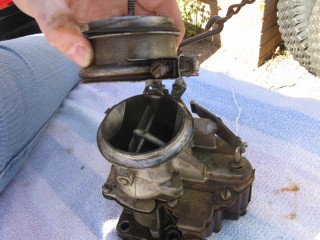
__________________
Step by steps: Remove primer to reveal original paint Rebuild a carburetor See My Build - Cecilia! Some people are like slinkys. Not worth much but funny as heck when pushed down stairs. |
|
|
|
|
10-27-2012, 05:48 PM
|
#9 |
|
Registered User
Join Date: Apr 2011
Location: Edmond, Ks
Posts: 595
|
Re: 1962 GMC 305V6 4WD Slow DD Build - Cecilia (Pic Heavy)
Then look at what's left. You have three main parts of the carb standing in front of you. The air horn on top, then the main body and finally the bottom part, which I forget the name of right now. We'll call it "the bottom plate" for now. My helper said we should just call it "Bob".
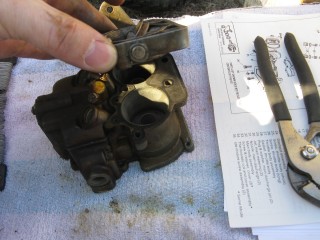
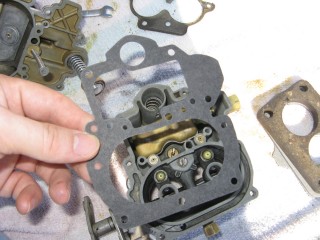
Remove the screws connecting the air horn to the main body. They're located here: 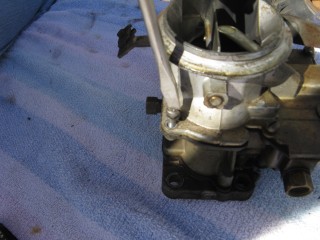 and here. This one also releases the brace that the throttle cable connected to. Don't lose them, store them together. 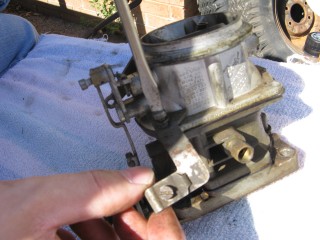 Then here...  And here... 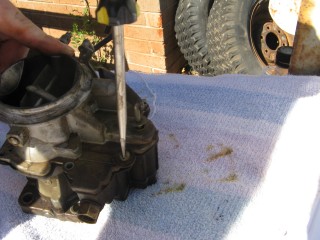 on to here... 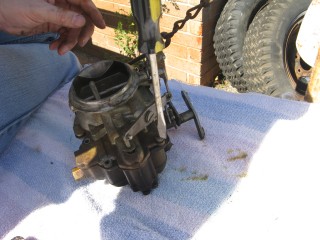 Then here, and this one's kinda hidden so pay attention 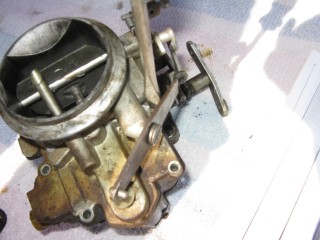 There are two long springy plungers under the main body so as you pick it up be careful to come out pretty straight and hold it over something like my awesomely manly pink and turquoise towel (mentioned earlier). You never know when stuff will fall out. If it does, don't sweat. We'll show you where it goes later. Lift the air horn off of the main body. 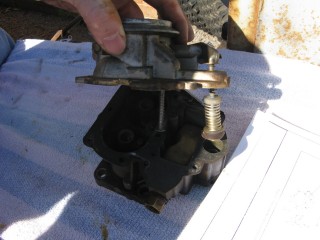 Be careful with the next portion. There's a little BB (yes, like you'd shoot in a BB gun) rolling around in two parts of the carb. The first part is right under this spring, which you might need to fish out with a screwdriver. 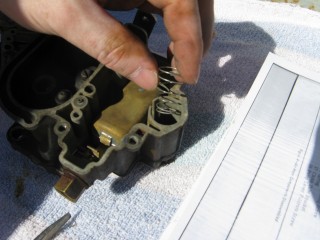 Now pour out the BB into your hand slowly so it doesn't jump out and run off. 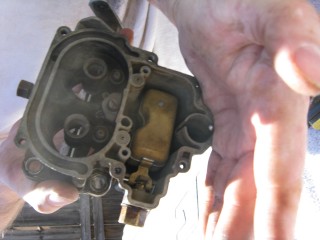 Here's a pic of everything we have done so far, with screws in the order they were removed, left to right... 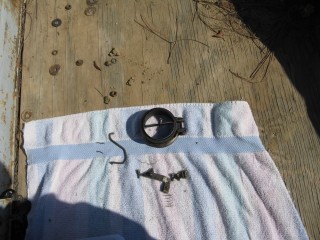 Here it started getting HOT under that boiling sun. We had to set up a little tent shade from Cecilia's cover. It worked OK for the time being.  Our shelter set up, we continued by removing these little needles. There are two of them.  Now remove the cotter pin from the pump piston if you have one on it. Mine didn't. Say it with me now....Gremlins! 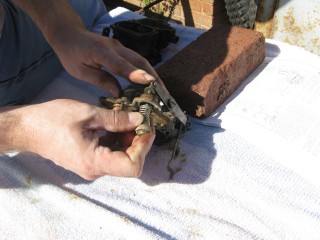 Mine also had a washer on the top of it with a spring poking through the hole. I'm 99% sure that was NOT factory rigging. When we rebuild we'll leave both the spring and the extra washer off. It's not pictured in my manual at all. Unless that breaks something. Then we'll just make it ugly again.  Here my expensive internet downloaded carb manual said to - and I kid you not - take a block of wood and a small wrench to pry out the vacuum piston pump (the second springy thing, located in the center of the carb). I thought, well that's weird. But if you say so... My vacuum piston was stamped in and no amount of gently tugging would pull it loose. So I obliged it as directed and sent the top flying off into the sunset. DO NOT DO THIS, though it made a beautiful SPROING noise. I found out later you don't even need to remove the vacuum piston as there isn't anything you need to replace in there. UGH. 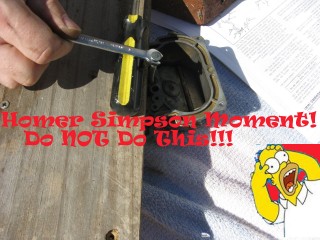 Oh, and of course you can't buy this part for anything. Instead I had to get a magnet and fish the yard for the cap then I JB Welded it back together. It'll disintegrate over time in the gas but I plan to replace it anyway so no sweat there. It just has to work for a few weeks. Anyway, lesson learned. Fun stuff keeps the boredom away, right? So moving on, we remove this big screw holding the throttle cable connections. Be careful though, there's a tiny spring on the back of the connections (shown below) 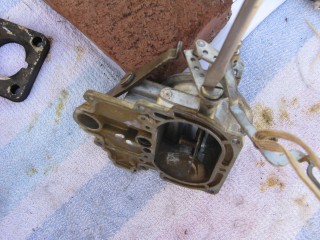 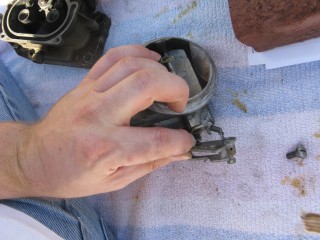 You only need to unhook one side of the spring, the side that hooks to the carb. The other side should be stuck on due to a pinch in the linkage. Just gently remove the whole thing and set it aside. We'll dip the entire thing as a family project. Next remove the brass fitting on the outside of the carb where the gas went in. My photographer had a potty/lunch break and took my camera so no pix. It's pretty easy though. Just unscrew it with a wrench and pull out the little rocketship looking pin inside by unhooking it from the float with a screwdriver. Then use the same screwdriver to unhitch the metal pin on the float side of the carb holding the back of the float in. It'll spring off by itself if you're not careful so put a hand over it as you pop it loose. Then remove the float and it's little pin that holds it in place. Here's a pic of the stuff we've removed so far, in order from left to right, in rows top to bottom. 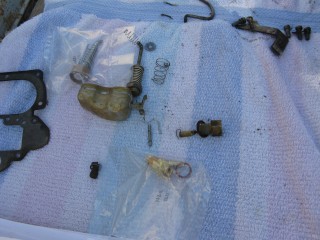 Now find some small wire to clean out the pins. Don't laugh, I have some of the wife's flower arrangement wire here. It works. Shut up. :P 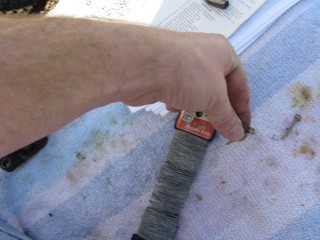 There are four more holes to clear while you're at it. The two inner ones are inside the smooth walls. You might have to hunt around for them. The outer ones are the big boobie looking nubs sticking up. 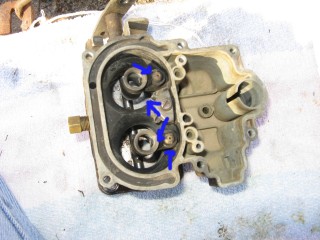 Now grab the trusty screwdriver again and remove this center piece. There is another even smaller BB under this so be careful. 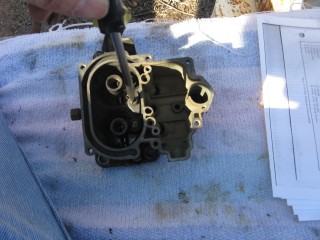 Again, be careful when you remove it...There's another BB under it. 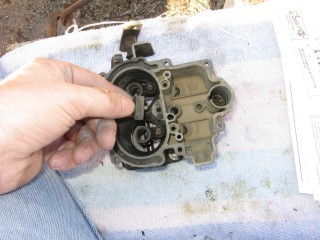 Then pour out the little BB inside. 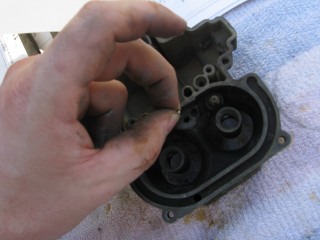 Now flip the whole thing over and take off the bottom big screws. These cover your jets. We won't be removing the jets this time but we will clean them out with the wire. Removal is unnecessary. 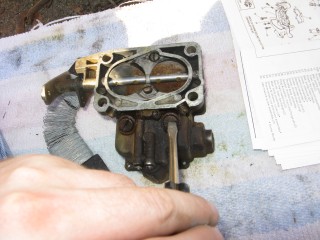 Under those big screws is two very dirty, probably invisible copper washers. Remove them and set them aside in case your new ones break when installing. Then clean the jets inside with the wire. 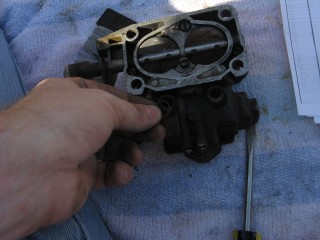 Now remove the vacuum brass fitting on the outside of the carb. 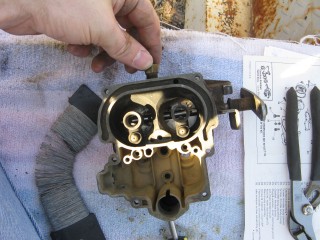 Now we begin removing the four little screws on the very bottom. These hold on "the bottom plate", or Bob if you prefer. They're located here... 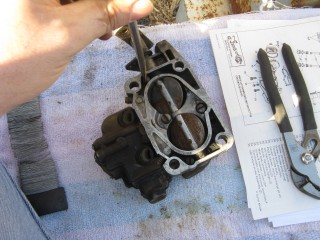 And here 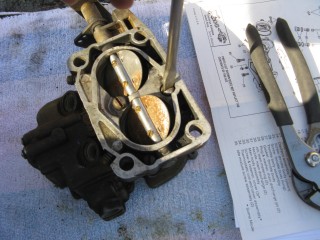 And here...  And finally here. 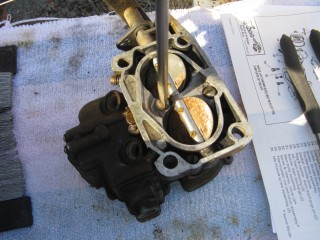
__________________
Step by steps: Remove primer to reveal original paint Rebuild a carburetor See My Build - Cecilia! Some people are like slinkys. Not worth much but funny as heck when pushed down stairs. |
|
|
|
|
10-27-2012, 06:00 PM
|
#10 |
|
Registered User
Join Date: Apr 2011
Location: Edmond, Ks
Posts: 595
|
Re: 1962 GMC 305V6 4WD Slow DD Build - Cecilia (Pic Heavy)
After that just lift off "the bottom plate" and set it aside. This completes the disassembly portion of our show!
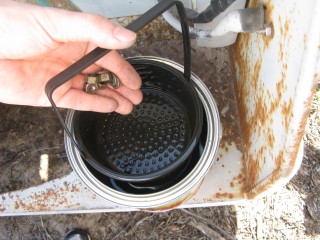
 You can now start cleaning your parts! Grab a wipe-off towel and it better be a big one because you'll have almost a full towel of funk. I took the air horn and dipped in the dip for 20 mins. The instructions say 15-30 mins. 20 mins seemed ok. Here's a before and after. I did have to dip the main body for two 30 min rounds though (not shown). 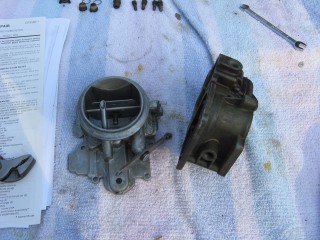 Now it's safe to reattach the top back on the air horn. There is no replacement gasket in your bundle so treat it carefully. 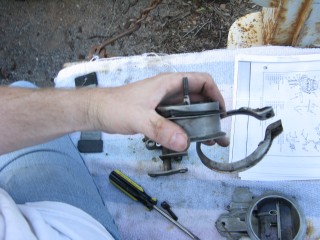 Continue dipping parts, wiping them, and putting them back in their order. Set a timer so you get a reminder and keep parts moving through the dip. A simple egg timer that you steal from the kitchen is perfect. Buy her another one though because it's going to get nasty. While that's happening we can open some plastic. Yummy fresh parts. 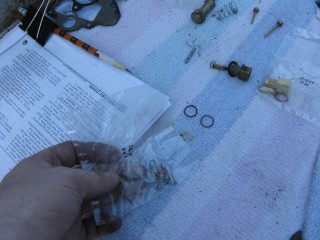 This is part of what all you'll replace from the first package. 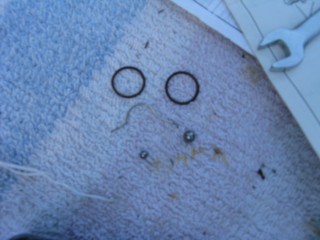 You'll also replace these parts... 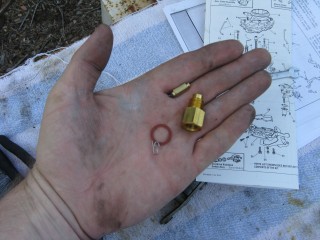 And here's the old ugly ones. 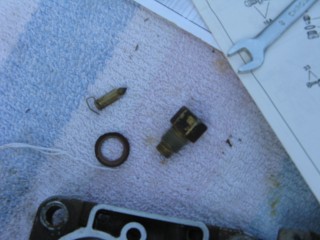 Next open up your new piston assembly. There's a bit of cardboard on the end of it - don't remove that until we're ready to put it back inside the carb. 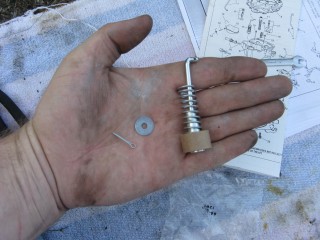 The old parts... 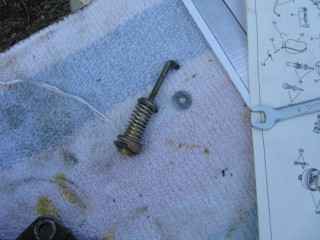 Reassembly will commence tomorrow after the JB Weld dries
__________________
Step by steps: Remove primer to reveal original paint Rebuild a carburetor See My Build - Cecilia! Some people are like slinkys. Not worth much but funny as heck when pushed down stairs. |
|
|
|
|
10-28-2012, 11:37 AM
|
#11 |
|
Registered User
Join Date: Dec 2006
Location: SLC, UT
Posts: 706
|
Re: 1962 GMC 305V6 4WD Slow DD Build - Cecilia (Pic Heavy)
Very entertaining, and informative. This will be a help to someone else down the road I am sure.
|
|
|
|
|
10-28-2012, 01:42 PM
|
#12 |
|
Just here to tinker
 Join Date: Jun 2008
Location: Holland, MI
Posts: 3,672
|
Re: 1962 GMC 305V6 4WD Slow DD Build - Cecilia (Pic Heavy)
Wowsers! Well done documenting all of that. It's really great that you get to do all this with your kiddos.
__________________
78 C10 SWB Diesel #1 (wrecked)http://67-72chevytrucks.com/vboard/s...1978+silverado 78 C10 SWB Diesel #2 (sold)http://67-72chevytrucks.com/vboard/s...d.php?t=650751 60 GMC Suburban (sold)http://67-72chevytrucks.com/vboard/s...d.php?t=445526 60 GMC 1000 (sold)http://67-72chevytrucks.com/vboard/s...d.php?t=298235 67 GMC 1500 (sold) http://67-72chevytrucks.com/vboard/s...d.php?t=803695 86 Suburban(summer unit) http://67-72chevytrucks.com/vboard/s...d.php?t=810697 88 Suburban 4x4(winter unit)https://67-72chevytrucks.com/vboard/...25#post8900725 |
|
|
|
|
10-28-2012, 05:03 PM
|
#13 | ||
|
Registered User
Join Date: Apr 2011
Location: Edmond, Ks
Posts: 595
|
Re: 1962 GMC 305V6 4WD Slow DD Build - Cecilia (Pic Heavy)
Quote:
Quote:
Thanks! Seeing their faces light up over something that isn't handheld and making bee-bee-boop sounds is pretty cool. I guess the acorn doesn't fall far from the tree after all. The oldest 2 are now trying to get me to give Cecilia to them after I'm finished.
__________________
Step by steps: Remove primer to reveal original paint Rebuild a carburetor See My Build - Cecilia! Some people are like slinkys. Not worth much but funny as heck when pushed down stairs. |
||
|
|
|
|
10-28-2012, 05:06 PM
|
#14 |
|
Registered User
Join Date: Apr 2011
Location: Edmond, Ks
Posts: 595
|
Re: 1962 GMC 305V6 4WD Slow DD Build - Cecilia (Pic Heavy)
You'll also have alot of gaskets in the kit but don't worry about them just yet.
Keep putting parts in the dip and don't forget to save a big piece to put in on top of the float because....wait for it.... It floats. And keep toweling them off as they come out. Once they're all dipped, it's time to start the rebuild. Screw this screw in. It's the one with the little pin coming out of the top. 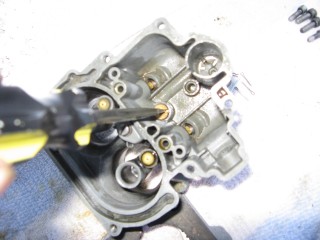 Then put this screw and cover in. Remember that there's a little tiny BB under it. Don't forget that! 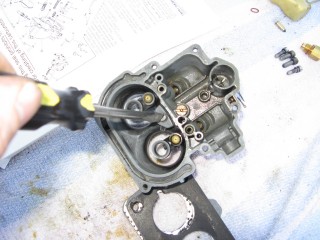 Then put the vacuum fitting back on. There is no washer or anything for it.  Then put the pin back in the float and drop it back in. 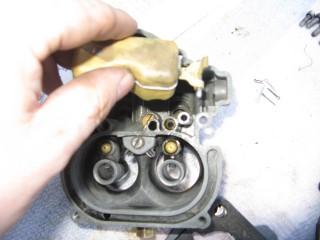 Don't forget your new keeper pin!  Use your screwdriver to gently work it back up under the lip that holds it in place. 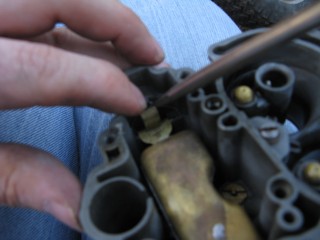 Then put your little rocket ship piece (I think it's called a needle valve) back in and use the included keeper wire to hold it to the float again.  Bend the end of it around with the screwdriver to make sure it stays put. 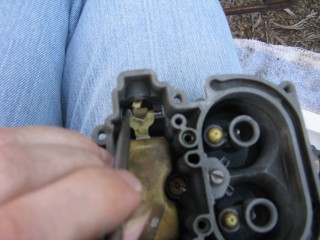 Now you can install the fancy new fuel fitting. I later found out this fitting didn't fit my gas line and had to revert to the old fitting. Never throw anything away until you finish! 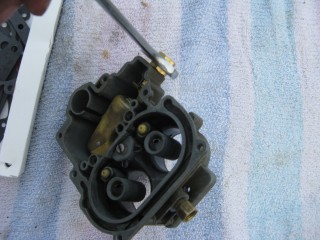 The float shouldn't need adjusting, but it's a good idea to do so anyway. Flip it over and make sure that with the float hanging upside down (dangling) that it closes the little rocket ship into your new fuel fitting. If it doesn't close it off then you need to bend the arm on the float so that it does. Flip the main body over now and find a gasket that looks like it fits. 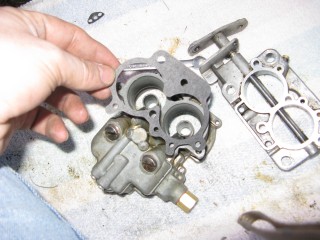 Then get your screws to bolt "Bob" back on. Two fat screws go in the middle. 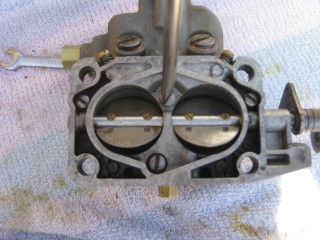 Two thinner screws go on the outside. 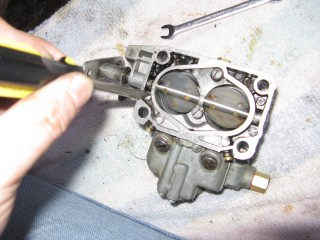 Put your jet covers back on, remember your new shiny copper gaskets! 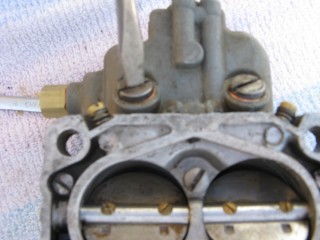 Grab the "air horn" (top of the carb) and your fuel piston pump. Poke one through the other. 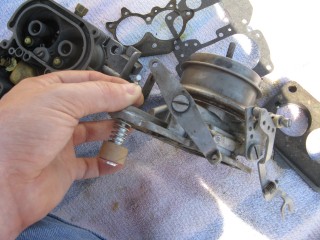 Pop a cotter pin through it. 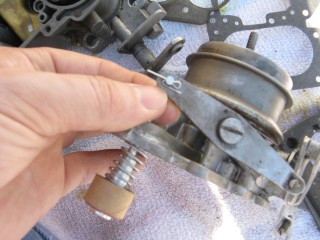 Put the stupid vacuum pump piston that I broke and JB Welded in. That I hate. Stupid part. Grr. 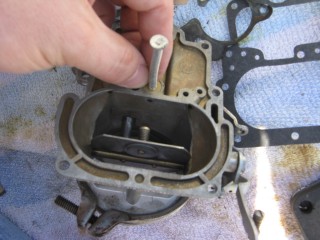 Put these pins back in. Remember that there are two.  Fnd our larger BB and drop it in the fuel pump piston hole. 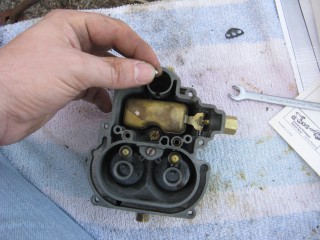 Drop the spring back in. Boioioingggg! 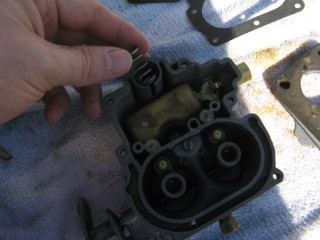
__________________
Step by steps: Remove primer to reveal original paint Rebuild a carburetor See My Build - Cecilia! Some people are like slinkys. Not worth much but funny as heck when pushed down stairs. |
|
|
|
|
10-28-2012, 05:12 PM
|
#15 |
|
Registered User
Join Date: Apr 2011
Location: Edmond, Ks
Posts: 595
|
Re: 1962 GMC 305V6 4WD Slow DD Build - Cecilia (Pic Heavy)
Go through your gaskets and find one that fits.
 Get your air horn again and pull the cardboard piece off of the fuel piston. 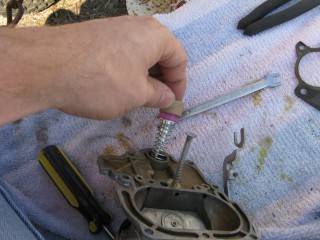 Fit the gasket over the pistons. 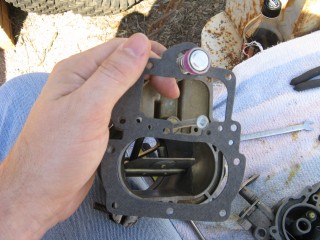
__________________
Step by steps: Remove primer to reveal original paint Rebuild a carburetor See My Build - Cecilia! Some people are like slinkys. Not worth much but funny as heck when pushed down stairs. |
|
|
|
|
10-28-2012, 05:44 PM
|
#16 |
|
Registered User
Join Date: Apr 2011
Location: Edmond, Ks
Posts: 595
|
Re: 1962 GMC 305V6 4WD Slow DD Build - Cecilia (Pic Heavy)
Put the air horn back on the main body. Try to keep the gasket lined up. If you can rock it forward and backward like a hobby horse then it's likely hanging up on those needles we put in. You should be able to wiggle it gently and get it to seat properly.
 Then start putting your screws back in the air horn. I like to put them all in then tighten them like you do a wheel, going from one side to the other so they seat as flat as possible. Does it matter? Probably not. I tighten them just enough to start really pinching the gasket tight. The first screw we do has that accelerator cable tie-down. Don't forget it like I did. That's why it isn't shown in the second pic. Whoops!  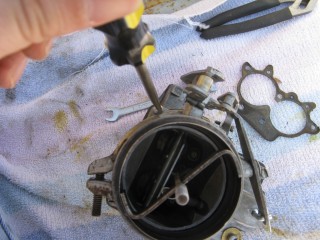 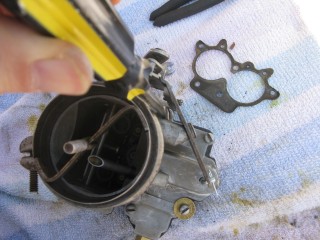 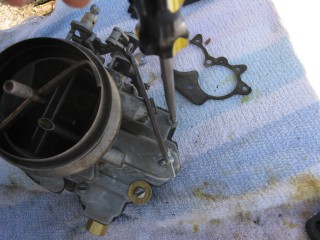 For this one make sure the little brass plate is pointing up so the next owner isn't swearing at you 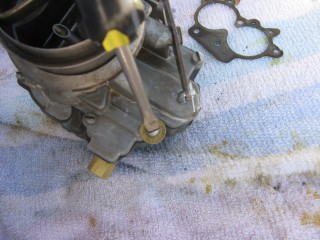 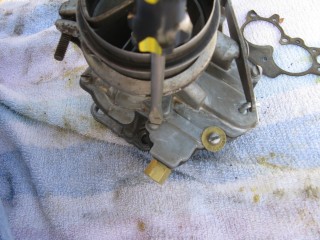 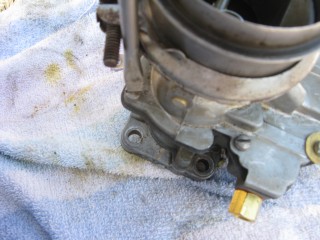 Your air horn is now attached! Let's do the spaghetti.
__________________
Step by steps: Remove primer to reveal original paint Rebuild a carburetor See My Build - Cecilia! Some people are like slinkys. Not worth much but funny as heck when pushed down stairs. |
|
|
|
|
10-28-2012, 05:53 PM
|
#17 |
|
Registered User
Join Date: Apr 2011
Location: Edmond, Ks
Posts: 595
|
Re: 1962 GMC 305V6 4WD Slow DD Build - Cecilia (Pic Heavy)
Grab your wrench looking piece of linkage and hook the wrench portion on the bottom of the carb.
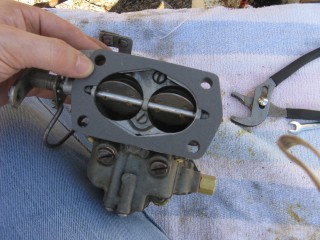
 Then hook the little spring on the back up and run the screw through it. Don't tighten it. 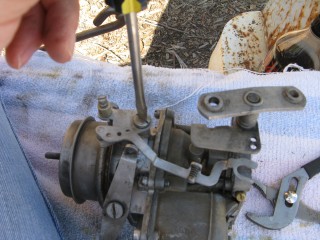 Here's a side view so you can see. You need to make sure the wrench shaped linkage is hanging on the screw you just ran in, not butted up to the carb. THEN start screwing it down. It should move freely once you get it screwed down. 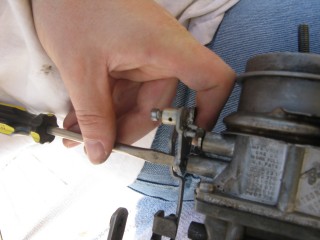 Put the link that looks like an "S" through the bottom part 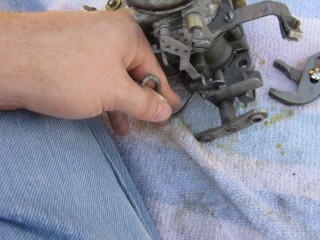 Then the top. 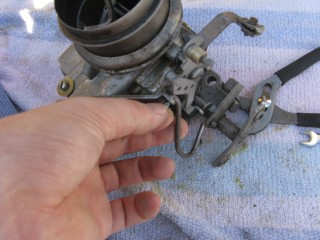 And cotter key them both. 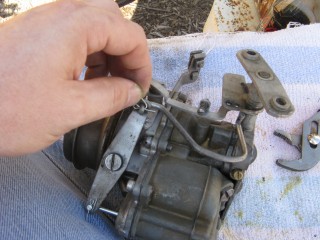 Now find a gasket to fit the bottom of "the bottom plate". This one obviously belongs in an art bucket at a pre-school. It doesn't fit. I have to say that for legal reasons so you don't try to use it and cause a thermo-nuclear reaction in your intake manifold. 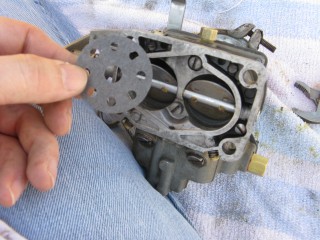
__________________
Step by steps: Remove primer to reveal original paint Rebuild a carburetor See My Build - Cecilia! Some people are like slinkys. Not worth much but funny as heck when pushed down stairs. |
|
|
|
|
10-28-2012, 08:26 PM
|
#18 |
|
Registered User
Join Date: Apr 2011
Location: Edmond, Ks
Posts: 595
|
Re: 1962 GMC 305V6 4WD Slow DD Build - Cecilia (Pic Heavy)
This one looks better.
 The block goes on top of that gasket. 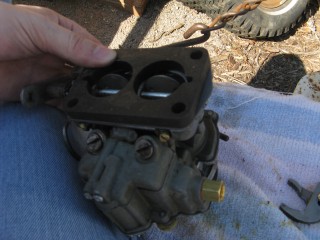 Then another gasket to seal it to the intake manifold. 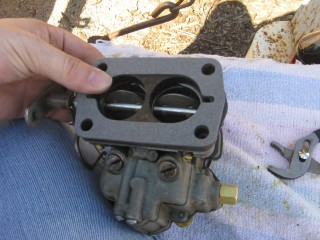 Now flip it back to where you can see the mixture screws pictured below. There are two, one on each side of the float bowl. Put your screwdriver in one of them and hold it very loosely. This is so that you can tell when it gets lightly seated (snug, not tight!). Now turn it clockwise and COUNT the turns, quarter turns, or half turns etc. as you tighten them. REMEMBER THIS NUMBER. Write it down if you need to. (This picture was taken after remounting b/c I forgot to reset them myself while it was off)  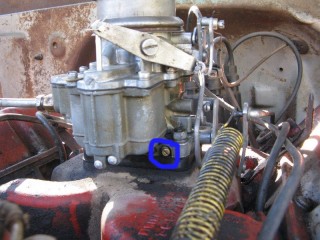 Once they're very lightly snug you now need to back them out one full turn. That's 360 degrees. That is how they should be set for life. Forget they exist now. Unless it runs like crap afterward, then go back to what they were and see if that fixes it. You remember what they were, right? You wrote it down. I just know you did. At this point we can move back to the engine bay. The end is in sight! Remove the rag you put in the intake now. Be sure to jerk it straight up so as not to knock something off of your dirty engine into the intake. 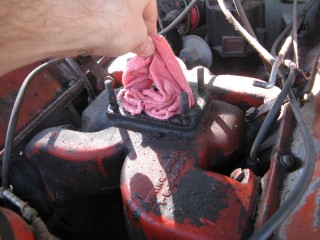 Then place your first gasket, your block (if you have one), and your second gasket (again, if you had a block) on the bolts and line them up. 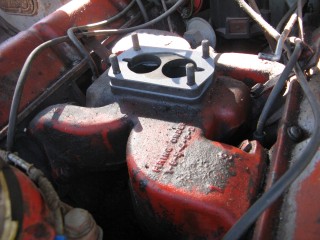 Set the carb down on it's new perch. 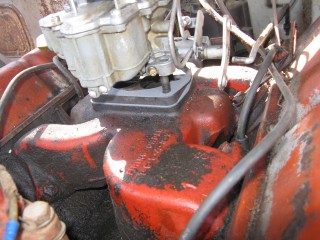
__________________
Step by steps: Remove primer to reveal original paint Rebuild a carburetor See My Build - Cecilia! Some people are like slinkys. Not worth much but funny as heck when pushed down stairs. |
|
|
|
|
10-28-2012, 08:30 PM
|
#19 |
|
Registered User
Join Date: Apr 2011
Location: Edmond, Ks
Posts: 595
|
Re: 1962 GMC 305V6 4WD Slow DD Build - Cecilia (Pic Heavy)
I forgot to dip my nuts and lock washers so I did that now. 10 mins in the drink!
 Then it's on the carb mounts. Again I like to tighten them opposite, like a wheel. I tighten them good and snug again. Not tight, just snug enough to pinch the gasket.  Then attach the throttle cable to the top and tighten the screw. 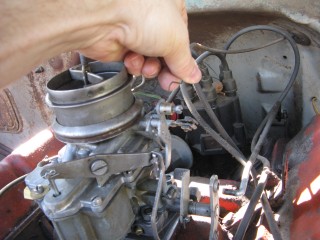 Attach the rear clamp and tighten. Remember it has that little nut on the underside so don't unscrew it much. 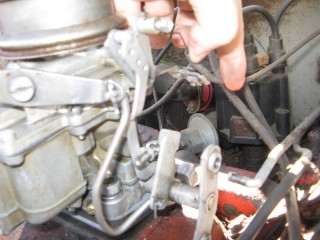 Connect the large spring to the linkage shown. 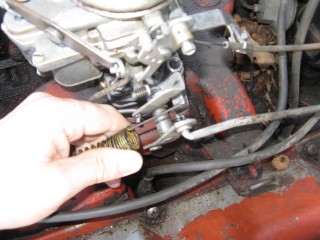 Hook up the fuel line. 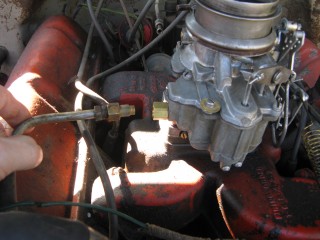 And finally fire it up and see if it runs. It has zero gas in the float bowl so remember that it might not start quickly the first time. After you get it to fire up it should start easily after that. If it runs put the air cleaner back on it. My photographer had a problem with the loud motor running so it's a little off center lol. 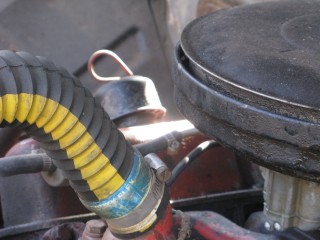 A little note about the air cleaner. I had intended to clean it as well but I ran out of weekend and painkillers so it got pushed back to next weekend. Sorry about that  If all went well the last step is to take the kiddos and the ugly mutt for a spin around the block! 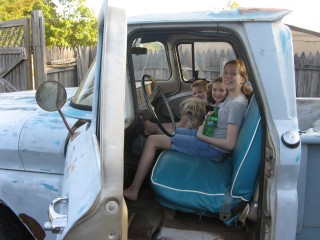 Congrats, you just rebuilt a carburetor! If you noticed something I did and shouldn't have done, or missed doing entirely, speak up! This was my first carb rebuild. I enjoyed it quite a bit. My only issues after mounting were gas coming out of the carb piston hole and a rough idle, both of which were fixed by adjusting the float then adjusting fuel mixture screws as described earlier. My mixture screws were an entire revolution off. Next up - some light engine cleaning...
__________________
Step by steps: Remove primer to reveal original paint Rebuild a carburetor See My Build - Cecilia! Some people are like slinkys. Not worth much but funny as heck when pushed down stairs. |
|
|
|
|
10-29-2012, 07:43 PM
|
#20 |
|
Registered User
Join Date: Apr 2011
Location: Edmond, Ks
Posts: 595
|
Re: 1962 GMC 305V6 4WD Slow DD Build - Cecilia (Pic Heavy)
Had a couple of spare keys made today. The guy at Ace Hardware couldn't figure out which blank to use. I pointed at one that looked like my key and said, "Maybe that one?" He said, "Hmm, let's try this" and grabbed an 80's style door key.
Nope. So being an intelligent 18ish year old he pulled out his Iphone and said, "Siri, what is the key blank for a 1962 GMC K1000?"  Siri told him "B10". He hung up on her (or ended her, whatever) and grabbed the key blank I pointed to and said, I guess this is it.  Worked perfectly.
__________________
Step by steps: Remove primer to reveal original paint Rebuild a carburetor See My Build - Cecilia! Some people are like slinkys. Not worth much but funny as heck when pushed down stairs. |
|
|
|
|
11-02-2012, 01:50 AM
|
#21 |
|
Registered User
Join Date: Apr 2011
Location: Edmond, Ks
Posts: 595
|
Re: 1962 GMC 305V6 4WD Slow DD Build - Cecilia (Pic Heavy)
A little update on the carb rebuild here. I adjusted the idle mixture screws and the idle setting screw according to what I found on the internet. It tends to surge at startup and act kinda wonky after it's warm.
I was talking to an old timer about it and he said this: Gently seat the Idle Mixture Screws again like you did before (tighten them till they're just barely seated). Now unscrew them two full turns. Start the engine and make sure the choke is wide open. Turn each screw in 1/2 turn at a time until the engine rpm starts to drop. Then back them both out equally until you reach the highest rpms possible. LEAVE THEM THERE. Idle Screw: Now just adjust the idle screw (by the spaghetti) till it's where you want the RPMs to be. That's it. Purrs like a kitten. I'd trade the entire internet for a handful of old timers with great stories. 
__________________
Step by steps: Remove primer to reveal original paint Rebuild a carburetor See My Build - Cecilia! Some people are like slinkys. Not worth much but funny as heck when pushed down stairs. Last edited by FetchMeAPepsi; 11-02-2012 at 02:04 AM. |
|
|
|
|
11-03-2012, 06:45 PM
|
#22 |
|
Registered User
Join Date: Aug 2009
Location: Detroit MI
Posts: 1,209
|
Re: 1962 GMC 305V6 4WD Slow DD Build - Cecilia (Pic Heavy)
I used to rebuid carbs in my dorm room when I was in tech school .. one day I did my buddys and set the mixture screws by ear ... My buddy not thinking I had it right put it on the machine in his class to see how far off I was .. He was surprised to find it spot on the number ... best done with a vacuum gauge ...
|
|
|
|
|
11-03-2012, 08:51 PM
|
#23 | |
|
Registered User
Join Date: Apr 2011
Location: Edmond, Ks
Posts: 595
|
Re: 1962 GMC 305V6 4WD Slow DD Build - Cecilia (Pic Heavy)
Quote:
What's the procedure for doing it with a vacuum gauge (if you have the time to explain it) -FMP
__________________
Step by steps: Remove primer to reveal original paint Rebuild a carburetor See My Build - Cecilia! Some people are like slinkys. Not worth much but funny as heck when pushed down stairs. |
|
|
|
|
|
11-03-2012, 09:29 PM
|
#24 |
|
Registered User
Join Date: Aug 2009
Location: Detroit MI
Posts: 1,209
|
Re: 1962 GMC 305V6 4WD Slow DD Build - Cecilia (Pic Heavy)
simply hook the gauge to manifold vacuum and adjust the screws til you obtain the highest reading ,make sure the engine is fully warmed up and that the timing is correct.. also verify that the vacuum advance (if it has it ) and the centrifical advance is working .. as far as the hesitaion , make sure the accelerator pump starts spraying the instant the throttle is opened..any slack or slop in the linkage may cause it to hesitate...you can bend the linkage to remove slack..
|
|
|
|
|
11-04-2012, 05:05 AM
|
#25 | |
|
Registered User
Join Date: Apr 2011
Location: Edmond, Ks
Posts: 595
|
Re: 1962 GMC 305V6 4WD Slow DD Build - Cecilia (Pic Heavy)
Quote:

__________________
Step by steps: Remove primer to reveal original paint Rebuild a carburetor See My Build - Cecilia! Some people are like slinkys. Not worth much but funny as heck when pushed down stairs. |
|
|
|
|
|
| Bookmarks |
| Tags |
| 305 v6, 305v6, gmc k1000, how to, pictures |
|
|


 Linear Mode

