
|
Register or Log In To remove these advertisements. |
|
|
|
|||||||
 |
|
|
Thread Tools | Display Modes |
 08-27-2015, 10:25 PM
|
#26 |
|
Registered User
Join Date: Jan 2014
Location: Comfort, TX
Posts: 142
|
Re: DIY 3 Point Seat Belt Installation 1960-66 Cab
Wow, great write up and bookmarked! I think I already have shoulder belt fasteners (the upper ones) in my 66, but with only lap belts in it. Maybe they were thinking about it in late 66? I'll try to get some pix and some measurements of them and their location.
|

|

|
|
08-27-2015, 10:28 PM
|
#27 | |
|
Registered User
Join Date: Jan 2013
Location: Columbia, SC
Posts: 1,926
|
Re: DIY 3 Point Seat Belt Installation 1960-66 Cab
Quote:
__________________
My 65 C10 build: www.lugnutz65chevystepside.weebly.com Want to know more about T5 transmissions? My website has a T5 Info Page and a Step by Step T5 rebuild. |
|
|
|
|
|
04-10-2016, 08:17 AM
|
#28 |
|
Registered User
Join Date: May 2013
Location: Melbourne, Victoria
Posts: 41
|
Re: DIY 3 Point Seat Belt Installation 1960-66 Cab
Thanks for this, it's an excellent write up - very comprehensive.
I did a similar thing for rear belts in a VW beetle but instead of welding the point in, we used Sikaflex sealant on one side of the washer, pulled it in to place, and held there while it formed a bond. The bond strength is probably not great, but as mentioned, its not the strength of the welds that matter, it's the washer etc behind the metal that does the work. I thought it was worth mentioning this as the whole thing could then potentially be done by someone who doesn't have a welder, and/or where you don't want to damage the cab paint. Cam |
|
|
|
|
04-10-2016, 09:20 AM
|
#29 |
|
Registered User
 Join Date: May 2014
Location: Western ND
Posts: 198
|
Re: DIY 3 Point Seat Belt Installation 1960-66 Cab
awesome writeup, when I do my BBW conversion, ill weld the top one together before I reinstall the rear window surround. Great on measurements!
__________________
Current Project : 1962 Chevy SWB Fleetside Others, 1958 Edsel Villager Station Wagon 1926 Ford Model T Roadster Hotrod www.suedescarclub.com |
|
|
|
|
04-16-2016, 10:23 AM
|
#30 |
|
Registered User
Join Date: Mar 2012
Location: portland, OR
Posts: 56
|
Re: DIY 3 Point Seat Belt Installation 1960-66 Cab
Great write up. I just finished my seatbelt install (Seatbelt Planet) and since my cab is painted I used rivets instead of welding. Drilled a small hole in the washer that matched the small hole I drilled in the cab. Lined them up and bingo!
__________________
When was the last time you did something for the first time? We never really grow up, we only learn how to act in public. 
|
|
|
|
|
04-20-2016, 03:38 PM
|
#31 |
|
Registered User
Join Date: Jan 2013
Location: Calgary Alberta
Posts: 1,164
|
Re: DIY 3 Point Seat Belt Installation 1960-66 Cab
I am about to drill the upper holes. Lugnutz did you weld a 7/16" or a 1/2" nut to the washer and coarse or fine threads? Thanks for this. It certainly takes out the guess work.
|
|
|
|
|
04-20-2016, 04:14 PM
|
#32 |
|
Senior Member
Join Date: Aug 2005
Location: Greenwell Springs, Louisiana
Posts: 2,882
|
Re: DIY 3 Point Seat Belt Installation 1960-66 Cab
Nice! Now I need to do mine!
|
|
|
|
|
04-20-2016, 04:50 PM
|
#33 | |
|
Registered User
Join Date: Jan 2013
Location: Columbia, SC
Posts: 1,926
|
Re: DIY 3 Point Seat Belt Installation 1960-66 Cab
Quote:
__________________
My 65 C10 build: www.lugnutz65chevystepside.weebly.com Want to know more about T5 transmissions? My website has a T5 Info Page and a Step by Step T5 rebuild. |
|
|
|
|
|
04-20-2016, 07:59 PM
|
#34 |
|
Registered User
Join Date: Jan 2013
Location: Calgary Alberta
Posts: 1,164
|
Re: DIY 3 Point Seat Belt Installation 1960-66 Cab
I guess it is off to the junk yard tomorrow to find a donor vehicle and will report back if I find something suitable.
|
|
|
|
|
01-02-2021, 10:38 AM
|
#35 |
|
Registered User
Join Date: Jun 2014
Location: Paul idaho
Posts: 263
|
Re: DIY 3 Point Seat Belt Installation 1960-66 Cab
Very nice write up! Thanks man
__________________
63 C10 |
|
|
|
|
01-02-2021, 01:10 PM
|
#36 |
|
Registered User
Join Date: Jan 2013
Location: Calgary Alberta
Posts: 1,164
|
Re: DIY 3 Point Seat Belt Installation 1960-66 Cab
I went for the Silverado seat with built in belts.
|
|
|
|
|
07-05-2021, 03:13 PM
|
#37 |
|
Registered User
Join Date: Nov 2012
Location: San Jose California
Posts: 196
|
Re: DIY 3 Point Seat Belt Installation 1960-66 Cab
My GMC has seat belt holes existing around 2" further back at the base. Think I would have an issue using these holes and just making the upper holes as suggested in this thread?
|
|
|
|
|
07-05-2021, 03:14 PM
|
#38 |
|
Registered User
Join Date: Nov 2012
Location: San Jose California
Posts: 196
|
Re: DIY 3 Point Seat Belt Installation 1960-66 Cab
passenger side
|
|
|
|
|
07-05-2021, 03:29 PM
|
#39 |
|
Moderator
  Join Date: Aug 2011
Location: China Spring, TX
Posts: 7,280
|
Re: DIY 3 Point Seat Belt Installation 1960-66 Cab
Vortech - Mine were close to yours, that's where I mounted the L-shaped bracket for the retractor on mine.
__________________
Master Chief, US Navy, Retired 1964 C10 Step-side Short Bed - In Progress 2009 2500HD Duramax LTZ 1948 GMC Panel 1956 Big Window Stepside 1953 5 Window Chevy Stepside 1932 Coupe New Seat Foam for Bench Seats? |
|
|
|
|
07-05-2021, 06:18 PM
|
#40 |
|
Registered User
Join Date: Nov 2012
Location: San Jose California
Posts: 196
|
Re: DIY 3 Point Seat Belt Installation 1960-66 Cab
great, thanks
|
|
|
|
|
11-27-2022, 09:37 PM
|
#41 | |
|
Registered User
Join Date: Sep 2022
Location: Eugene, OR
Posts: 490
|
Re: DIY 3 Point Seat Belt Installation 1960-66 Cab
Quote:
My belts also came from Seatbelt Planet, and I ordered a pair of mount plates for the upper mounts. These plates have a pair of small holes for rivets (or small bolts, I suppose). https://www.seatbeltplanet.com/i-304...tegory:1389311 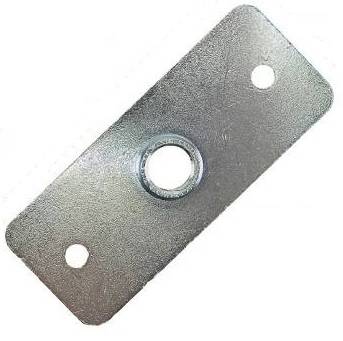 After drilling the main hole, I set the plate over the hole from the outside, and marked only the lower rivet hole. I figure the whole point is not to add any strength, but just to hold the plate in place when you take out the seat belt later. A single rivet will do that just fine. By using only the lower hole for the rivet, the rivet head is hidden by the seat belt when everything is in place. No welding or painting needed. Last edited by Arne; 11-27-2022 at 09:59 PM. |
|
|
|
|
|
11-28-2022, 03:17 PM
|
#42 |
|
Registered User
Join Date: Nov 2012
Location: San Jose California
Posts: 196
|
Re: DIY 3 Point Seat Belt Installation 1960-66 Cab
what length do you need for the center lap belt.
|
|
|
|
|
11-28-2022, 04:56 PM
|
#43 |
|
Registered User
Join Date: Sep 2022
Location: Eugene, OR
Posts: 490
|
Re: DIY 3 Point Seat Belt Installation 1960-66 Cab
I didn't get a center belt, at least not yet. But the 60" should be correct, I've used that one on a different project for a single lap belt, and it was just fine.
|
|
|
|
|
12-01-2022, 12:18 AM
|
#44 |
|
Registered User
Join Date: Oct 2006
Location: San Jose NOR*CAL
Posts: 3,080
|
Re: DIY 3 Point Seat Belt Installation 1960-66 Cab
I used the same pate Arne used. I wound up using "new" surplus Hummer 3 point.... fit and work well
__________________
1960 Apache long bed fleet L6 250 Clifford intake 2 bbl carb. Langdon cast headers with dual exhaust and bellflower tips. T-5 5 speed, power steering and power disc brakes. "Over, Around or through it... " |
|
|
|
|
03-07-2023, 08:39 PM
|
#45 | |
|
Registered User
Join Date: May 2014
Location: Melbourne, FL
Posts: 297
|
Re: DIY 3 Point Seat Belt Installation 1960-66 Cab
Quote:

|
|
|
|
|
|
03-10-2023, 11:13 PM
|
#46 | |
|
Registered User
Join Date: Jan 2013
Location: Columbia, SC
Posts: 1,926
|
Re: DIY 3 Point Seat Belt Installation 1960-66 Cab
Quote:
Here’s an update that I’ll soon add to the original DIY. I just finished installing 3 point seat belts in my 1963 cab. Another C10 owner commented to me that he was able to reach up into the B pillar high enough that he didn’t need to tack weld the fender washer/nut assembly to the inner wall of the B pillar. Here’s what I did this time. I used 5 minute epoxy to hold the nut onto the fender washer. Once it was dry, I used masking tape to attach my crescent wrench to a large heavy paint stick. Then I used a VERY MINIMAL amount of masking tape to hold the fender washer/nut to the wrench. I was able to easily feed this up inside the B pillar and line it up with my predrilled hole. I was able to tighten the shoulder strap bolt onto the fender washer/nut with no problems. I then pulled DOWN on the paint stir stick to free the wrench from the fender washer/nut. The driver side required removal of the gas tank filler neck to gain access to the B pillar, so I guess I’d still recommend removing the tank to minimize frustration.
__________________
My 65 C10 build: www.lugnutz65chevystepside.weebly.com Want to know more about T5 transmissions? My website has a T5 Info Page and a Step by Step T5 rebuild. Last edited by Lugnutz65; 03-12-2023 at 08:28 AM. |
|
|
|
|
|
03-11-2023, 09:30 AM
|
#47 |
|
Registered User
Join Date: Dec 2013
Location: stony creek va
Posts: 236
|
Re: DIY 3 Point Seat Belt Installation 1960-66 Cab
as always great tech from lugnutz...also thanks for the T5 info that i used on my 57 210
|
|
|
|
|
03-11-2023, 01:59 PM
|
#48 |
|
Registered User
Join Date: Aug 2020
Location: Braunschweig, Lower Saxony, Germany
Posts: 749
|
Re: DIY 3 Point Seat Belt Installation 1960-66 Cab
Another great idea from them.
__________________
------------------------------------------- Greetings Harald My 62 build thread http://67-72chevytrucks.com/vboard/s...d.php?t=829782 |
|
|
|
|
03-14-2023, 09:37 AM
|
#49 | |
|
Registered User
Join Date: Jan 2013
Location: Columbia, SC
Posts: 1,926
|
Re: DIY 3 Point Seat Belt Installation 1960-66 Cab
Quote:
__________________
My 65 C10 build: www.lugnutz65chevystepside.weebly.com Want to know more about T5 transmissions? My website has a T5 Info Page and a Step by Step T5 rebuild. |
|
|
|
|
|
| Bookmarks |
|
|


 Linear Mode

