
|
Register or Log In To remove these advertisements. |
|
|
|
|||||||
 |
|
|
Thread Tools | Display Modes |
 02-22-2010, 11:51 PM
|
#1 |
|
PITbut
Join Date: Sep 2007
Location: monroe washington
Posts: 3,041
|
1 step forward, 2 steps back....
A few weekends ago i finally got my truck running. My lower radiator hose had a sharp bend to it so i took it off, trimmed it and reinstalled it. I then added coolant and watched as the coolant poured out of the middle of the radiator. So my brand new 4 core radiator i some how put a hole in it. SOO, i pull the radiator and go and put my new radiator in. Its an identical radiator but i installed my rubber bushings on the bottom this time. ( i had left them off last time. Bad, i know.)
NOW, the radiator sits .5" to high....The radiator isnt a stock replacement for my vehicle. It sits about .5" to high. I took care of that by not having the rubber mounts in the bottom. But, i realize i cant do that because it will just rub right through the radiator if its metal on metal. I cant use my mounts and honestly i am not good at coming up with ideas. I just need two upper radiator supports that will mount in the stock location. Any suggestions? Tips? Materials? I dont need it super fancy. Stock worked fine.
__________________
New project. 1971 Twin Turbo blazer http://67-72chevytrucks.com/vboard/s...d.php?t=676047 My new YOUTUBE channel.. Videos of my truck and a current walk around. Lyrikz74 Youtube channel DONE! SOLD!  My 1971 stepside build thread My Build Thread UPDATED 6/11. DONE and sold. |

|

|
|
02-23-2010, 12:14 AM
|
#2 |
|
Senior Member
Join Date: Aug 2002
Location: Valley Center KS
Posts: 3,525
|
Re: 1 step forward, 2 steps back....
Sounds like my radiator. I believe mine may actually be for a 73+. It is aluminum with plastic side tanks.
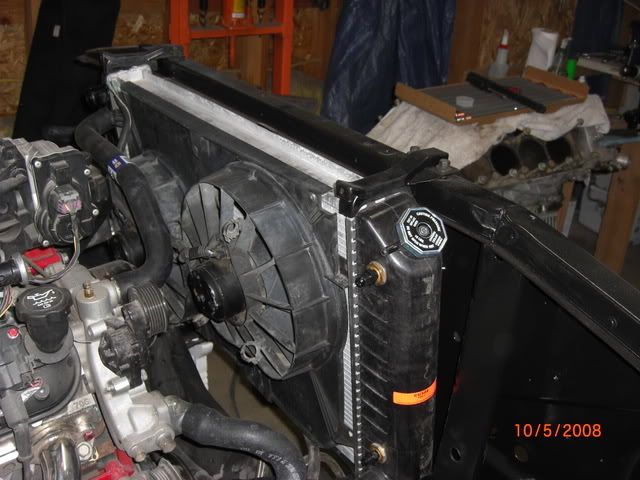 I don't know if you can tell in this picture, but I used a stack of washers and longer bolts to hold the upper supports in place for now. |
|
|
|
|
02-23-2010, 12:15 AM
|
#3 |
|
Registered User
Join Date: Jan 2010
Location: Roanoke, Tx.
Posts: 1,561
|
Re: 1 step forward, 2 steps back....
I put a desert cooler radiator in my 69. It was a little bigger. I trimmed the rubber supports a little. I got it to work. You could use an old inner tube. Cut and make your own pieces.
|
|
|
|
|
02-23-2010, 12:26 AM
|
#4 | |
|
PITbut
Join Date: Sep 2007
Location: monroe washington
Posts: 3,041
|
Re: 1 step forward, 2 steps back....
Quote:
I was thinking of the washer. I was actually contemplating using a plate with the holes in it. That looks like my radiator. I have electric pusher fans. Mines plastic with aluminum core. The one i jabbed a hole in was brass... This one is a ton lighter and i guess the aluminum cools better??
__________________
New project. 1971 Twin Turbo blazer http://67-72chevytrucks.com/vboard/s...d.php?t=676047 My new YOUTUBE channel.. Videos of my truck and a current walk around. Lyrikz74 Youtube channel DONE! SOLD! My 1971 stepside build thread My Build Thread UPDATED 6/11. DONE and sold. |
|
|
|
|
|
02-23-2010, 08:42 AM
|
#5 | |
|
Registered User
Join Date: Feb 2000
Location: Center City, MN, USA
Posts: 3,253
|
Re: 1 step forward, 2 steps back....
Quote:
I posted questions in this forum about it. The general consensus was if you go with the new cushions everything sits up too high.
__________________
'70 cab, '71 chassis, 383, TH350, NP205. '71 Malibu convertible '72 Malibu hard top Center City, MN |
|
|
|
|
|
02-23-2010, 10:20 AM
|
#6 |
|
Registered User
Join Date: May 2007
Location: LOUISIANA
Posts: 811
|
Re: 1 step forward, 2 steps back....
Check out how these were raised. 2nd post down
http://louisianaclassictruckclub.fre...-t1016-60.html
__________________
James '68 Stepside (ground up in progress) My 68 build thread http://louisianaclassictruckclub.fre...side-t956.html '81 SWB "Pap paw" (Driver) The 81 build thread http://louisianaclassictruckclub.fre...-swb-t960.html Member of www.louisianaclassictruckclub.com https://www.facebook.com/groups/296290610747732/ |
|
|
|
|
02-23-2010, 10:50 AM
|
#7 | |
|
PITbut
Join Date: Sep 2007
Location: monroe washington
Posts: 3,041
|
Re: 1 step forward, 2 steps back....
Quote:
__________________
New project. 1971 Twin Turbo blazer http://67-72chevytrucks.com/vboard/s...d.php?t=676047 My new YOUTUBE channel.. Videos of my truck and a current walk around. Lyrikz74 Youtube channel DONE! SOLD! My 1971 stepside build thread My Build Thread UPDATED 6/11. DONE and sold. |
|
|
|
|
|
02-23-2010, 10:59 AM
|
#8 |
|
Senior Member
Join Date: Jan 2005
Location: SUNNY WARM BIKE RIDING COTTONWOOD ARIZONA
Posts: 2,097
|
Re: 1 step forward, 2 steps back....
just get some 1/2" spacers w/ longer bolts and be done....
|
|
|
|
|
02-23-2010, 11:51 AM
|
#9 | |
|
PITbut
Join Date: Sep 2007
Location: monroe washington
Posts: 3,041
|
Re: 1 step forward, 2 steps back....
Quote:
__________________
New project. 1971 Twin Turbo blazer http://67-72chevytrucks.com/vboard/s...d.php?t=676047 My new YOUTUBE channel.. Videos of my truck and a current walk around. Lyrikz74 Youtube channel DONE! SOLD! My 1971 stepside build thread My Build Thread UPDATED 6/11. DONE and sold. |
|
|
|
|
|
02-23-2010, 12:00 PM
|
#10 |
|
The Older Generation
   Join Date: Aug 2006
Location: Montezuma, Iowa
Posts: 25,348
|
Re: 1 step forward, 2 steps back....
-
How about having your brass radiator fixed? Ask around at some of the auto repair shops and see if they know of someone that fixes them. I have fixed three or four of them and depending on where the hole is they can be pretty easy to fix. LockDoc
__________________
Leon Locksmith, Specializing In Antique Trucks, Automobiles, & Motorcycles (My Dually Pickup Project Thread) http://67-72chevytrucks.com/vboard/s...d.php?t=829820 - |
|
|
|
|
02-23-2010, 02:15 PM
|
#11 | |
|
PITbut
Join Date: Sep 2007
Location: monroe washington
Posts: 3,041
|
Re: 1 step forward, 2 steps back....
Quote:
__________________
New project. 1971 Twin Turbo blazer http://67-72chevytrucks.com/vboard/s...d.php?t=676047 My new YOUTUBE channel.. Videos of my truck and a current walk around. Lyrikz74 Youtube channel DONE! SOLD! My 1971 stepside build thread My Build Thread UPDATED 6/11. DONE and sold. |
|
|
|
|
|
02-23-2010, 03:00 PM
|
#12 |
|
vw guy & now c-10 guy
Join Date: Sep 2008
Location: Louisville,KY
Posts: 483
|
Re: 1 step forward, 2 steps back....
I had the same problem- I ended up using the 4-core brackets and rubbers at the bottom- but just went and bought some metal strips at Lowe's and drilled them so i could use the factory holes in the core support and then bent the other end 90 degrees to hold the radiator in place- nice and simple and only cost like 6 bucks- works for me.
|
|
|
|
|
02-23-2010, 08:13 PM
|
#13 | ||
|
Registered User
Join Date: May 2007
Location: LOUISIANA
Posts: 811
|
Re: 1 step forward, 2 steps back....
Quote:
Quote:
__________________
James '68 Stepside (ground up in progress) My 68 build thread http://louisianaclassictruckclub.fre...side-t956.html '81 SWB "Pap paw" (Driver) The 81 build thread http://louisianaclassictruckclub.fre...-swb-t960.html Member of www.louisianaclassictruckclub.com https://www.facebook.com/groups/296290610747732/ |
||
|
|
|
|
02-23-2010, 08:28 PM
|
#14 | |
|
Account Suspended
Join Date: Jun 2000
Location: over yonder
Posts: 14,270
|
Re: 1 step forward, 2 steps back....
Quote:
Last edited by Shane; 02-23-2010 at 08:29 PM. |
|
|
|
|
|
| Bookmarks |
|
|


 Linear Mode

