
|
Register or Log In To remove these advertisements. |
|
|
|
|||||||
 |
|
|
Thread Tools | Display Modes |
 05-19-2011, 06:09 PM
|
#26 |
|
Registered User
Join Date: Apr 2009
Location: swindon, england
Posts: 290
|
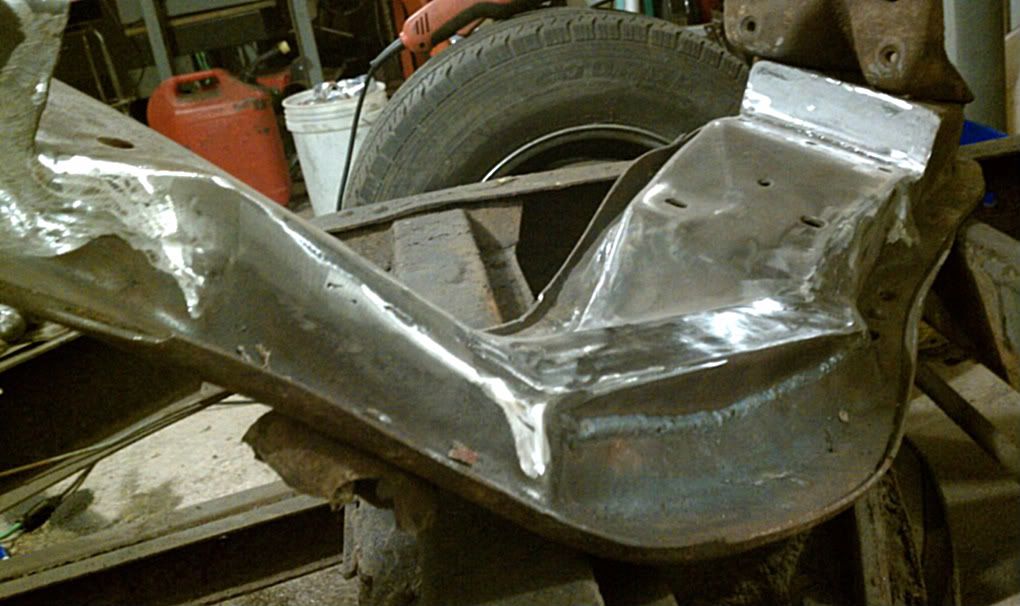
Re: just finished my front crossmember section
Looks like its the way to go,
|

|

|
|
05-19-2011, 06:38 PM
|
#27 |
|
It'd be alot cooler if you did
Join Date: May 2003
Location: Three Rivers, MI
Posts: 2,345
|
Re: just finished my front crossmember section
Some guys run a rack and pinion, may be worth looking into and its a nice upgrade.
Posted via Mobile Device |
|
|
|
|
05-19-2011, 07:23 PM
|
#28 | |
|
Registered User
Join Date: Apr 2001
Location: DALLAS,TX
Posts: 21,931
|
Re: just finished my front crossmember section
Quote:
__________________
67SWB-B.B.RetroRod 64SWB-Recycle 89CCDually-Driver/Tow Truck 99CCSWB Driver All Fleetsides @rattlecankustoms in IG Building a small, high rpm engine with the perfect bore, stroke and rod ratio is very impressive. It's like a highly skilled Morrocan sword fighter with a Damascus Steel Scimitar..... Cubic inches is like Indiana Jones with a cheap pistol. Last edited by SCOTI; 05-19-2011 at 07:23 PM. |
|
|
|
|
|
05-20-2011, 01:54 AM
|
#29 | |
|
Registered User
Join Date: Apr 2009
Location: swindon, england
Posts: 290
|
Re: just finished my front crossmember section
Quote:
Oh well, tape measure out again, my options are, move my steering up the same 1.5" or go rack and pinion, Thanks for the replys. |
|
|
|
|
|
05-28-2011, 03:57 AM
|
#30 |
|
Registered User
Join Date: Jul 2010
Location: Snowflake Az.
Posts: 86
|
Re: just finished my front crossmember section
K, I've been considering doing this to my 65 for awhile. is there any reason why you couldn't raise the xmember up into the frame instead of pancaking the xmemeber? I know alot of guys don't like the idea of cutting into the frame but I'd rather raise the xmember up into the frame like 5"s, welded it in and use a rack and pinion system and have better camber angles etc. I've never liked the idea of z'ing the frame. Any thoughts???
|
|
|
|
|
05-28-2011, 07:35 AM
|
#31 | |
|
Registered User
Join Date: Apr 2001
Location: DALLAS,TX
Posts: 21,931
|
Re: just finished my front crossmember section
Quote:
__________________
67SWB-B.B.RetroRod 64SWB-Recycle 89CCDually-Driver/Tow Truck 99CCSWB Driver All Fleetsides @rattlecankustoms in IG Building a small, high rpm engine with the perfect bore, stroke and rod ratio is very impressive. It's like a highly skilled Morrocan sword fighter with a Damascus Steel Scimitar..... Cubic inches is like Indiana Jones with a cheap pistol. |
|
|
|
|
|
05-28-2011, 11:06 AM
|
#32 |
|
Registered User
Join Date: Apr 2009
Location: swindon, england
Posts: 290
|
Re: just finished my front crossmember section
I am now going to take a 1.25" section from the chassis & then raise the steering so its in the same location for the steering issues, it should work out to be a very cost affective way of lowering the front end of the c10,
|
|
|
|
|
05-28-2011, 05:50 PM
|
#33 |
|
Registered User
Join Date: Oct 2009
Location: Howell, MI
Posts: 403
|
Re: just finished my front crossmember section
Outstanding. Keep us updated!
|
|
|
|
|
05-28-2011, 11:34 PM
|
#34 |
|
Registered User
Join Date: Jul 2010
Location: Snowflake Az.
Posts: 86
|
Re: just finished my front crossmember section
SCOTI, who was it?
|
|
|
|
|
05-29-2011, 01:37 AM
|
#35 | |
|
Registered User
Join Date: Apr 2001
Location: DALLAS,TX
Posts: 21,931
|
Re: just finished my front crossmember section
Quote:
__________________
67SWB-B.B.RetroRod 64SWB-Recycle 89CCDually-Driver/Tow Truck 99CCSWB Driver All Fleetsides @rattlecankustoms in IG Building a small, high rpm engine with the perfect bore, stroke and rod ratio is very impressive. It's like a highly skilled Morrocan sword fighter with a Damascus Steel Scimitar..... Cubic inches is like Indiana Jones with a cheap pistol. |
|
|
|
|
|
09-08-2011, 04:22 AM
|
#36 | |
|
Registered User
Join Date: Jul 2000
Location: East Bay,CA
Posts: 298
|
Re: just finished my front crossmember section
Quote:
Just thinking out loud here: could the steering issues be solved by moving the steering box and related components one inch forward, then adding one inch to the steering shaft?
__________________
51 Chevy 3100 Deluxe Cab(SOLD)  65 **stang 6cyl 70 C10 Long Bed Fleetside(1st truck,thanks Dad![SOLD]) 72 C10 Short Bed Fleetside 73 Blazer 2WD Catalina Blue White Top(Needs Love) 73 Blazer 2WD Work in progress LT1/4L60E 83 Grand National (SOLD) 94 Blazer K1500 Silverado (SOLD) 96 Impala SS All original (NEXT IN LINE 2 B SOLD) 99 Tahoe 2DR, 2WD 
|
|
|
|
|
|
09-08-2011, 09:49 PM
|
#37 |
|
Registered User
Join Date: Jun 2008
Location: pensacola fl
Posts: 3,072
|
Re: just finished my front crossmember section
ok see if you can follow me here. I have a 1.5 sec xmember that I am thinking of using. What if you take the upper and lower control arms and move the ball joint forward an inch? This would fix this and also move the wheels up and inch. You might have to grind a little on the xmember to clear but I dont think it would be that much.
What do you guys think? As far as mounting the rack I wonder if there is a front steer unit that works like the rear steer on the Pontiac sunfire. It can be mounted closer to the driver side of the frame. This makes routing shaft and clearance issues down to a minimum. Any feed back?
__________________
68 BB burb build thread Scott's super slam front/rear http://67-72chevytrucks.com/vboard/s...d.php?t=378084 |
|
|
|
|
09-09-2011, 12:35 PM
|
#38 |
|
Registered User
Join Date: Aug 2006
Location: St. Albans, Vt
Posts: 2,520
|
Re: just finished my front crossmember section
My question is can you section a crossmember more than 1.5, if you use a rack and pinion without any major issues?
|
|
|
|
|
09-09-2011, 12:57 PM
|
#39 | |
|
Registered User
Join Date: Apr 2001
Location: DALLAS,TX
Posts: 21,931
|
Re: just finished my front crossmember section
Quote:
__________________
67SWB-B.B.RetroRod 64SWB-Recycle 89CCDually-Driver/Tow Truck 99CCSWB Driver All Fleetsides @rattlecankustoms in IG Building a small, high rpm engine with the perfect bore, stroke and rod ratio is very impressive. It's like a highly skilled Morrocan sword fighter with a Damascus Steel Scimitar..... Cubic inches is like Indiana Jones with a cheap pistol. |
|
|
|
|
|
09-09-2011, 01:14 PM
|
#40 | |
|
Registered User
Join Date: Aug 2006
Location: St. Albans, Vt
Posts: 2,520
|
Re: just finished my front crossmember section
Quote:
I know the frame will need to be notched for the rack, the spindles reemed out for the tie rods and the motor mount shorten or dropped.. That's the route I was looking at. Also I was think of moving the whole crossmember forward 1" to center the wheels in the wheel wells.. Not sure if this is an option.. |
|
|
|
|
|
09-09-2011, 02:53 PM
|
#41 | |
|
Registered User
Join Date: Apr 2001
Location: DALLAS,TX
Posts: 21,931
|
Re: just finished my front crossmember section
Quote:
Porterbuilts Dropmember get's you there much easier....
__________________
67SWB-B.B.RetroRod 64SWB-Recycle 89CCDually-Driver/Tow Truck 99CCSWB Driver All Fleetsides @rattlecankustoms in IG Building a small, high rpm engine with the perfect bore, stroke and rod ratio is very impressive. It's like a highly skilled Morrocan sword fighter with a Damascus Steel Scimitar..... Cubic inches is like Indiana Jones with a cheap pistol. |
|
|
|
|
|
09-09-2011, 03:08 PM
|
#42 | |
|
Registered User
Join Date: Aug 2006
Location: St. Albans, Vt
Posts: 2,520
|
Re: just finished my front crossmember section
Quote:
Thanks for the advice, Scoti and sorry to Hijack the thread. |
|
|
|
|
|
09-09-2011, 03:40 PM
|
#43 | |
|
Registered User
Join Date: Sep 2010
Location: Tulsa, Oklahoma
Posts: 1,925
|
Re: just finished my front crossmember section
Quote:
i thought of that and wondered why no one would use it. 
|
|
|
|
|
|
09-09-2011, 03:43 PM
|
#44 | |
|
Registered User
Join Date: Oct 2009
Location: Howell, MI
Posts: 403
|
Re: just finished my front crossmember section
Quote:
|
|
|
|
|
|
09-09-2011, 03:56 PM
|
#45 | |||
|
Registered User
Join Date: Oct 2009
Location: Howell, MI
Posts: 403
|
Re: just finished my front crossmember section
Quote:
Quote:
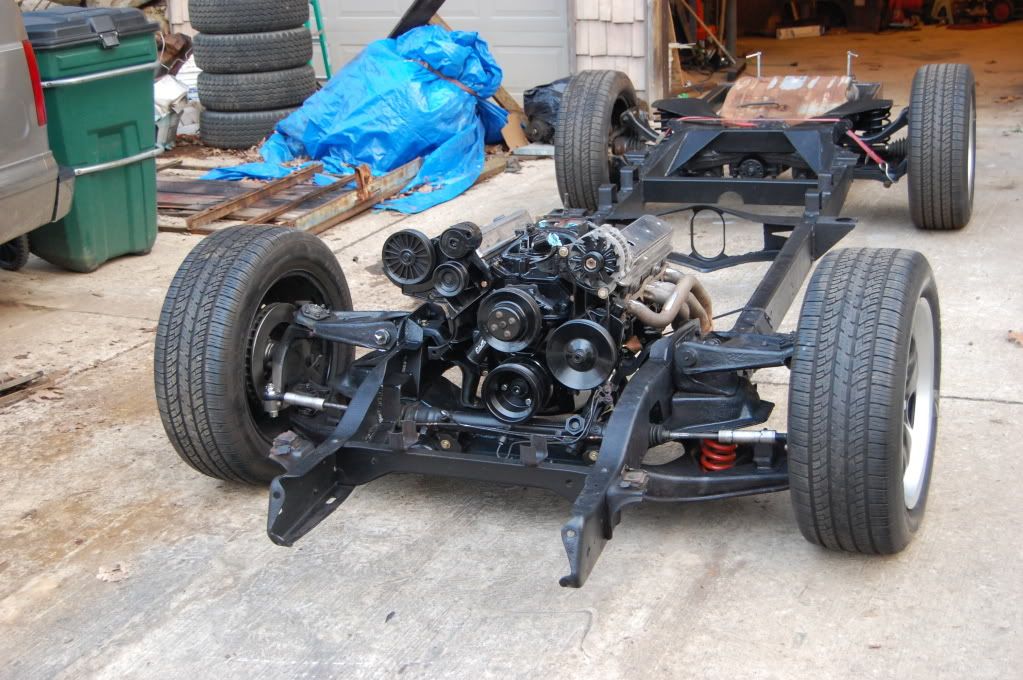
 Here's a good shot showing the stock motormounts in place:  Quote:
 They can be had for cheap and I wanted to shorten my wheelbase a bit (explained in my build thread) - was much cheaper than building a proper 4 link ( I didn't want to mess with moving the entire stock suspension forward) They can be had for cheap and I wanted to shorten my wheelbase a bit (explained in my build thread) - was much cheaper than building a proper 4 link ( I didn't want to mess with moving the entire stock suspension forward)
|
|||
|
|
|
|
09-09-2011, 04:05 PM
|
#46 | |
|
Registered User
Join Date: Apr 2001
Location: DALLAS,TX
Posts: 21,931
|
Re: just finished my front crossmember section
Re-read what I said.....
Quote:
__________________
67SWB-B.B.RetroRod 64SWB-Recycle 89CCDually-Driver/Tow Truck 99CCSWB Driver All Fleetsides @rattlecankustoms in IG Building a small, high rpm engine with the perfect bore, stroke and rod ratio is very impressive. It's like a highly skilled Morrocan sword fighter with a Damascus Steel Scimitar..... Cubic inches is like Indiana Jones with a cheap pistol. |
|
|
|
|
|
09-09-2011, 04:38 PM
|
#47 |
|
Registered User
Join Date: Aug 2006
Location: St. Albans, Vt
Posts: 2,520
|
Re: just finished my front crossmember section
Well, I might take the measuring tape out and do some thinking..
|
|
|
|
|
09-09-2011, 05:42 PM
|
#48 | |
|
Registered User
Join Date: Oct 2009
Location: Howell, MI
Posts: 403
|
Re: just finished my front crossmember section
Quote:
|
|
|
|
|
|
09-09-2011, 06:11 PM
|
#49 | |
|
Registered User
Join Date: Apr 2001
Location: DALLAS,TX
Posts: 21,931
|
Re: just finished my front crossmember section
Quote:
For everyone else but you, I would recommend to verify this concern before going through the effort of raising the x-member more than 1.5".
__________________
67SWB-B.B.RetroRod 64SWB-Recycle 89CCDually-Driver/Tow Truck 99CCSWB Driver All Fleetsides @rattlecankustoms in IG Building a small, high rpm engine with the perfect bore, stroke and rod ratio is very impressive. It's like a highly skilled Morrocan sword fighter with a Damascus Steel Scimitar..... Cubic inches is like Indiana Jones with a cheap pistol. |
|
|
|
|
|
09-09-2011, 07:16 PM
|
#50 | |
|
Registered User
Join Date: Oct 2009
Location: Howell, MI
Posts: 403
|
Re: just finished my front crossmember section
Quote:

|
|
|
|
|
|
| Bookmarks |
|
|


 Linear Mode

