
|
 07-13-2013, 09:17 AM
|
#226 |
|
A320 Pilot/USAF Retired
Join Date: Mar 2009
Location: Charleston, SC
Posts: 2,622
|
Re: 1957 Chevy truck re-rebuild
Nice work on the seat frame!
__________________
JJ My 1957 build: http://67-72chevytrucks.com/vboard/s...d.php?t=334552 http://www.trifive.com/forums/showthread.php?t=22037 Instagram - Chuckdriver57 |

|

|
|
07-13-2013, 11:29 AM
|
#227 |
|
Registered User
Join Date: Mar 2009
Location: Derby Kansas
Posts: 564
|
Re: 1957 Chevy truck re-rebuild
Ok...Lets have a show of hands. How many people copied and saved tons of pics from this thread to use for future refrence.
Ok I saved a few. I'm probably not going to be to this level of perfection on my build, but the pics are so good and documentation is so clear I will definately be revisiting thoughout my build. Lots of things here to inspire my build. Thanks for taking the time to share this with all of us.
__________________
av8tr33337 AKA Bartman  Email av8tr33337@yahoo.com Email av8tr33337@yahoo.comBartman's Ad-S10 Chassis Swap http://67-72chevytrucks.com/vboard/s...d.php?t=415418 My First Youtube Video http://www.youtube.com/watch?v=B6hSt...eature=channel More Pics of the 51 Project http://s668.photobucket.com/albums/v...hassis%20Swap/ 1951 3100 Pickup |
|
|
|
|
07-13-2013, 12:14 PM
|
#228 |
|
Registered User
Join Date: Aug 2007
Location: Corona, California
Posts: 7,998
|
Re: 1957 Chevy truck re-rebuild
Nice seats.
Kim |
|
|
|
|
07-13-2013, 11:15 PM
|
#229 |
|
Registered User
Join Date: Aug 2012
Location: Salem Mo
Posts: 647
|
Re: 1957 Chevy truck re-rebuild
papastrk, Thanks, I did sit a visualize the one frame concept for some time before I started in. There are some additions soon to come with the seat framing, I'll get those posted soon.
Moving to the frame question... I'm planning on leaving the frame behind the control arm the way it is. I believe with the square frame of the independent, that'll be strong. But.... as I've been visiting this forum an issue has been brought to my attention. The idea of the front weight of the cab mounts reaching out beyond the frame can put stress on trying to twist the frame outward. Without going to the extent of boxing the frame, I decided to reinforce the upper frame to the transmission crossmember. This reinforcement isn't too far from the cab mount so I hope it helps the situation.  For those who like the breakdown of the build, here goes.  The crossmember is hollow, if I drilled and tightened against it, it would collapse and never stay true. If I drill oversize then put in a sleeve, I've got a nice strong and clean look when done.  I made the tube slightly longer so a large washer can be welded to it.  After the welding and clean up.  A closer look at the finished brace. 
|
|
|
|
|
07-13-2013, 11:23 PM
|
#230 |
|
Registered User
Join Date: Aug 2012
Location: Salem Mo
Posts: 647
|
Re: 1957 Chevy truck re-rebuild
ChuckDriver, thank you very much.
av8tr33337, wow, it's always nice to hear that inspiration has come from this build thread. Thank you. Kim57, I've been looking and looking at seats for about a year now. I've come close to hitting the order button on others, but I'm extremely with how these wrap around my body. |
|
|
|
|
07-14-2013, 12:35 AM
|
#231 |
|
Registered User
Join Date: Aug 2007
Location: Corona, California
Posts: 7,998
|
Re: 1957 Chevy truck re-rebuild
That brace came out nice.
Kim |
|
|
|
|
07-14-2013, 09:20 AM
|
#232 | |
|
'57 Rosa
 Join Date: Sep 2009
Location: Fitzgerald,GA
Posts: 162
|
Re: 1957 Chevy truck re-rebuild
Quote:
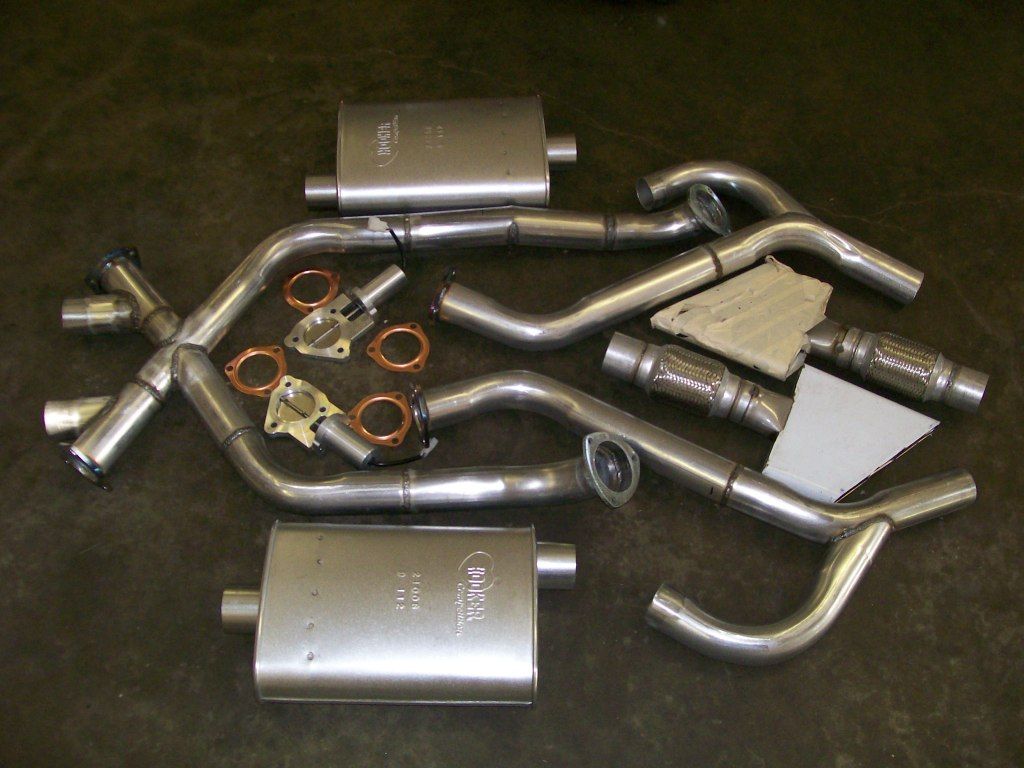
 that you purchased your tips and cut out valves from JEGS. Can you let me know where you purchased the rest of your kit from. I am assuming the pipes and mufflers came in a kit? Thanks! that you purchased your tips and cut out valves from JEGS. Can you let me know where you purchased the rest of your kit from. I am assuming the pipes and mufflers came in a kit? Thanks!
__________________
My '57 Truck Build "Rosa" (Current Project) http://67-72chevytrucks.com/vboard/s...21#post4118721 2003 Dodge Dakota 4X4 (Daily Driver) Only two defining forces have ever died for us: CHRIST died for our salvation and VETERANS died for our freedoms. Glorify CHRIST and thank VETERANs  Dru~ USN Retired Dru~ USN Retired
|
|
|
|
|
|
07-14-2013, 09:38 AM
|
#233 | |
|
Registered User
Join Date: Aug 2012
Location: Salem Mo
Posts: 647
|
Re: 1957 Chevy truck re-rebuild
Quote:
Pretty much the rest is all fabricated from going to the local muffler shop and giving them a drawn image and have them do some bending. The x-pipe was home made with a couple pieces of 2 1/2" pipe. The flanges were cut with the torchmate plasma cutting system. Otherwise, I spent alot of time on my back trying to imagine how I can make it all fit together. I've had the system all together and running in the garage and it worked perfect. Now that I'm getting closer to finishing this truck I can't wait to drive and have some fun with it. |
|
|
|
|
|
07-14-2013, 10:43 AM
|
#234 |
|
'57 Rosa
Join Date: Sep 2009
Location: Fitzgerald,GA
Posts: 162
|
Re: 1957 Chevy truck re-rebuild
Thanks. You have done a great job. I appreciate your attention to detail. I plan on using a MagnaFlow System. I had planned on my tips exiting thru the steps also but had not gotten as far as you. You saved me a lot of time. I do have a question about the mesh adapter connected to the tips. I assume you are using it for vibration purposes? Where did you find those? Also, keep up the great work and keep the pictures coming.
__________________
My '57 Truck Build "Rosa" (Current Project) http://67-72chevytrucks.com/vboard/s...21#post4118721 2003 Dodge Dakota 4X4 (Daily Driver) Only two defining forces have ever died for us: CHRIST died for our salvation and VETERANS died for our freedoms. Glorify CHRIST and thank VETERANs Dru~ USN Retired
|
|
|
|
|
07-14-2013, 01:41 PM
|
#235 | |
|
Registered User
Join Date: Aug 2012
Location: Salem Mo
Posts: 647
|
Re: 1957 Chevy truck re-rebuild
Quote:
Especially with a X pipe system where there is no flex through out the whole system. I got mine from Jegs also. I used the 2 1/2" inch part # 555-30771. If you use a different size, by using this number on the Jegs site, it should get you to all the variables available.
|
|
|
|
|
|
07-14-2013, 02:06 PM
|
#236 |
|
56 - autocross
Join Date: Apr 2010
Location: Camarillo, Ca
Posts: 1,121
|
Re: 1957 Chevy truck re-rebuild
Hey Stepside
Can you tell us more about your torchmate? How do you like it? Suggestions, what size, what plasma are you using, etc?????? I have always wanted one. Getting tired of cutting things out with a wheel, and then having to grind it etc... How did you finish off the exhaust exit on the step? Looks like you have some kind of metal roll or ??? on there? Looks good. |
|
|
|
|
07-14-2013, 11:08 PM
|
#237 |
|
Registered User
Join Date: Aug 2012
Location: Salem Mo
Posts: 647
|
Re: 1957 Chevy truck re-rebuild
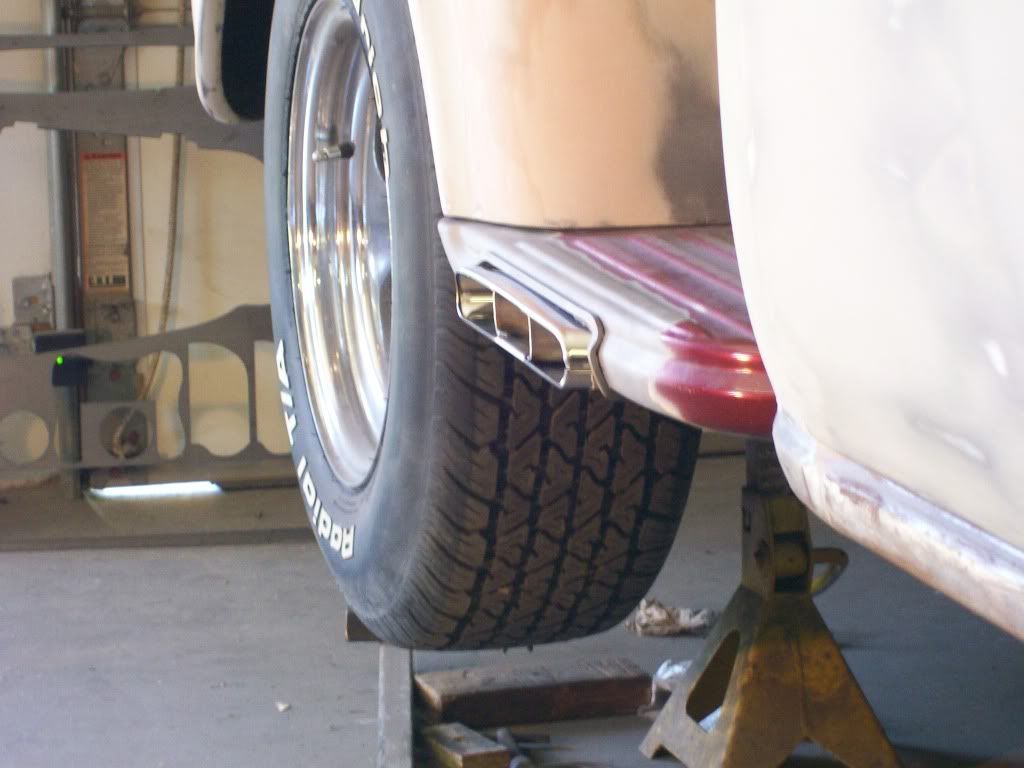
Hi hotrod1, I've had a couple personal messages on the outlets and the steps, I'll put up some pictures to show how I got the edge.
I decide to use square vs round for the edging. I knew I'd want to use body filler to smooth around the edge, if I used round material I'd have to fill under the edging also. By using the torchmate I cut the edging for a piece of 3/8" plate. I made it slightly oversized, always better to have to much material vs not enough. Here is how the edging fits around the exhaust tip.  There was no way I could shape the edging as one piece, so I cut it in half and by clamping it in the vise and using a hammer I was able shape it to be very close to the contour of the step.  Once I shaped both pieces I was able to weld them back together as one piece. The far end is welded, the near end has a gap, since the other end is secure I tacked the close end then put it in the vise and filled the gap, then ground it smooth.  Once together it fit nicely.  Once I had the fit I did a 100 % weld on the inside. I didn't want and vibration to allow a crack to happen where the step and the edge meet. Once it was done I assembled all the pieces. The tip comes through at an angle so I still had to fine tune to get the same clearance all around the tip. As for the torchmate..... I use a Miller spectrum 2010 I think. I believe it'll cut up 1" thick. A lighter duty plasma cutter, say that cuts up to 1/2" would probably work fine in most situations. I knew absolutely nothing about CAD systems to design the cut, it just took time and error for me to figure the CAD system. At first it fights you, then once you learn it, it works with you. Once you become familiar, the simplest items I hardly think about. Often I will draw and make what I want out of construction paper, once the pattern is made I use the scanner/copier and use the image to create a cut path. Then let the machine make the cut. There are times when the day almost over so I'll bring my patterns into the house and while inside I'll create the cut paths so the next morning I'm ready to hook up and cut right away. Costly, yes, I was fortunate, but we won't go there. Hope this helps.. Jim |
|
|
|
|
07-14-2013, 11:19 PM
|
#238 | |
|
56 - autocross
Join Date: Apr 2010
Location: Camarillo, Ca
Posts: 1,121
|
Re: 1957 Chevy truck re-rebuild
Quote:
|
|
|
|
|
|
07-15-2013, 12:07 AM
|
#239 |
|
Registered User
Join Date: Aug 2012
Location: Salem Mo
Posts: 647
|
Re: 1957 Chevy truck re-rebuild
I'd say for 90 some percent of what I do a 2X2 table would be fine. One time I needed the 4X4 table lately was making the crossmember sides.
Mine is a 2008 model I'm sure the software has probably been updated, as long as they keep it user friendly, you should be fine. I can only compare it to Autocad, yikes, I get lost with that one. The Torchmate cad system is much more user friendly and still has plenty of definition to the drawings that you do. The tech support has been very kind the couple times I've called them also. Plasma cutting does create a fine dust in the air. Some use a water tray under the table to catch the dust. I have a pretty good exhaust fan so I run it when cutting. If your shop is attached to the house this could be an issue. |
|
|
|
|
07-19-2013, 12:01 AM
|
#240 |
|
Registered User
Join Date: Aug 2012
Location: Salem Mo
Posts: 647
|
Re: 1957 Chevy truck re-rebuild
Moving along on the seat bracket. One reason for the framework was I knew I was gonna need a floor counsel to support the shifter. I wanted a sport shifter that has a ratcheting mechanism, so a real long handle shifter wasn't going to work.
If mounted to the floor, way too low.  Fortunately a couple blocks of wood raises it to a comfortable height.  With most of the frame assembled I was able attach the shifter and get a feel for how it works.  The design of the shifter causes the handle to go forward quite far for park . My only cure was to angle the shifter mounting back to offset the forward lean into park. This is also the very first time I tried my new bead roller. I wanted a design that was similar to the design on the inside door panels.  I got the plastic B&M cover trimmed to fit the angle and installed the other interior pieces to check the drivers fit. 
|
|
|
|
|
07-19-2013, 09:20 AM
|
#241 |
|
Registered User
Join Date: Feb 2013
Location: Lakeside Ariz
Posts: 445
|
Re: 1957 Chevy truck re-rebuild
That is going to be nice.
Rich |
|
|
|
|
07-19-2013, 10:27 AM
|
#242 |
|
Registered User
Join Date: Aug 2007
Location: Corona, California
Posts: 7,998
|
Re: 1957 Chevy truck re-rebuild
Looks real good.
Kim |
|
|
|
|
07-19-2013, 04:06 PM
|
#243 |
|
A320 Pilot/USAF Retired
Join Date: Mar 2009
Location: Charleston, SC
Posts: 2,622
|
Re: 1957 Chevy truck re-rebuild
Nicely done!!
__________________
JJ My 1957 build: http://67-72chevytrucks.com/vboard/s...d.php?t=334552 http://www.trifive.com/forums/showthread.php?t=22037 Instagram - Chuckdriver57 |
|
|
|
|
07-19-2013, 09:56 PM
|
#244 |
|
Registered User
Join Date: Dec 2011
Location: Southern Oklahoma
Posts: 181
|
Re: 1957 Chevy truck re-rebuild
Just keeps getting better and better. That is going to be one nice interior!
|
|
|
|
|
07-19-2013, 10:18 PM
|
#245 |
|
Registered User
Join Date: Dec 2010
Location: seattle, wa
Posts: 529
|
Re: 1957 Chevy truck re-rebuild
You mentioned using an etch primer? Epoxy is not etch primer? I think using something to etch first then epoxy is better?? I'm kinda just asking the questions....
|
|
|
|
|
07-19-2013, 11:37 PM
|
#246 |
|
Registered User
Join Date: Aug 2012
Location: Salem Mo
Posts: 647
|
Re: 1957 Chevy truck re-rebuild
This is great, 10 seconds to up-load a picture to photobucket, high speed is wonderful.
Thanks everybody, this my first attempt at creating an interior so I'm slowly stepping into this project. One other reason for the center counsel was to give a side foot rest. With the flat floor I have no place to prop my right foot while driving, especially if I take a long trip. Here's the fit.  I stopped the bead roller just before it reaches my foot. I know I'll end up wearing off the paint or what ever is there. Once finished I plan on cutting a piece of stainless steel and attaching it where my foot will make contact. dicer, on the etching primer/ epoxy primer. For years the etching primer was the way to go. It was like an acid based primer, it would etch into the metal and the primer would hold well to it. I used it for along time, one issue was it usually wasn't recommended over body filler or left over paints or primers. Plus it had no filling characteristics. Then comes epoxy primers. Extremely universal, can be used over fillers and prepared paints and primers and although it does have a slight filling characteristic it is nothing like a good filling primer and it holds to metal very well. Another plus is it is good for coating something that will not be painted for sometime, it is not porous so it should lock out moisture. Now, spraying epoxy over etching primer, I can only say, "lean to the safe side". We have to be chemists anymore with all the different stuff we mix and spray. With all the choices, one thing to be very careful not to use products that could repel each other. I usually tell beginners, find a brand name that covers bare metal to clear. If you have any issues when done and you bring in a paint representative, he can not back away if it was his product line used 100 percent. |
|
|
|
|
07-26-2013, 11:13 PM
|
#247 |
|
Registered User
Join Date: Aug 2012
Location: Salem Mo
Posts: 647
|
Re: 1957 Chevy truck re-rebuild
I've been working on this truck for some time now. Lingering in the back of my mind is what I'm gonna do about wheels and tires, so many choices.
I not only have to figure what wheels, but also the size and the offset for the mounting. Fortunately I have a very kind tire dealer in town, he allowed me to take home and try a couple different wheels and he mounted used tires on them also so I could get a good idea of the fit. I went with Boss 338, 18" x 8". Here's the outcome.   I've been pondering what steering wheel to go with also. Once the wheels were on the truck, it was an easy decision. They very closely match the spokes of the wheels.  Getting these things figured out now is gonna help me keep my focus later when I start painting. |
|
|
|
|
07-27-2013, 02:27 AM
|
#248 |
|
Registered User
Join Date: Aug 2007
Location: Corona, California
Posts: 7,998
|
Re: 1957 Chevy truck re-rebuild
Those are nice.
Kim |
|
|
|
|
07-27-2013, 07:41 PM
|
#249 |
|
Senior Member
Join Date: Jul 2009
Location: Tomball, Texas
Posts: 1,592
|
Re: 1957 Chevy truck re-rebuild
Your truck is really taking shape Jim. Looks great, and the wheels look really good on it.
__________________
Rick 78 GMC K15 SWB, 350/NV4500/NP205/4.10s Project Hazel 71 GMC C25 350/TH400 - Project Angie 59 Chevy SWB Stepside (next in line? Not sure now  ) )2001 GMC Sierra K2500 |
|
|
|
|
08-04-2013, 10:57 PM
|
#250 |
|
Registered User
Join Date: Aug 2012
Location: Salem Mo
Posts: 647
|
Re: 1957 Chevy truck re-rebuild
Thanks Kim and rgunlock. Although the truck is just temporarily together to test fit parts and set the ride height, I'm starting to get that anxious feeling of getting the truck done. In reality, it's showing the many little adjustments yet to finish. Such as getting the door gaps set and test fitting all the wood for the bed floor, bumper fitments, etc. Pretty much all the headaches you don't want to have issues with once the truck has paint on it.
One issue I encountered with the new wheels was the mounting flange was much thicker than the stock wheels. Out came the originals for a set of ARP long studs. I couldn't find the ones with the proper knurl diameter where the stud presses into the flange. I had to drill all the holes to fit the closest high performance studs. The fun never ends.....  They ended up being about 3/4" too long. I cut them to length and rounded the outer edges. Problem solved.  It's these never ending issues that you simply can not explain to a "non automotive" enthusiast when they can't understand why a project goes on and on and on.
|
|
|
|
 |
| Bookmarks |
|
|


 Linear Mode

