
|
 07-08-2008, 01:36 AM
|
#26 |
|
Registered User
Join Date: Mar 2008
Location: Monroe, WA
Posts: 181
|
Re: My project 55 begins
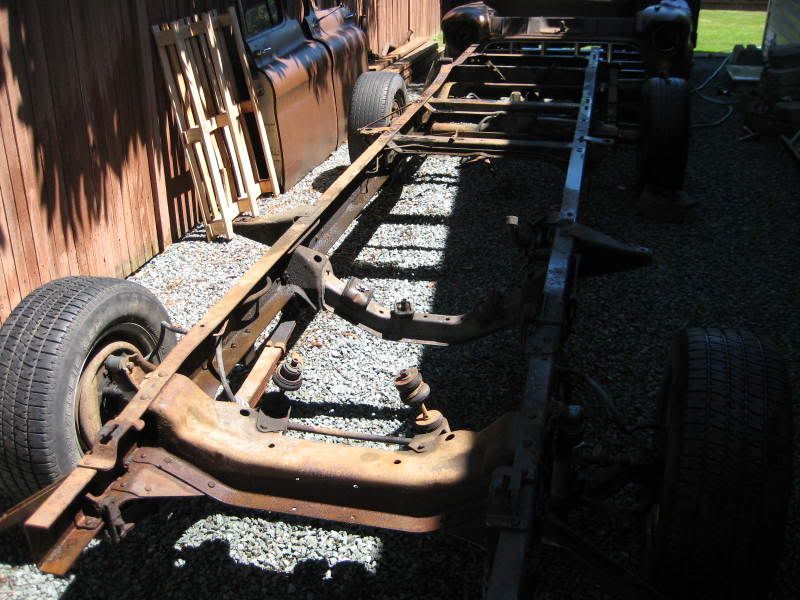
Not a whole lot to report, but I did pull the engine and transmission from the chassis and I have started the scrubing, scraping, and brushing of the frame to prepare it for a coating of rust bullet and then some black paint to give my truck a nice clean base to build up from.
  -Joel |

|

|
|
07-08-2008, 10:23 AM
|
#27 | |
|
PITbut
Join Date: Sep 2007
Location: monroe washington
Posts: 3,041
|
Re: My project 55 begins
Quote:
|
|
|
|
|
|
07-16-2008, 11:32 PM
|
#28 |
|
Registered User
Join Date: Mar 2008
Location: Monroe, WA
Posts: 181
|
Re: My project 55 begins
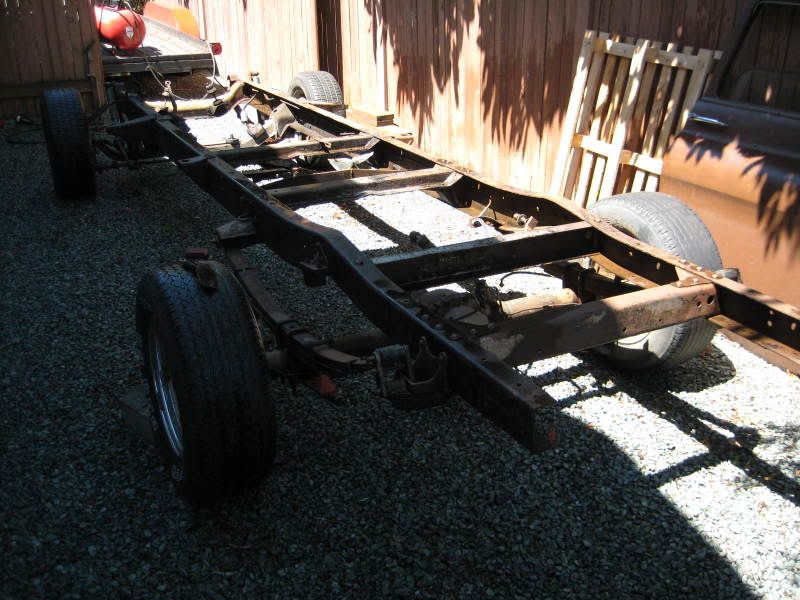
I coated the frame with Rust Bullet and then top-coated it with some glossy black paint, the overall effect is pretty good although I would suggest to anyone thinking of using the Rust Bullet to spray it if possible instead of brushing it on. Unlike the POR15 which self levels and looks sharp this stuff is next to impossible to keep brush strokes out of it. That being said it is a cinch to use, no real prep required, although I did go a bit further than the directions said to and cleaned the frame pretty good with de-greasers and sanding/brushing. I think it will be a good base for my cruiser.
 -Joel |
|
|
|
|
07-17-2008, 01:05 AM
|
#29 |
|
Registered User
Join Date: Aug 2007
Location: Corona, California
Posts: 7,998
|
Re: My project 55 begins
Your frame looks really nice. I can't wait untill I get to that stage.
Kim |
|
|
|
|
07-17-2008, 04:24 PM
|
#30 |
|
Registered User
Join Date: Aug 2005
Location: NJ
Posts: 160
|
Re: My project 55 begins
Hey Joel,
Quick question, where did you find the plans for the frame on casters you built? I need to make one for my 56 in the near future. Thanks, Sam |
|
|
|
|
07-18-2008, 12:11 AM
|
#31 | |
|
Registered User
Join Date: Mar 2008
Location: Monroe, WA
Posts: 181
|
Re: My project 55 begins
Quote:
-Joel |
|
|
|
|
|
07-18-2008, 12:53 AM
|
#32 | |
|
Registered User
Join Date: Aug 2005
Location: NJ
Posts: 160
|
Re: My project 55 begins
Quote:
Thanks, Sam |
|
|
|
|
|
07-21-2008, 12:39 AM
|
#33 |
|
Registered User
Join Date: Mar 2008
Location: Monroe, WA
Posts: 181
|
Re: My project 55 begins
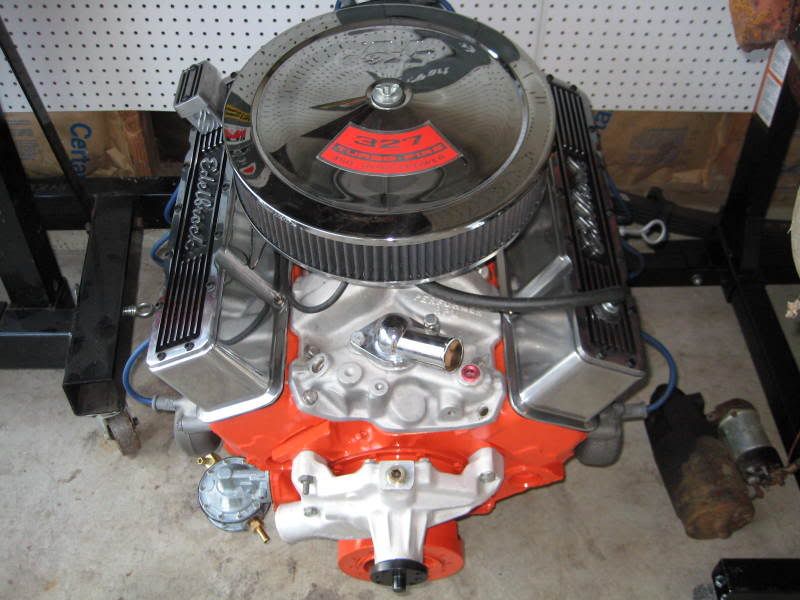
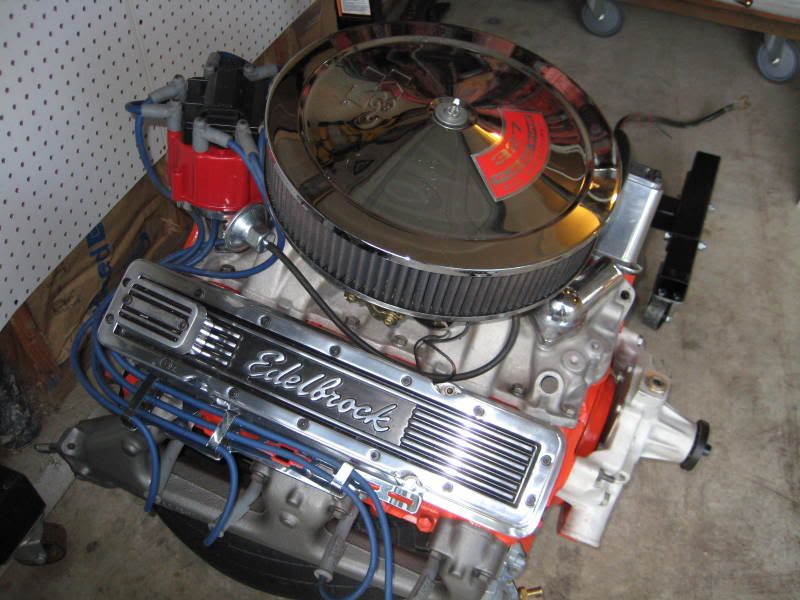
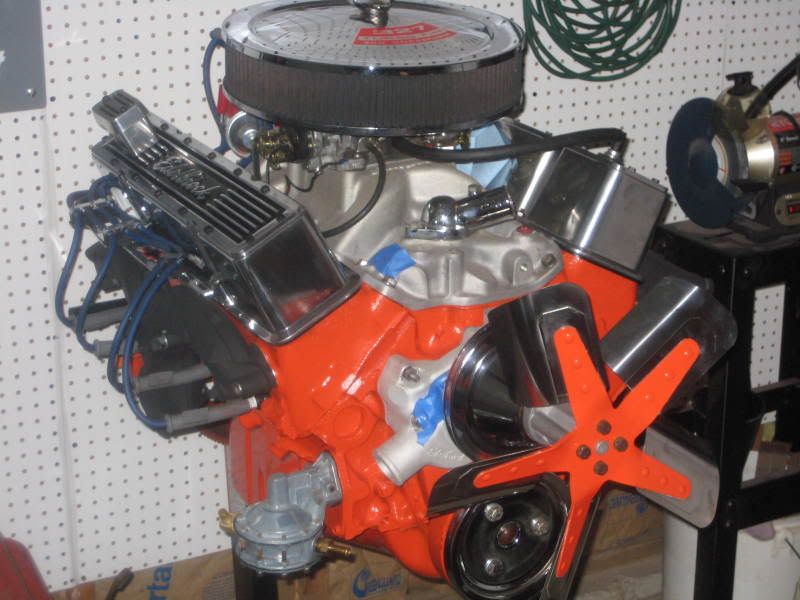
This weekend I came across a good deal on a new source of motivation for my '55. Its a '68 327ci with some Edelbrock goodies and an MSD HEI distributor and wire set.
  -Joel |
|
|
|
|
07-21-2008, 11:38 PM
|
#34 | |
|
Registered User
Join Date: Mar 2008
Location: Monroe, WA
Posts: 181
|
Re: My project 55 begins
Quote:
-Joel |
|
|
|
|
|
07-22-2008, 08:45 AM
|
#35 | |
|
Registered User
Join Date: Aug 2005
Location: NJ
Posts: 160
|
Re: My project 55 begins
Quote:
Thanks, I might start building this, this weekend. Thanks, Sam |
|
|
|
|
|
07-23-2008, 12:25 AM
|
#36 |
|
Registered User
Join Date: Jun 2008
Location: Vancouver, Washington
Posts: 1
|
Re: My project 55 begins
Dude.... WHERE did you get that fantastic idea for the cab dolly?!
|
|
|
|
|
07-23-2008, 11:14 PM
|
#37 | |
|
Registered User
Join Date: Mar 2008
Location: Monroe, WA
Posts: 181
|
Re: My project 55 begins
Quote:
 -Joel |
|
|
|
|
|
08-01-2008, 05:25 PM
|
#38 |
|
Registered User
Join Date: Apr 2008
Location: Kansas
Posts: 191
|
Re: My project 55 begins
Hey Joel i was wondering if you could take some measurements on your frame of the cab mount locations? I want to build a metal cab dolly that i can mount cab to. I have to replace steps and rockers and cab corners. The measurements that i need are (1) centerline measurement of mounting bolts on front cab mounts. (2) Centerline measurement of mounting bolts on rear cab mounts. (3) centerline measurement of cab mounting bolts from front cab mount to rear cab mount. (4) Measurement of your cabs overall height as it sits on cab dolly. (5) Measurement from bottom of your cabs front cab mount mounting surface to floor. ( trying to build a cab dolly as high as i can and still have cab go thru a 7' garage door. I would get these measurements my self but truck is 30 miles away and i want to have cab dolly built before i go out and bring the cab back to my shop. I have some friends that are going to help lift it and having dolly already built would help a bunch. Any help would be appreciated.
|
|
|
|
|
10-21-2008, 12:15 PM
|
#39 |
|
Registered User
Join Date: Mar 2008
Location: Monroe, WA
Posts: 181
|
Re: My project 55 begins
So its been awhile since I have been out in the garage, my son was born on 10-10-08 so I have been busy with more important things! Now that we are more settled back in I decided it was time to do some more work on the project. The original ball and socket tie rod ends were very worn and sloppy feeling so out with the old and in with the new.
1st take apart the old ball and socket ends, remove the cotter pin on the ends and then unscrew the cap on the end with a big flat head. 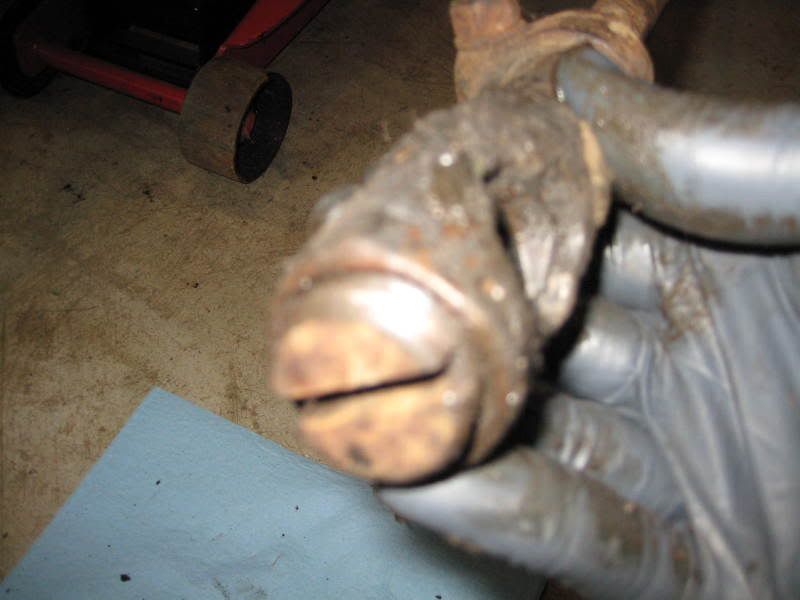 Now we need to remove the ball stud. 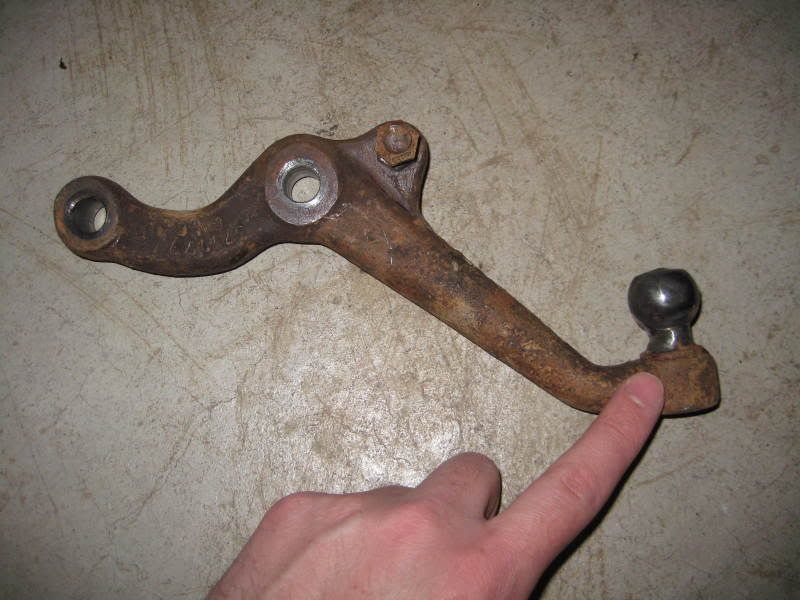 grind the end flat to remove the flared end (don't take off too much) and use a 1/8" bit to drill a pilot hole in the center of the stud. 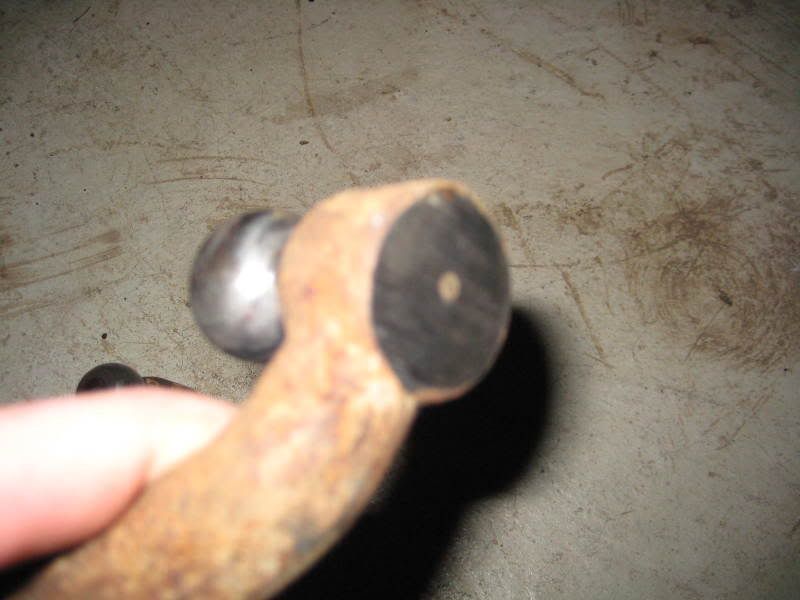 Now use a 1/2" bit and drill down into the stud making sure to stay centered. Use a punch and a BF Hammer to drive out the stud.  Now you can install the new style tie rod ends. 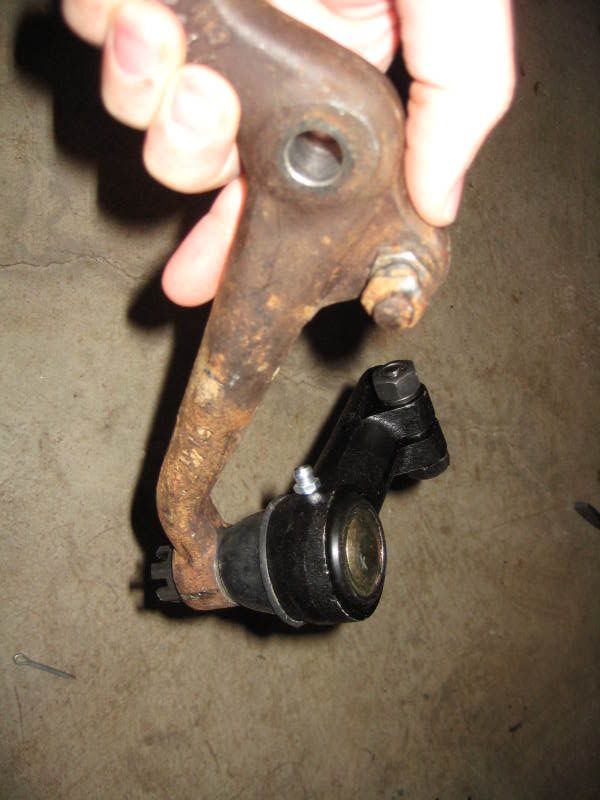 have fun! |
|
|
|
|
10-21-2008, 12:34 PM
|
#40 | |
|
Registered User
Join Date: Oct 2006
Location: Central Coast, CA.
Posts: 1,202
|
Re: My project 55 begins
Quote:
__________________
Mom's 1954 (TBI 5.7/700R4/14 bolt 4:10) 5 Chevrolet window 3/4 ton long bed Pick up build thread ->http://www.67-72chevytrucks.com/vboa...d.php?t=228674 My 1954 (TPI 5.7/700R4/10 bolt 3:73) Chevrolet 5 window 1/2 ton short bed Pick up build thread->http://67-72chevytrucks.com/vboard/s...3&goto=newpost 1960 (400/T350/?) Apache 10 short/fleet side-big window 1973 (TPI 5.7/700R4/14 bolt 4:10 w DANA 60 front) Chevrolet Cheyenne 4X4 2013 (Vortec 5.3/6-speed 6L90 automatic) Sierra LT CREW CAB Doing my part to warm the globe 
|
|
|
|
|
|
10-21-2008, 01:08 PM
|
#41 | |
|
Registered User
Join Date: Mar 2008
Location: Monroe, WA
Posts: 181
|
Re: My project 55 begins
Quote:
|
|
|
|
|
|
10-21-2008, 08:22 PM
|
#42 | |
|
Registered User
Join Date: Aug 2007
Location: Mountain View, Alberta, Canada
Posts: 415
|
Re: My project 55 begins
Quote:
Your cab condition looks very similar to mine except I have no rust around the windshield. I love that 327. What is the serial number? What was it originally from? I have a 327 block out of a 64-67 that was also used in the 66 vette and can't wait to get at it. Alas I am a long way from getting the engine done up. Trying to score goodies along the way. 56hotrodred Last edited by 56hotrodred; 10-21-2008 at 08:23 PM. |
|
|
|
|
|
11-30-2008, 09:45 PM
|
#43 |
|
Registered User
Join Date: Mar 2008
Location: Monroe, WA
Posts: 181
|
Re: My project 55 begins
snuck into the garage the other day and worked on my motor. I liked the ram horn manifolds on my 283 so I canabilized those off the old motor and had them sandblasted. I drilled out the old broken studs re-tapped the holes and painted them with high temp black. I also got some chrome pulleys for the crank and water pump. The fan was blue, so I sanded that down and painted it the same chevy orange to match the block. I need to pick up a transmission so I can test fit the whole thing in the frame and get a new trans cross member.
|
|
|
|
|
12-01-2008, 02:40 AM
|
#44 |
|
Registered User
Join Date: Oct 2008
Location: Ocean Springs, MS
Posts: 117
|
Re: My project 55 begins
Man you gotta get some updates on those body repairs posted, I feel like I am flying blindly into this, lol looking good. looking real good, and nice machine work!
|
|
|
|
|
12-02-2008, 12:15 AM
|
#45 |
|
Registered User
Join Date: Jun 2007
Location: Saskatoon, Saskatchewan,:
Posts: 2,901
|
Re: My project 55 begins
it is looking really good, as for around th windsheild, i am personally going to repair my own, 18gauge metal, bent with a brake andthen a shrinker strecher for the bend and then weld it it.
__________________
James 1968 GMC "HAVOC" 1986 GMC "Frank" J.J.R.H. Design & Consulting My 68`Rebuild "HAVOC": http://67-72chevytrucks.com/vboard/s...d.php?t=316300 A 58' chev build thread: http://www.67-72chevytrucks.com/vboa...d.php?t=311238 1969 Camaro Pro Touring http://67-72chevytrucks.com/vboard/s...61#post3513361 Swiss Cheese: http://67-72chevytrucks.com/vboard/s...d.php?t=384390 Adjustable Trailing Arm How-To: http://67-72chevytrucks.com/vboard/s...d.php?t=321100 1968 Ford Farm Truck: http://67-72chevytrucks.com/vboard/s...=1#post6555587 |
|
|
|
|
02-01-2009, 02:27 PM
|
#46 |
|
Registered User
Join Date: Mar 2008
Location: Monroe, WA
Posts: 181
|
Re: My project 55 begins
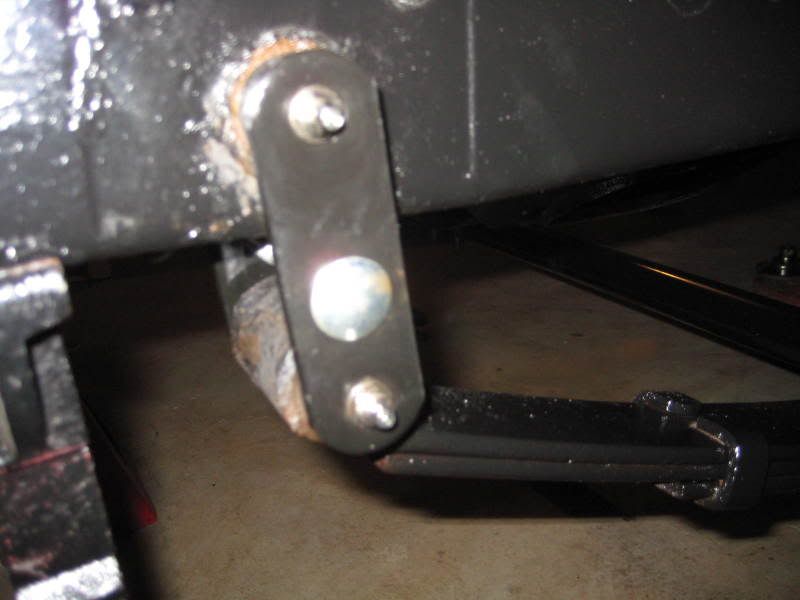
Its been months since I have been able to do anything but walk by my truck in the garage. So yesterday I decided that a pile of parts I have been slowly stacking on my work bench needed to be attached to the truck. So on went the drop axle, new shackles, and some new disc brakes to replace those tired drums.
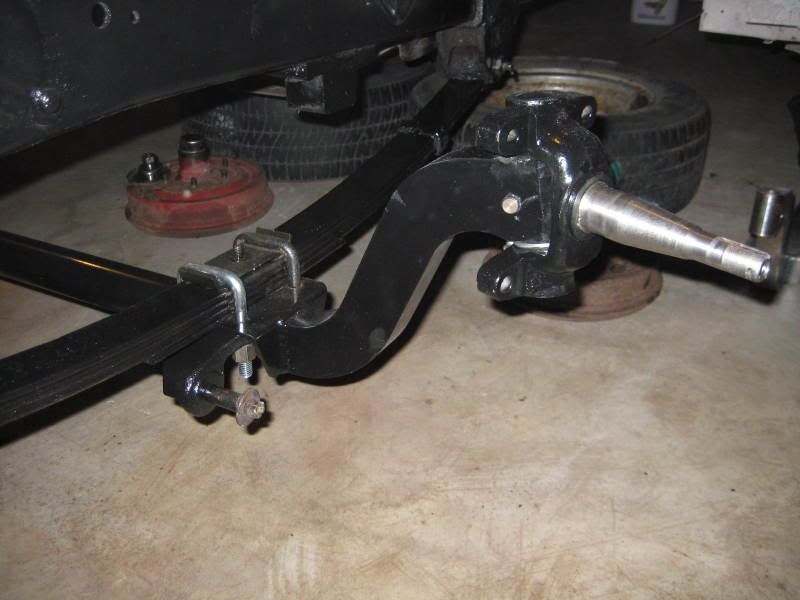  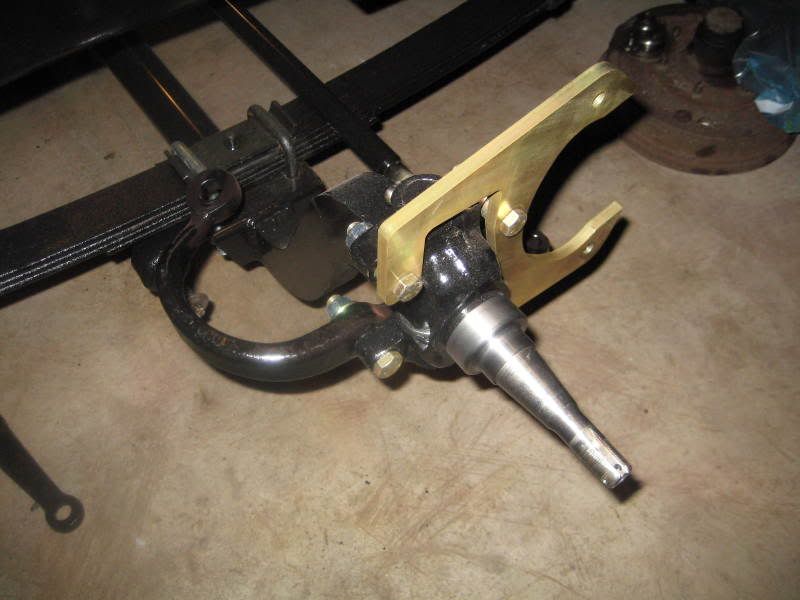 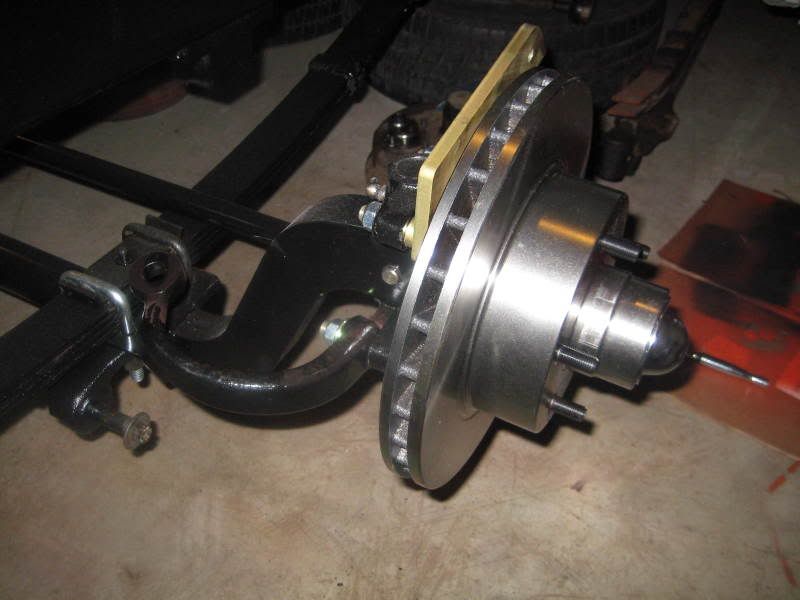 The drop axle and the brake kit are from Classis Performance Parts, although after the way this transaction was handled I won't be buying anything further from them.  Thankfully there are tons of options out there when it comes to parts for our trucks! So hopefully now that the days are getting a tad longer I will be able to sneek into the garage a bit more, but being I have a 3 year old and a 3 month old I have really come to appreciate the small victories! Thankfully there are tons of options out there when it comes to parts for our trucks! So hopefully now that the days are getting a tad longer I will be able to sneek into the garage a bit more, but being I have a 3 year old and a 3 month old I have really come to appreciate the small victories! -Joel |
|
|
|
|
02-03-2009, 03:21 PM
|
#47 |
|
Registered User
Join Date: Dec 2007
Location: Jacksonville, AL
Posts: 479
|
Re: My project 55 begins
The clearance between your rotor and bracket looks close. I have the same kit and mine is further apart. Did you have any trouble with the spindle nut going on enough to get the cotter pin through?
__________________
---Ben Jammin's 1955 Chevy/GMC Project --- ---The shop's live video feed--- <<< See what I'm up to! |
|
|
|
|
02-03-2009, 10:36 PM
|
#48 | |
|
Registered User
Join Date: Mar 2008
Location: Monroe, WA
Posts: 181
|
Re: My project 55 begins
Quote:
-Joel |
|
|
|
|
|
02-03-2009, 10:49 PM
|
#49 |
|
Registered User
Join Date: Dec 2007
Location: Jacksonville, AL
Posts: 479
|
Re: My project 55 begins
Thanks for that info Joel, things are looking great by the way! Can't wait to see more!
__________________
---Ben Jammin's 1955 Chevy/GMC Project --- ---The shop's live video feed--- <<< See what I'm up to! |
|
|
|
|
02-04-2009, 12:21 PM
|
#50 |
|
Senior Member
Join Date: Jun 2005
Location: Clovis Ca.
Posts: 3,311
|
Re: My project 55 begins
Great job so far! How much lower are you now that you have the dropped axle installed?
PS, Congratulations on the new born!!!
__________________
Classic Trucks Link http://www.classictrucks.com/feature...uck/index.html 1958 GMC.Project Build http://67-72chevytrucks.com/vboard/s...d.php?t=162816 1966 Chevelle Build http://67-72chevytrucks.com/vboard/s...d.php?t=443576 Video http://www.youtube.com/watch?v=prrNKo8F7Zw#GU5U2spHI_4 Last edited by CAL 58 GMC; 02-04-2009 at 12:21 PM. |
|
|
|
 |
| Bookmarks |
|
|


 Linear Mode

