
|
Register or Log In To remove these advertisements. |
|
|
|
|||||||
 |
|
|
Thread Tools | Display Modes |
|
|
 01-19-2016, 02:10 AM
|
#1 |
|
Registered User
Join Date: Jan 2016
Location: Mesa, AZ
Posts: 60
|
A K5 Cummins Conversion: The saga continues...
OK, I'm gonna preface this build thread with an admission: It's a shameless rip-off Nick's (mosesburb) build thread, in that it will be told in quasi-storylike fashion. It actually helps because this saga spans some 9 years, from the time I got the truck to now. Nick says I owe him royalties for said shameless rip, so I guess that means I owe him a beer
 Way back in 2006 I acquired a white 1991 K5 Blazer with a TBI 350 and a blown-up 700R4 automatic.. Actually, by this time GM was calling it a V1500, which reflected the fact that it was an old body style vs the new body pickups that came out in 1988. The 4WD new body trucks got the "K" designation, so the old body 4WDs got the "V" designation. The "1500", then as now, denoted a 1/2 ton chassis. It was a Silverado package truck, which meant power-everything and alloy wheels. Here's what she looked like back in the day:  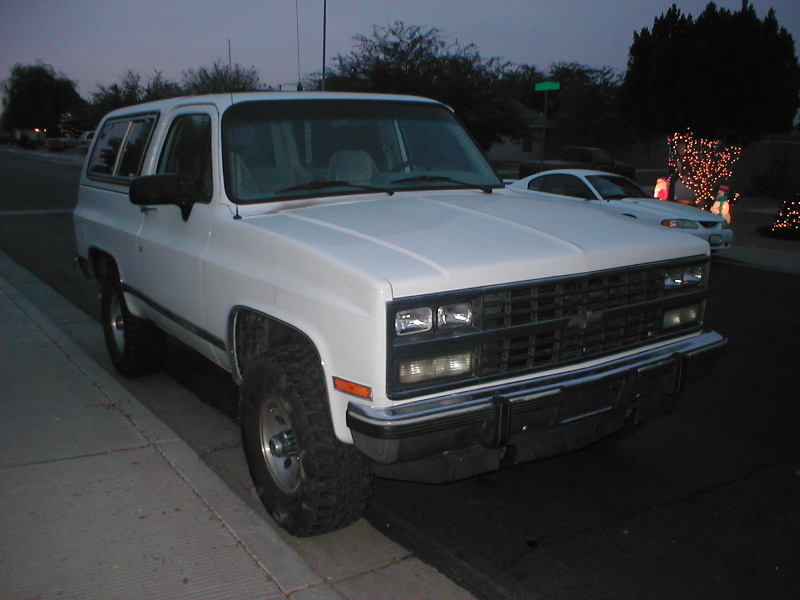 As you can see, it was clean and straight. With a rebuilt trans it ran good as well, and it became my hunting and camping rig: 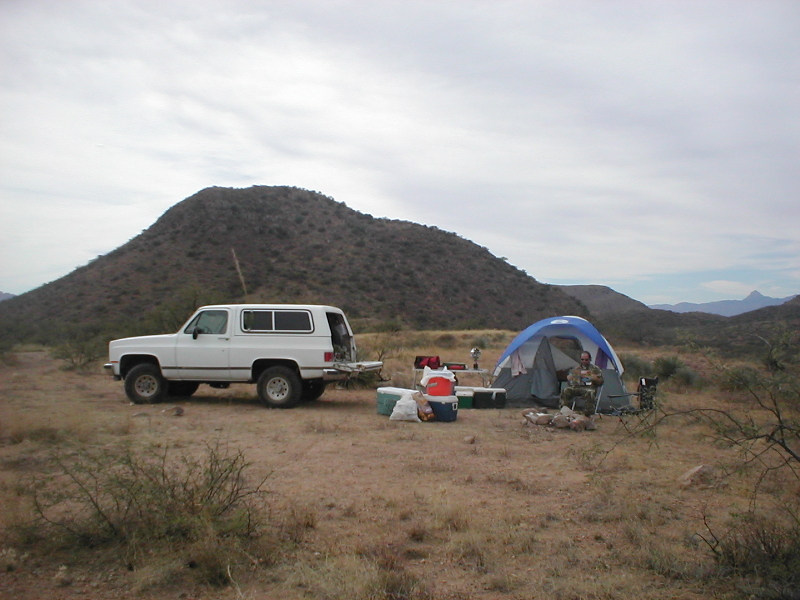 5-star hunting accommodations: 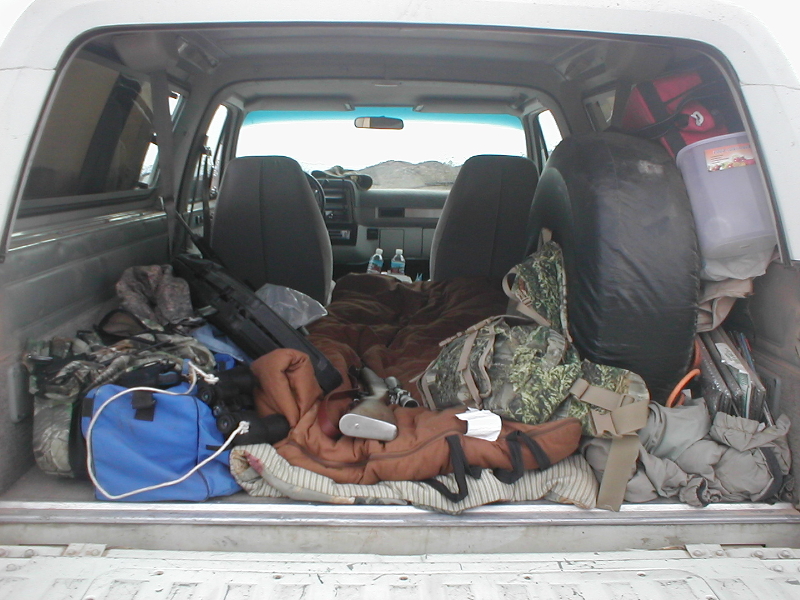 Then, one day it decided to spring a waterfall out of the drivers side head gasket  With a truck I find it's easier to pull the engine to replace head gaskets, so that's what I did: With a truck I find it's easier to pull the engine to replace head gaskets, so that's what I did: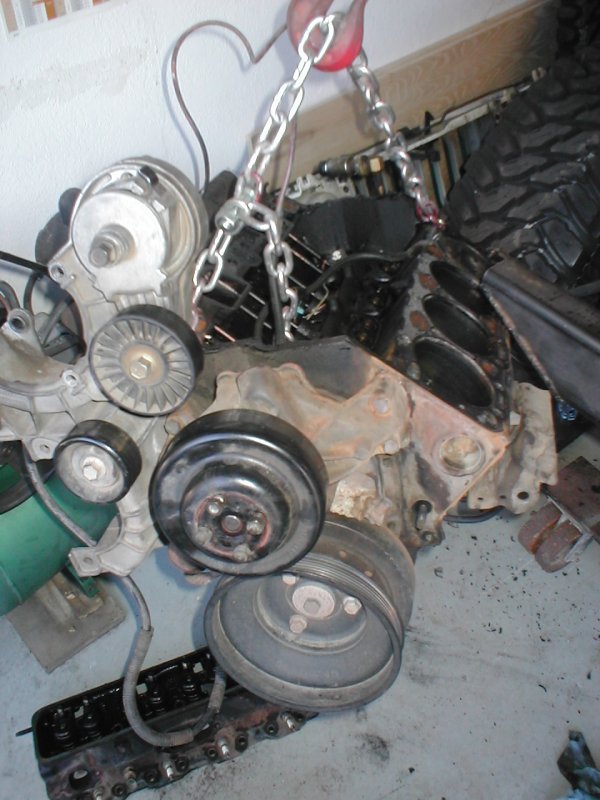 Pics with the heads removed: 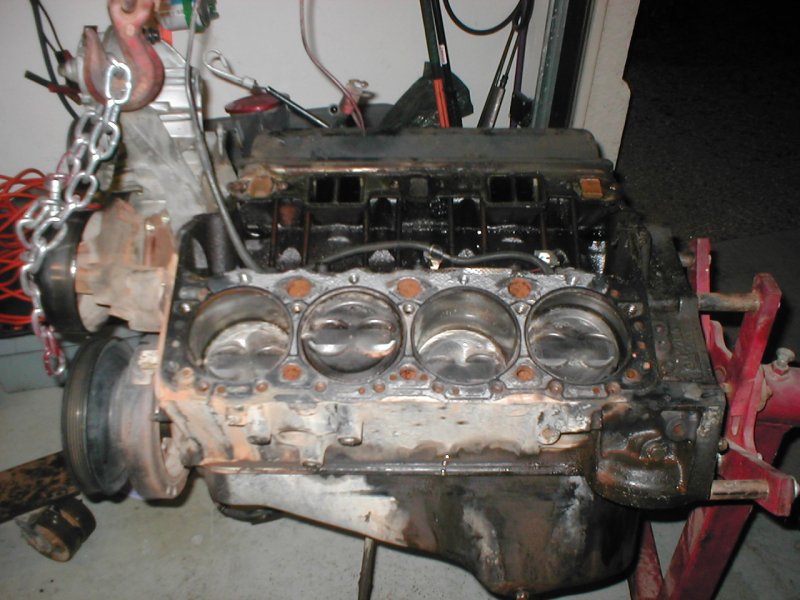 Doesn't look to bad, eh? Well, take a closer peek at the coolant passages, Apparently, the PO didn't believe in cooling system maintenance. When I removed a freeze plug, this is what I saw: 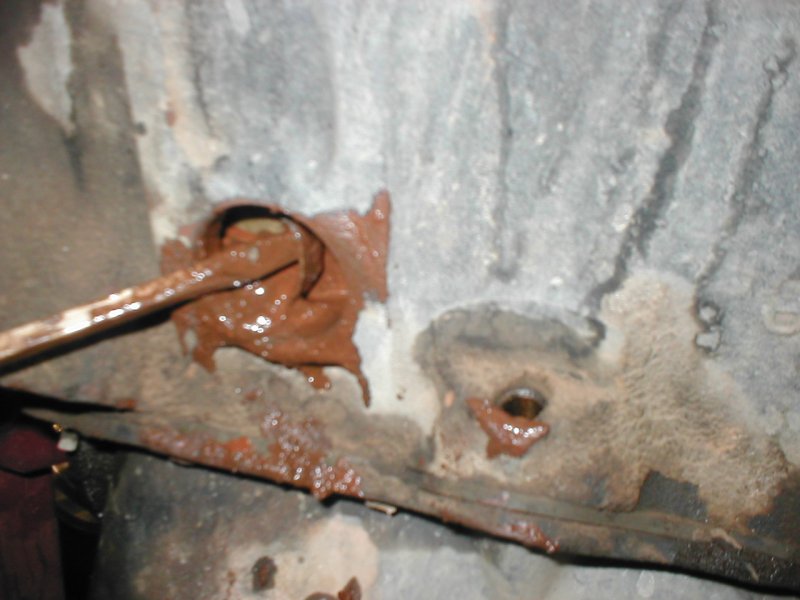 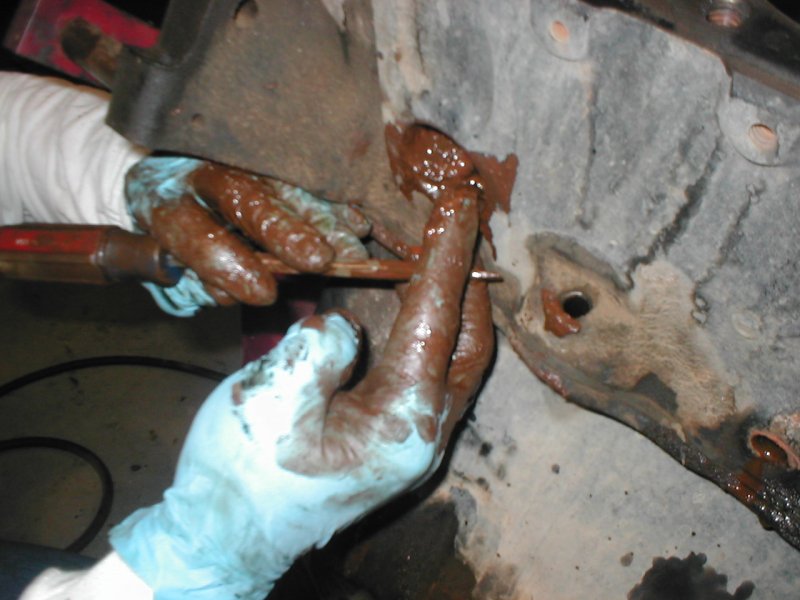 Yuck! It didn't help that this happened right after new years in January of '07 and it was miserably cold and windy  Since the oil pan leaked a bit I decided to pull it off and take a peek in there as well. It got worse: Since the oil pan leaked a bit I decided to pull it off and take a peek in there as well. It got worse: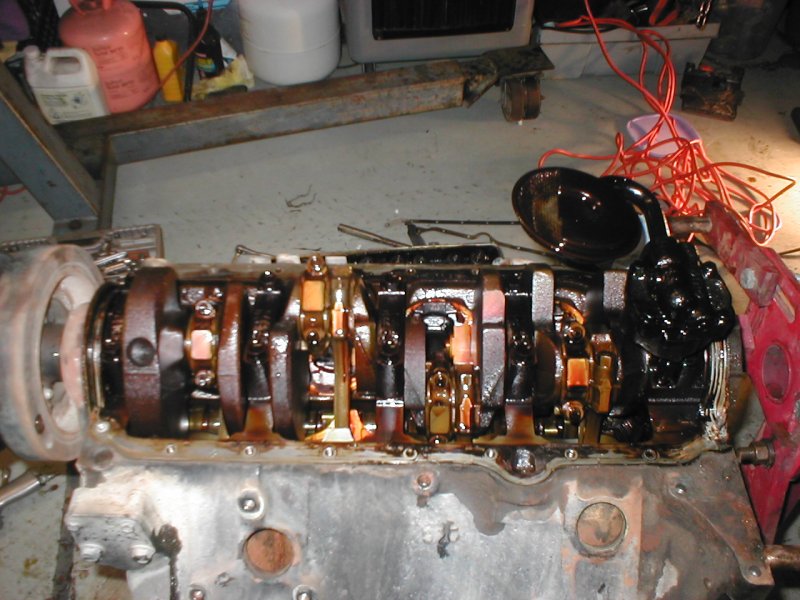 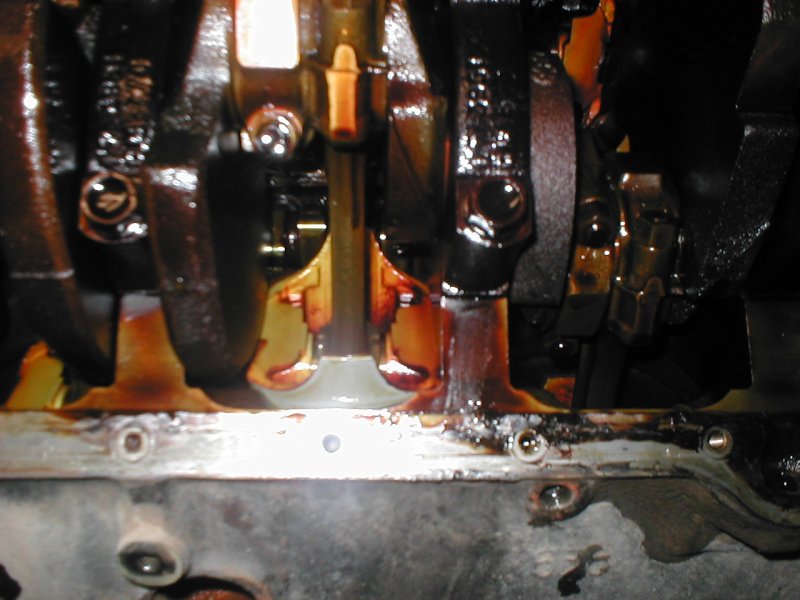 It seems routine oil changes were also neglected. All that reddish-brown stuff is some kind of varnish-like residue. It was thick and hard (phrasing!  ) and I have never seen anything like it. That said, the engine had good oil pressure, ran good, didn't burn oil, and passed emissions, so I put it back together. I flushed the block, installed new freeze plugs, and put the pan back on with a new gasket: ) and I have never seen anything like it. That said, the engine had good oil pressure, ran good, didn't burn oil, and passed emissions, so I put it back together. I flushed the block, installed new freeze plugs, and put the pan back on with a new gasket: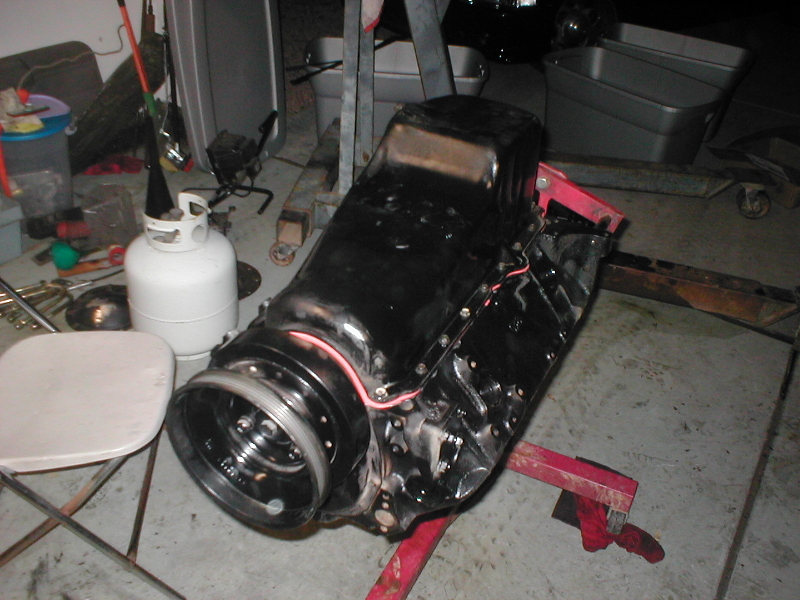 Likewise, I cleaned and re-assembled the heads and put them back on with new head gaskets:  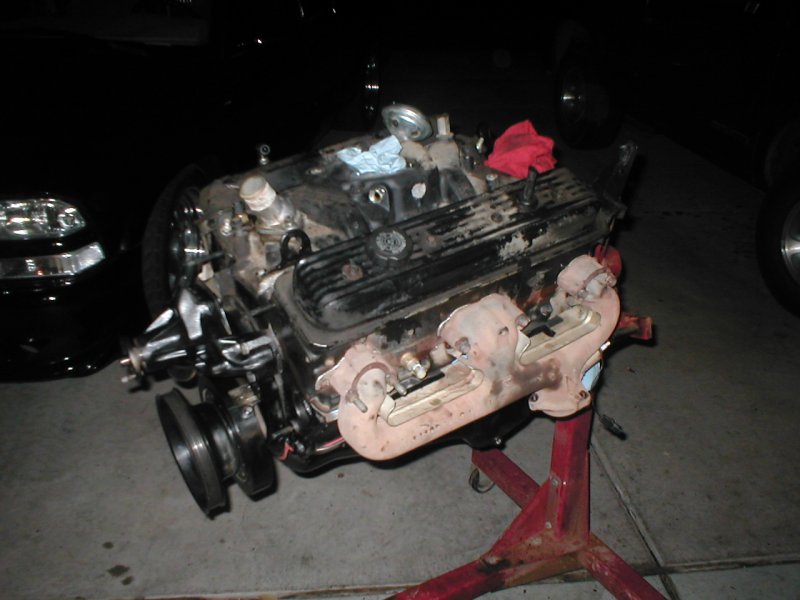 I put the motor back in the truck and it ran great. I proceeded to wheel it, and at some point incurred some body damage 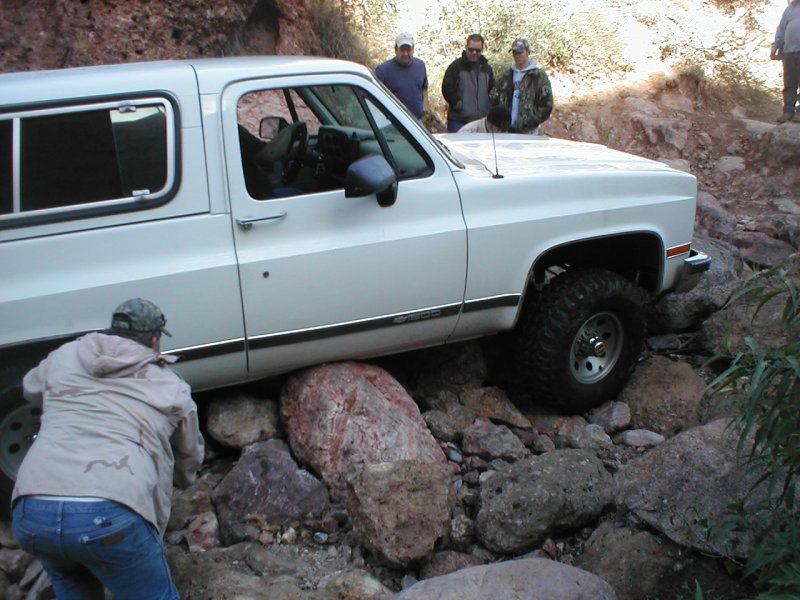 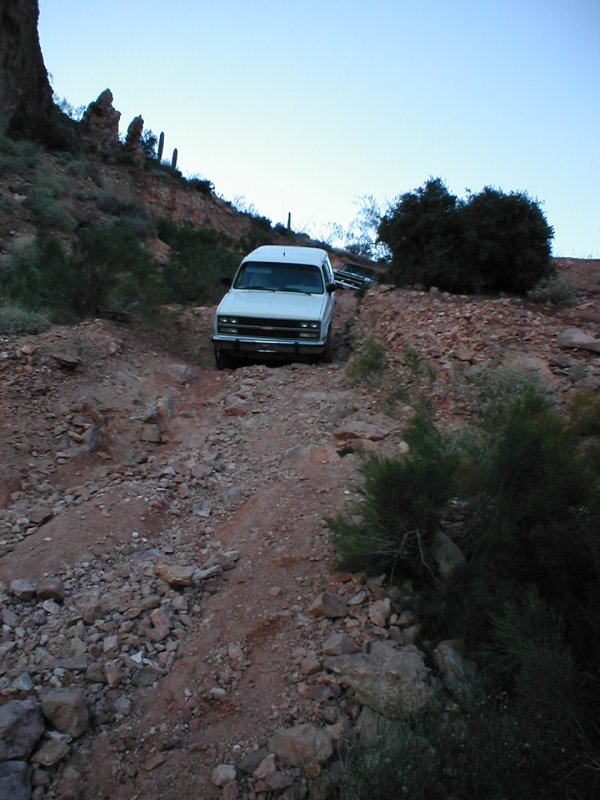 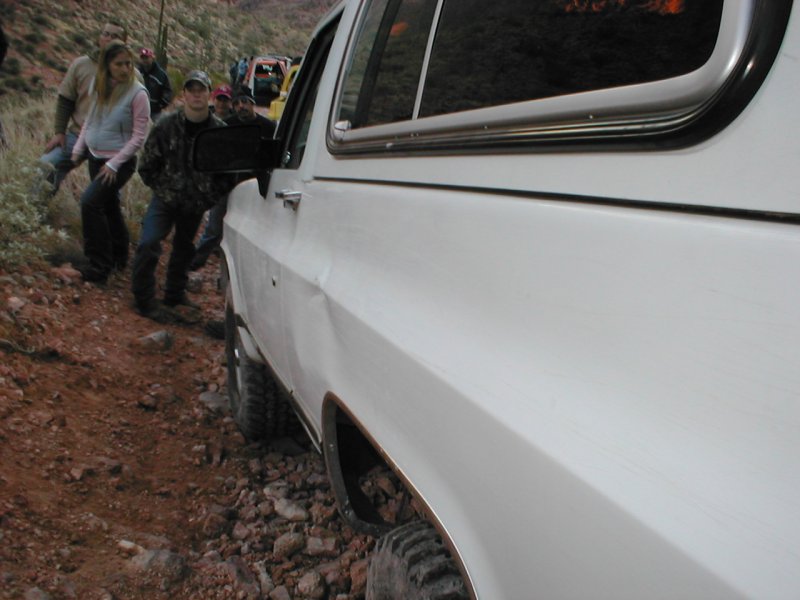 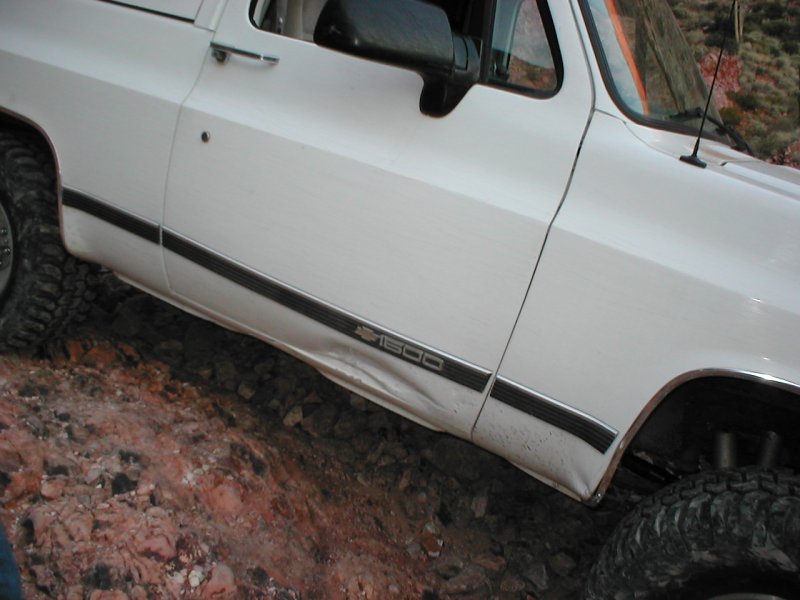 Now that I am faced with fixing the accumulated body damage I wish I had never taken the truck out on those trails without a lift. Live and learn, and boy did I learn! To be continued...
__________________
1991 V1500 Blazer (Silverado), 5.9L 12V P-pumped Cummins (5x .012 sac injectors, #6 fuel plate, WH1C with external 38mm wastegate running 30psi), NV4500 with 1-⅜" input shaft, SBC Con-O clutch, NP205, HAD, 4.10 D61/14BFF spinning 37" Nitto Exo's  "I got a shotgun, a rifle, and a four wheel drive and a country boy can survive." |

|

|
|
01-19-2016, 02:16 AM
|
#2 |
|
Registered User
Join Date: Jan 2016
Location: Mesa, AZ
Posts: 60
|
Re: A K5 Cummins Conversion: The saga continues...
I kinda skipped past an intermediate step: my first axle swap in the Blazer. This happened in October 2006. I wanted to eventually run 37" tires and I figured the 10 bolt rear wouldn't appreciate it too much. I found a 6 lug 9.5" 14 bolt for a reasonable price, stripped it completely apart, and got it ready to swap:
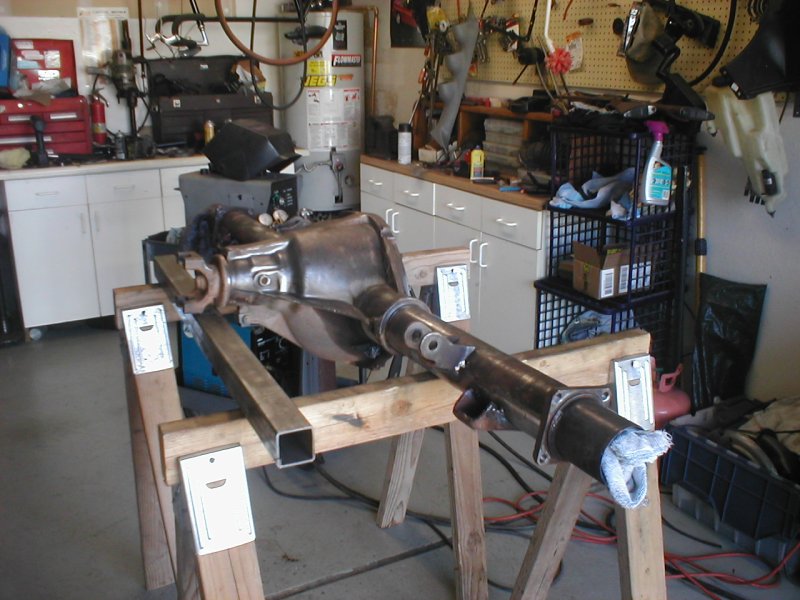 After re-gearing, new bearings, and paint it got swapped in: 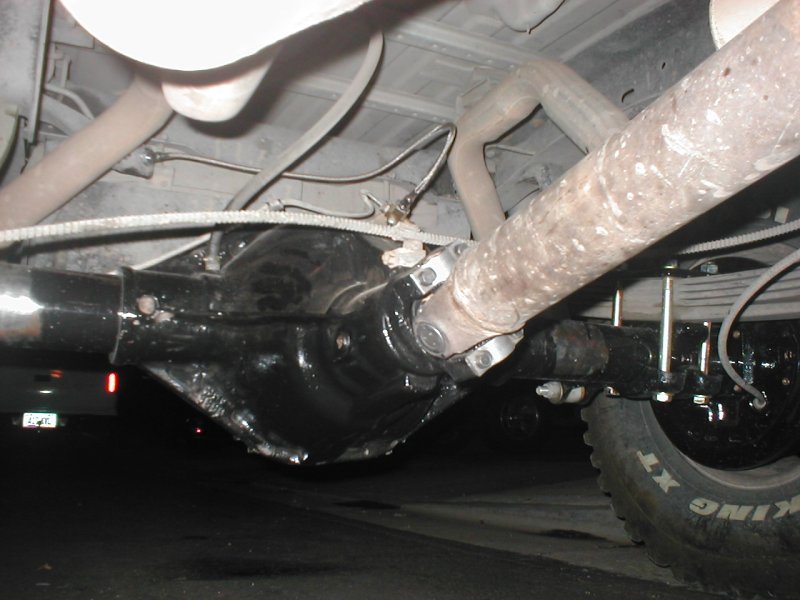  Now, I know what you're thinking: Big f**kin' deal, right? As far as the axle itself you'd be right as it's nothing special. However, this swap marked the beginning of The Slippery Slope  Sometime around mid-January of 07 I found a pair of 10b E-Lockers for sale on Ebay for a smokin' price Since I got such a good deal on them (one for my truck, one for my friend Todd's Jeep) I figured why not get some traction aids for the 14b with the savings. Todd, who also decided to run a 6-lug 14b in his Jeep, agreed. A few days later a pair of these arrived: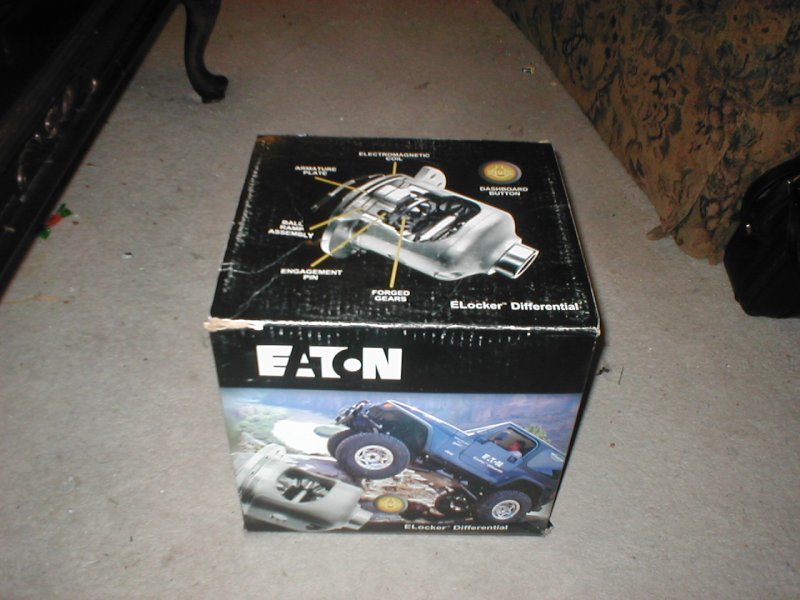 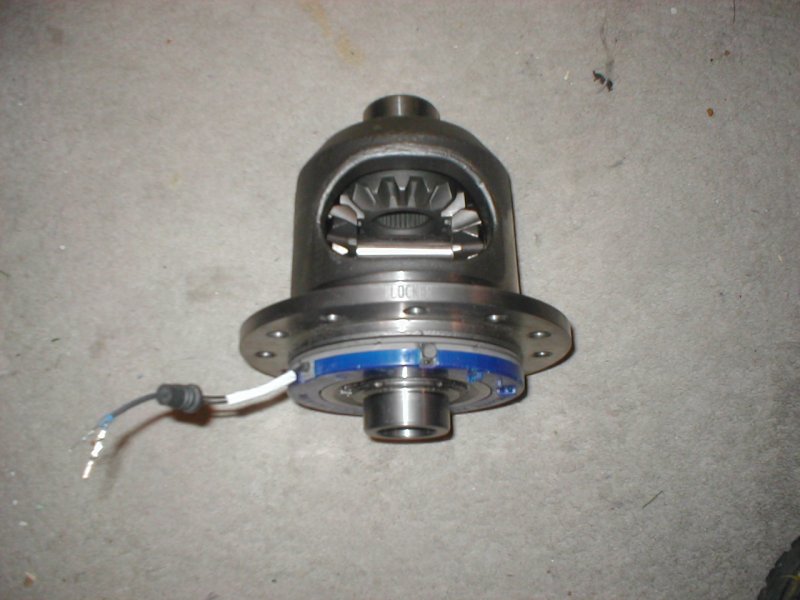 A couple months later I added comms gear in the form of an Icom 2720H dual band ham transceiver and a Rat Shack TRC-485 CB radio along with a Larsen dual band antenna for the ham rig and a Wilson 1000 for the CB: 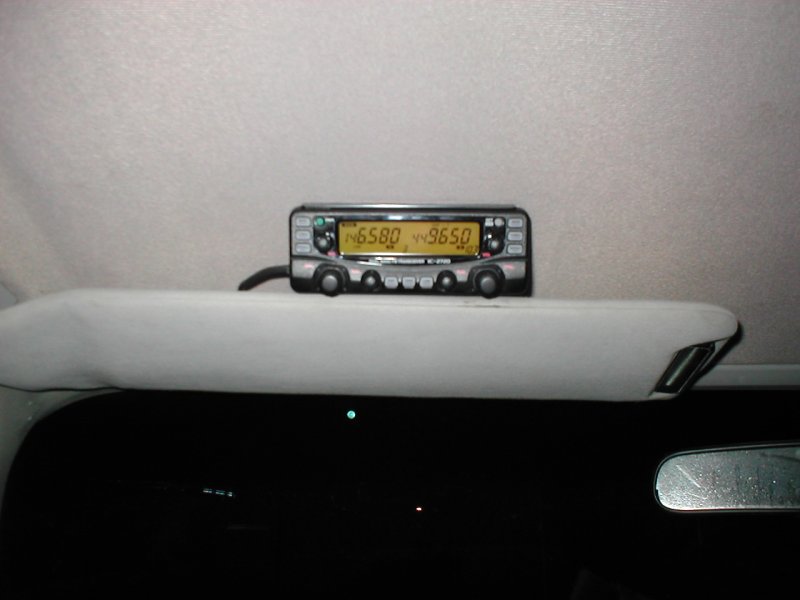 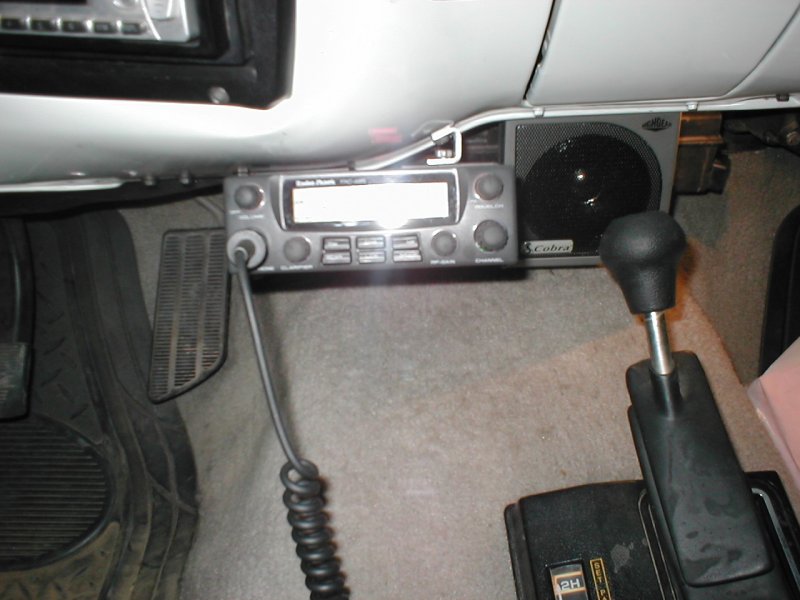 With newfound traction and comms I was able to tackle harder trails, and more body damage ensued  i really, REALLY needed bigger tires, and to fit them I needed a lift..... i really, REALLY needed bigger tires, and to fit them I needed a lift.....
__________________
1991 V1500 Blazer (Silverado), 5.9L 12V P-pumped Cummins (5x .012 sac injectors, #6 fuel plate, WH1C with external 38mm wastegate running 30psi), NV4500 with 1-⅜" input shaft, SBC Con-O clutch, NP205, HAD, 4.10 D61/14BFF spinning 37" Nitto Exo's "I got a shotgun, a rifle, and a four wheel drive and a country boy can survive." |
|
|
|
|
01-19-2016, 02:19 AM
|
#3 |
|
Registered User
Join Date: Jan 2016
Location: Mesa, AZ
Posts: 60
|
Re: A K5 Cummins Conversion: The saga continues...
Most guys increase tire size progressively: 33's to 35's to 37's and so on. I started with 32's when I bought the truck, and put 33's on it shortly thereafter. 33's are the biggest a Blazer will take without a lift. Like many others, I decided at some point I needed to go bigger. I ended up buying 37" Dick Cepek Radial FC-II's and mounting them on 15" Black Soft-8 steelies. Now, thesde tires wouldn't fit on my truck without a lift, but I already had a plan.
I scored a set of 2-1/2" lift Rancho prerunner springs from another wheeler. 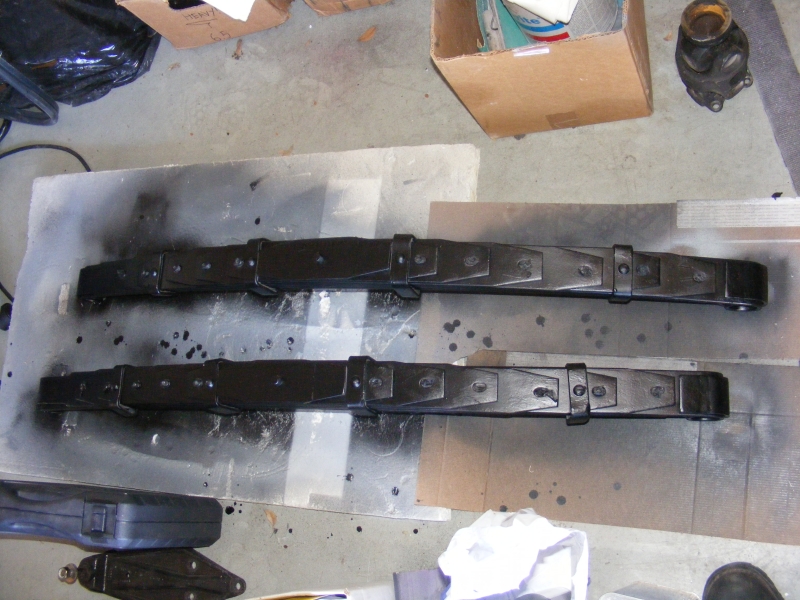 2-1/2" wasn't quite tall enough, so I built a pair of 1 inch "zero-rates" 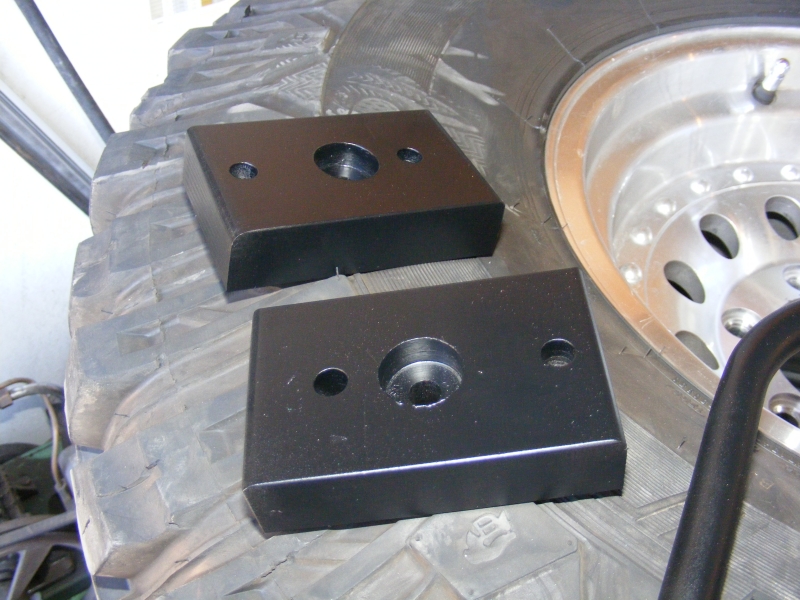 In order to avoid cutting the rear part of my fenders I moved the axle forward about 2 inches. Here's the result, with the then-new Cepeks mounted up: 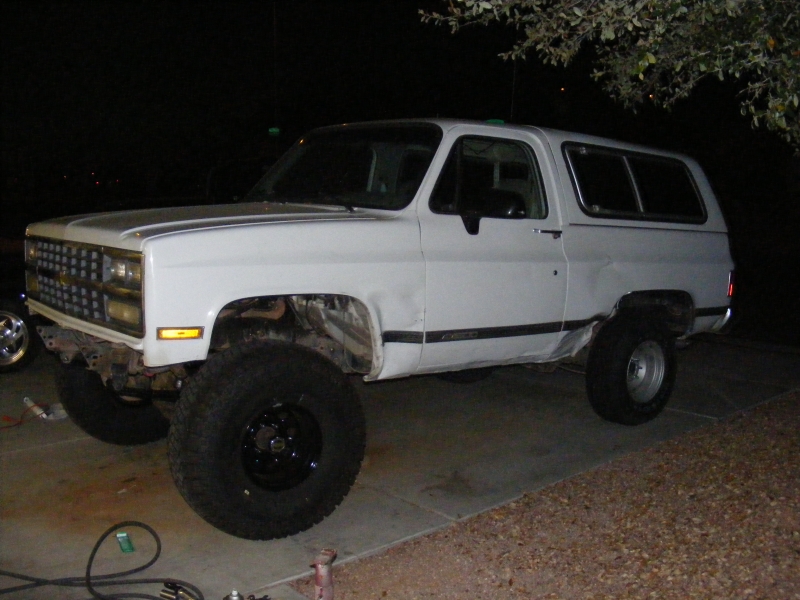 To lift the rear I used a shackle flip. A popular easy flip was the "Echobit" flip, which was a bracket that converted the stock tension shackle setup to a compression shackle setup. It required no cutting or removal of stock brackets and gave about 6 inches of lift. Since old Blazers usually suffer from saggy butt syndrome the extra bit of rear lift is welcome. I built my own Echobit-type brackets: 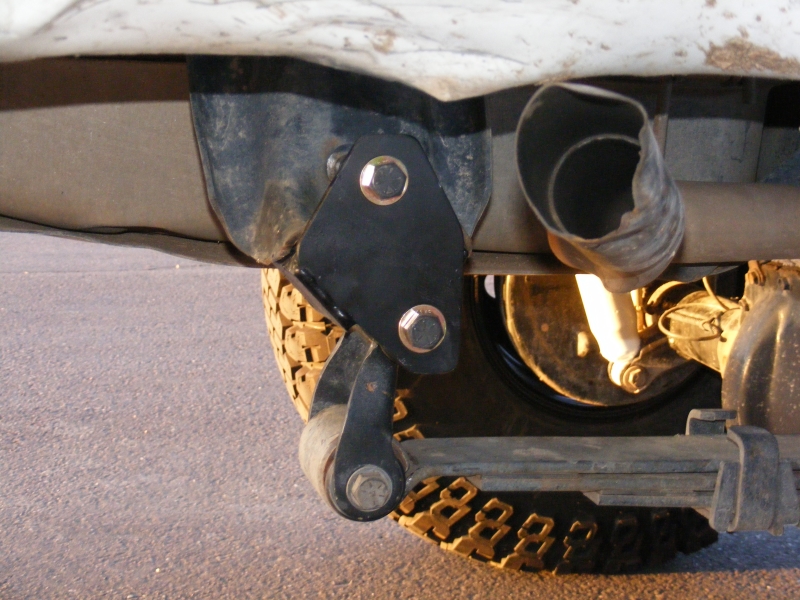 And the final result: 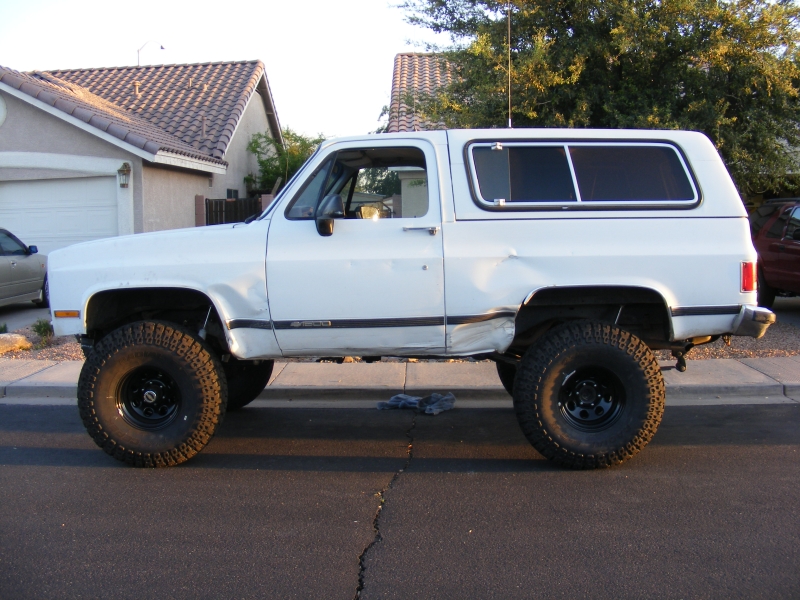 With big tires and wheeling I eventually ended up with the dreaded frame cracks around the steering box bolt holes. I welded the cracks up and welded some thick washers around the holes to hopefully prevent a recurrence: 
__________________
1991 V1500 Blazer (Silverado), 5.9L 12V P-pumped Cummins (5x .012 sac injectors, #6 fuel plate, WH1C with external 38mm wastegate running 30psi), NV4500 with 1-⅜" input shaft, SBC Con-O clutch, NP205, HAD, 4.10 D61/14BFF spinning 37" Nitto Exo's "I got a shotgun, a rifle, and a four wheel drive and a country boy can survive." |
|
|
|
|
01-19-2016, 02:29 AM
|
#4 |
|
Registered User
Join Date: Jan 2016
Location: Mesa, AZ
Posts: 60
|
Re: A K5 Cummins Conversion: The saga continues...
One thing everyone discovers about a lift and big tires is the effect it has on fuel mileage. Now, K5s aren't exactly the most aerodynamic design ever created, and in stock form I got 13-14MPG. With the lift and 37's I was getting consistent 11MPG tanks
From 1982-on, K5's were available with 6.2L diesels. They aren't powerhouses, but they are known for getting great fuel mileage. I had been on the lookout for one when a stroke of luck hit. My roommate at the time found a 1991 1 ton 4WD Chevy truck that was being sold by a county flood control department. He wanted the truck for the Dana 60 front axle, but I was interested because it had a 6.2L diesel engine! The best part was the fact that, being a flood control vehicle in AZ, it never had many miles put on it; the truck only had 50,000 original miles! We made a trade: the 6.2L diesel for my TBI 350. Within a couple days the truck was minus a front axle and this: 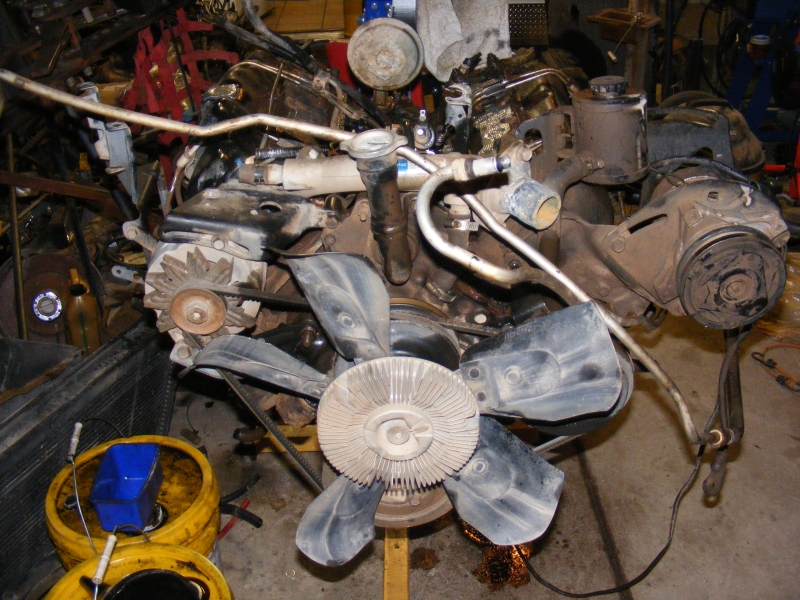 I had to pull the intake and do some cleanup. Mice had made a home in the valley, chewing through the supply hose to the injector pump and leaving all kinds of biohazard behind: 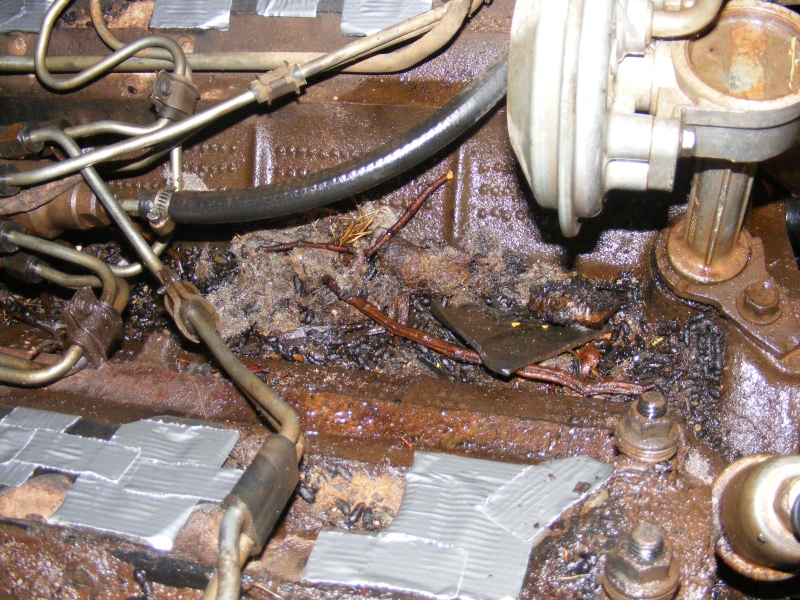 I got it all cleaned up, put back together, bumped the timing up a bit, and swapped it into my truck. Small block to 6.2 swaps are super easy since the engine drops right in using the same motor mounts and the trans bolts right up. I also swapped in the bigger diesel radiator and shroud, hydroboost, second battery tray, diesel instrument cluster, a Racor 10 micron filter assembly, and a few other odds and ends. Here's the result: 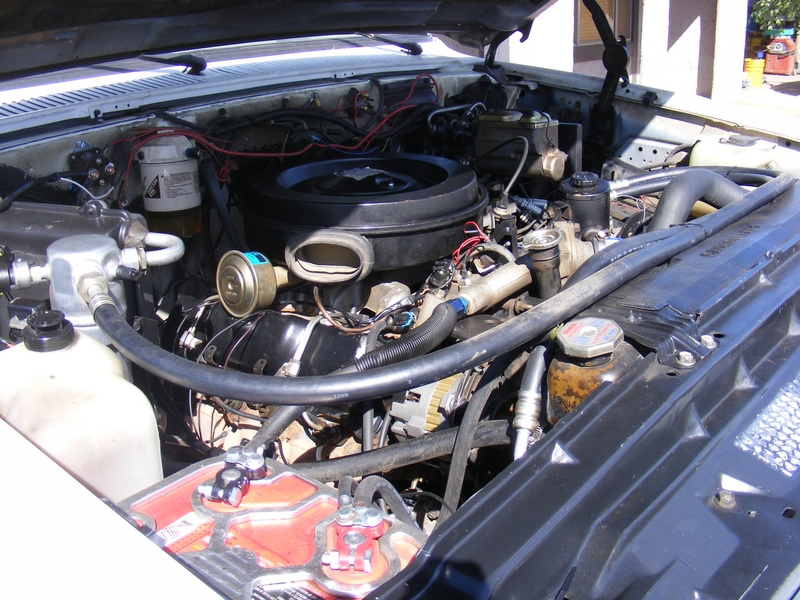 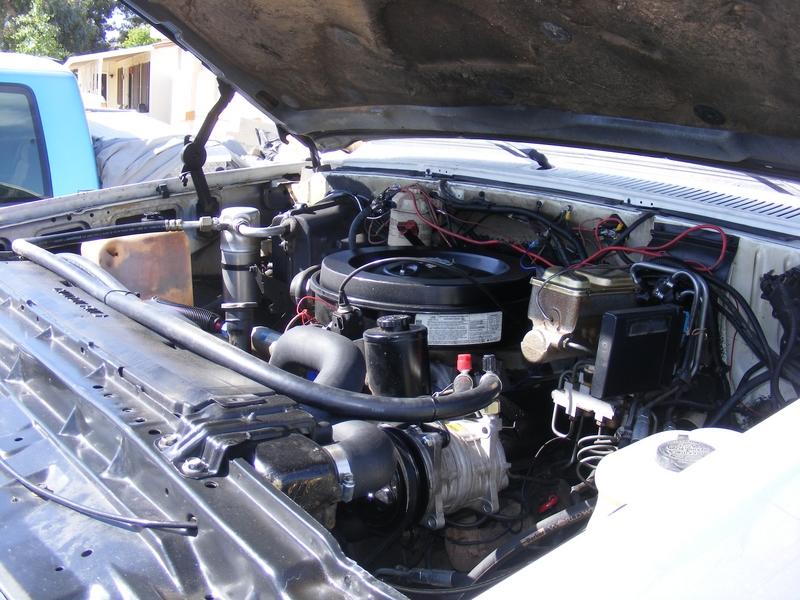 Not long after the swap it went on it's first off-road adventure as a diesel-powered K5. I went on a run to Crown King with members of the Hummer gang (yes, they actuallly wheel their H3's and H2's!). We even had some Jeep guys along for the ride, as well as an 80's Ramcharger: 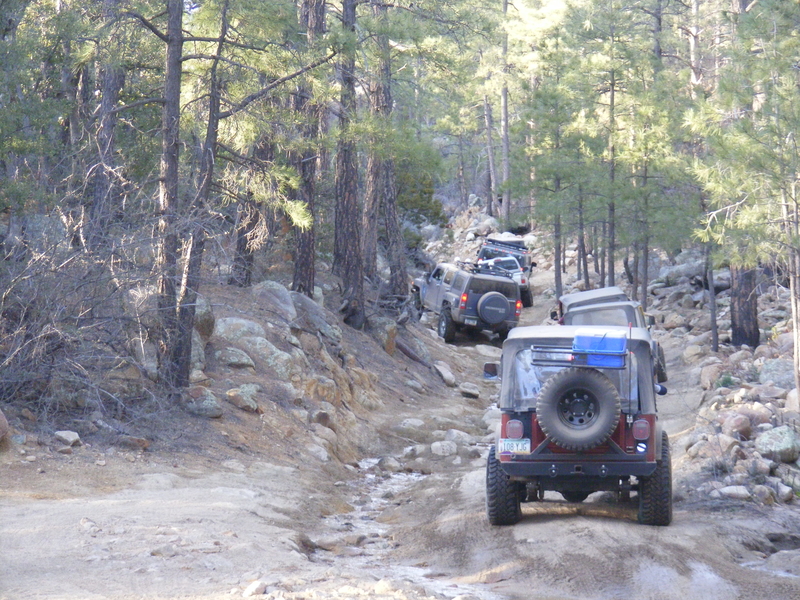 The 6.2 ran great. This particular engine was the last year that the 6.2 was offered, and at 165HP it was the highest horsepower J code 6.2 made. 165HP may not sound like much, but thanks to the extra helping of torque vs the 350 it was pretty spry. This run was done at the beginning of March 2009, and up near Crown King the elevation was high enough that there were still patches of snow on the ground: 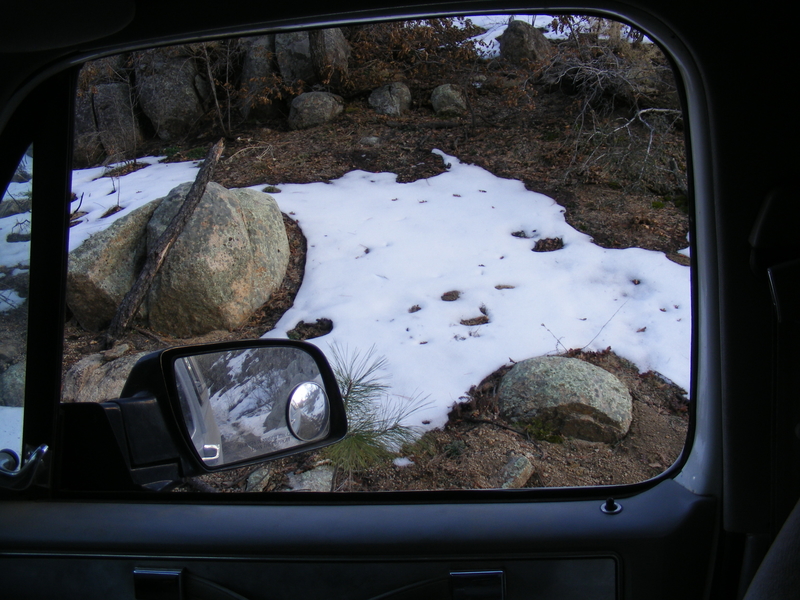 Around the time we hit the first traces of snow I snapped a couple pics of my gauges. The temp ran lower than the gas 350: 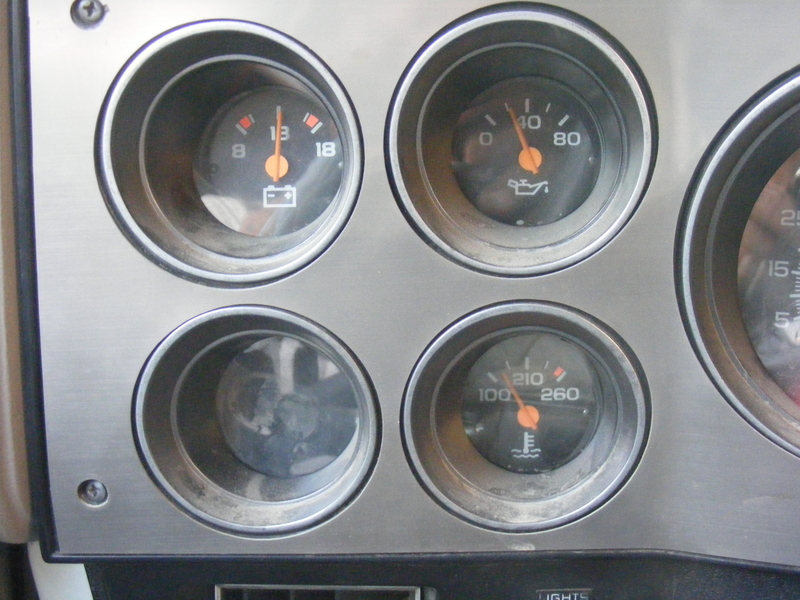 The best gauge pic is this blurry pic of the fuel gauge. Note that this is with about 90 miles on the tank, and 30 or so at low speed off road: 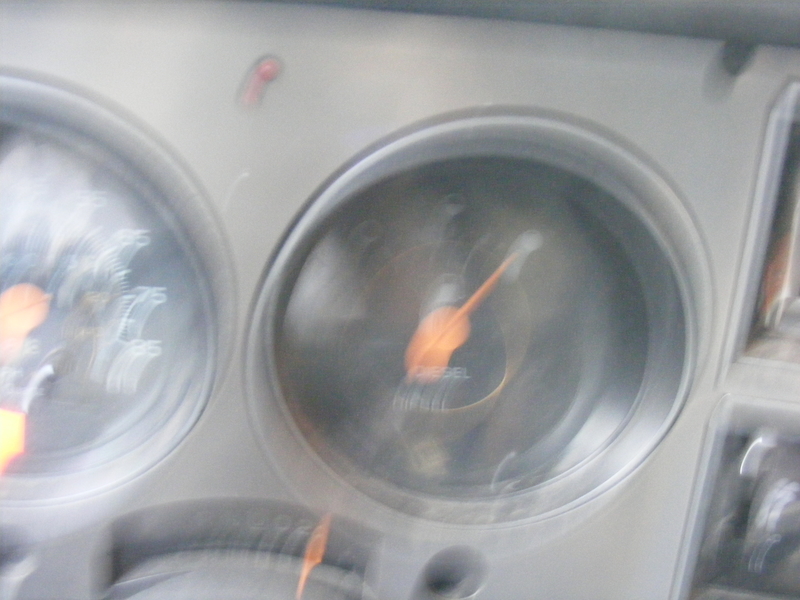 Gotta love the efficiency of a diesel engine! We finally roll into the thriving metropolis of Crown King and stop in the local watering hole for a hot burger and a frosty beer:  Well, that's it for now. Stay tuned for our next episode of "How Max ends up with a 12V Cummins in a K5 Blazer".
__________________
1991 V1500 Blazer (Silverado), 5.9L 12V P-pumped Cummins (5x .012 sac injectors, #6 fuel plate, WH1C with external 38mm wastegate running 30psi), NV4500 with 1-⅜" input shaft, SBC Con-O clutch, NP205, HAD, 4.10 D61/14BFF spinning 37" Nitto Exo's "I got a shotgun, a rifle, and a four wheel drive and a country boy can survive." |
|
|
|
|
01-19-2016, 02:42 AM
|
#5 |
|
Registered User
Join Date: Jan 2016
Location: Mesa, AZ
Posts: 60
|
Re: A K5 Cummins Conversion: The saga continues...
When we last left our intrepid swapper he was enjoying a burger and beer in Crown King after enjoying the fuel-sipping economy of a 6.2L GM diesel. At that point, I should have simply been happy with the swap, cleaned up a few odds and ends (i.e. wiring), and started on some bodywork to fix the previous wheeling damage. Had I done this I would have saved a bunch of money and time, and been using my truck for the last few years rather than working on it.
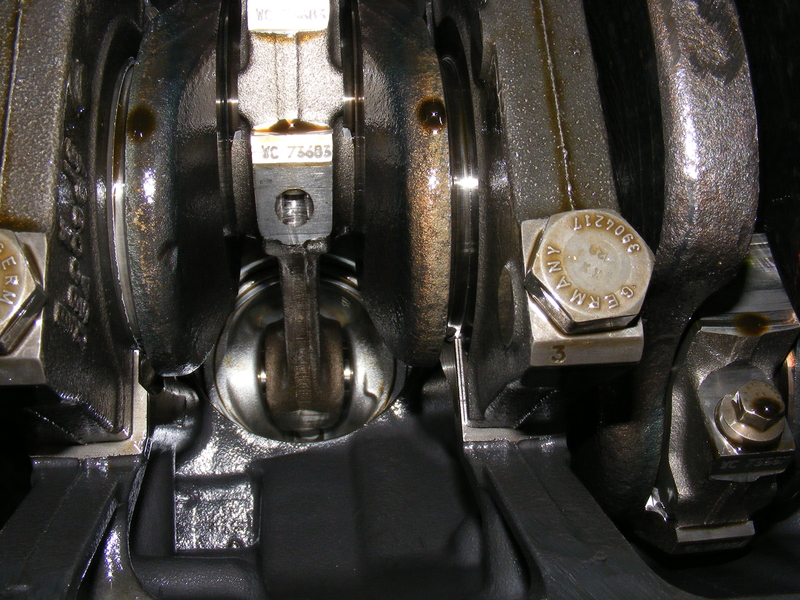
 By this point my interests in wheeling and how I wanted to use my truck had changed dramatically. I was no longer interested in spending a day wheeling stupidly difficult terrain, only travelling a mile or three, damaging my truck, and not really going anywhere or doing anything. I preferred the type of wheeling I had just completed with the Hummer and Jeep guys, more of the scenic exploration over moderate terrain. I also wanted it to remain a camping and hunting rig - a RELIABLE camping and hunting rig! For these uses the increased range and economy were very welcome, but at 165HP I had lost 35HP over the gas engine, and it was most noticeable on mountainous highways. I had already researched adding a turbo, and in fact had laid my hands on a Holset HY-35 as well as a set of 6.5 turbo exhaust manifolds. I was also concerned about the future reliability of the 4L60 trans, so I had obtained a late model, aluminum-top SM465 manual transmission, but the trans swap wouldn't happen until after the 6.2 was turbo'd and had the fuel turned up. Three things happened that would change my plans for the 6.2. The first was Nick's suburban build (the bastidge!!) This made me think a Cummins swap into my Blazer would be uber-cool, but I figured it would be too expensive and so I didn't really consider it too seriously at the time. The second thing was another friends decision to do a 12V swap into his 1991 square body crew cab Chevy to replace his gas-swilling 454. Now, normally a Cummins swap donor comes in the form of either a complete Dodge truck, or an engine pulled from a Dodge truck, and the price tags are usually north of two grand for a real high miler and three+ for something between 100k and 150k miles. Minimum. Often they are even more.Then we found a guy who scraps out medium duty delivery trucks and busses and had P-pumped Cummins engines that he had pulled. And he was asking only a grand for a good runner! We went down there, fired one up, and it purred like a very loud kitten. Good oil pressure, minimal blowby, immediate starting, everything you look for, Cash changed hands and my friend hauled his prize home.. Which brings me to the third thing: I had just got my tax return from Uncle Sam, and it was way more than enough for one of these MD engines. I already had the Cummins itch, and now I had money burning a hole in my pocket. With a complete lack of forethought or planning I piled into my friend's crew cab, headed down to the guys yard, listened to another engine run, and traded money for a half ton of Cummins:   The first thing you notice is that it is BIG. The second is that it is incredibly scuzzy. It took a whole day of degreaser, oven cleaner, pressure washer, and elbow grease to get it cleaned up. The oven cleaner, pressure washer, and elbow grease also blew off much of the paint, so I had to paint it. I sprayed 5 Star Xtreme epoxy primer on first, since there was a fair bit of bare metal showing after the cleanup job. The paint used is Western's 3rd Dimension acrylic urethane in genuine Cummins beige (for future reference, the 3rd Dimension number for that color is DS-7366-A). I used 3rd dimension because I already had the reducer and hardener from another project, it's fairly durable, and it only costs $20 a pint.   Those who notice little details will see that the pic of the engine in the bed of the crew cab has a front sump and an SAE #2 flywheel housing, while the painted engine has a rear sump and a Dodge second-gen flywheel housing. The pan on a Cummins is reversible, but the oil pickup isn't. Getting a rear sump pickup required a trip to the local Freightshaker parts joint and trading the counter guy a sizeable wad of cash for the pickup I needed. The flywheel housing came from a guy on 4BT swaps and was much more reasonably priced. I also installed a new pan gasket and replaced the rear main seal, but that wouldn't be the last of the repairs needed before the engine could be installed. When I had the pan off to rotate it and swap the pickup I decided to check the main and rod bearings. The mains were in excellent shape. 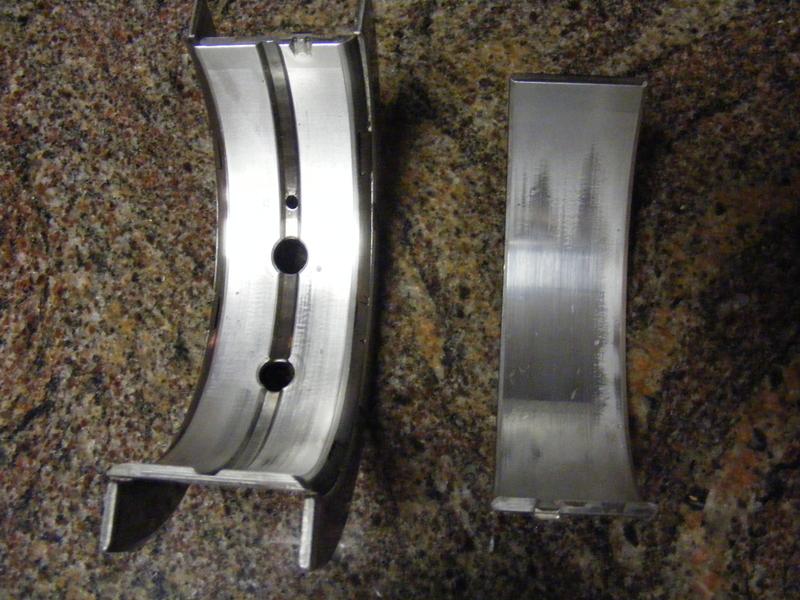 The rod bearings, not so much... 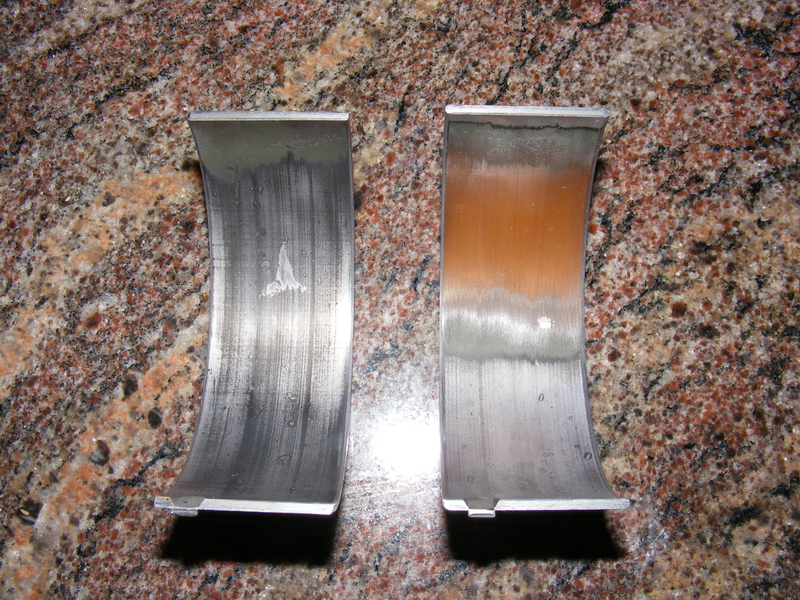 You can see the bearing material is completely worn off in one area of the top bearing half, exposing the copper layer beneath, while a strange mark is eroded into the other half (looks like a three pointed star). I did some research and found that the exposed copper is likely due to lugging the engine excessively, while the strange mark is cavitation erosion. The cavitation erosion is apparently common on Cummins rod bearings after enough hours are on the engine and don't seem to do any harm since that portion of the bearing is lightly loaded.. The lugging damage is not normal, but is expected from the types of folks who drive busses and delivery vans ") Anyway, the crank surfaces were fine so I replaced the rod bearings with gen-u-ine Cummins replacements. Anyway, the crank surfaces were fine so I replaced the rod bearings with gen-u-ine Cummins replacements.The next item that needed attention was the turbo. It had lost it's thrust bearing causing the compressor wheel to get cozy with the compressor housing. That required another significant outlay of cash, this time to the local turbo parts shop: 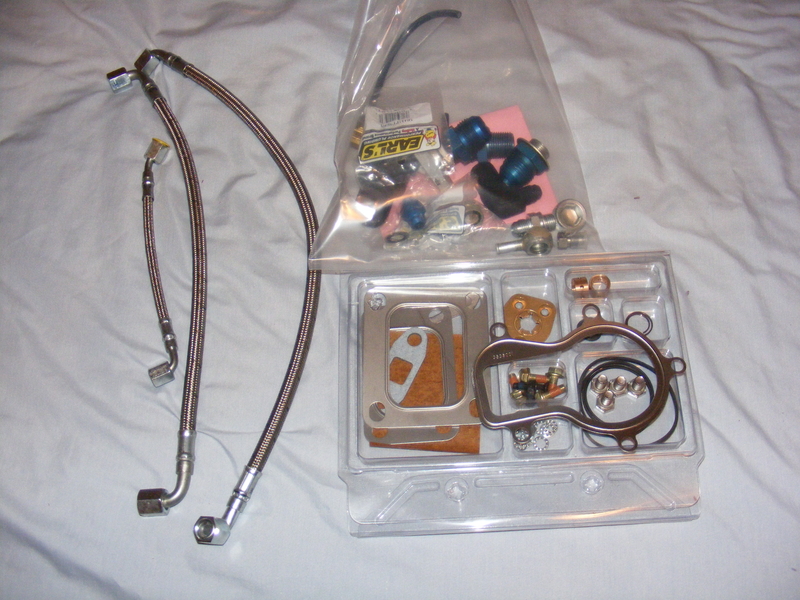 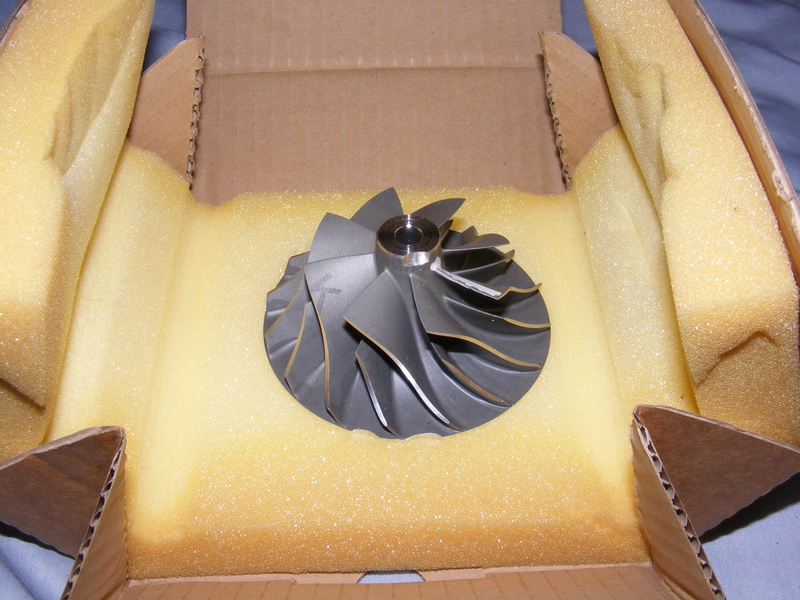 As my wallet gets bled dry I keep telling myself "This is fun!" Stay tuned for the next episode called "Ramen noodles and Cummins mods"...
__________________
1991 V1500 Blazer (Silverado), 5.9L 12V P-pumped Cummins (5x .012 sac injectors, #6 fuel plate, WH1C with external 38mm wastegate running 30psi), NV4500 with 1-⅜" input shaft, SBC Con-O clutch, NP205, HAD, 4.10 D61/14BFF spinning 37" Nitto Exo's "I got a shotgun, a rifle, and a four wheel drive and a country boy can survive." |
|
|
|
|
01-19-2016, 02:57 AM
|
#6 |
|
Registered User
Join Date: Jan 2016
Location: Mesa, AZ
Posts: 60
|
Re: A K5 Cummins Conversion: The saga continues...
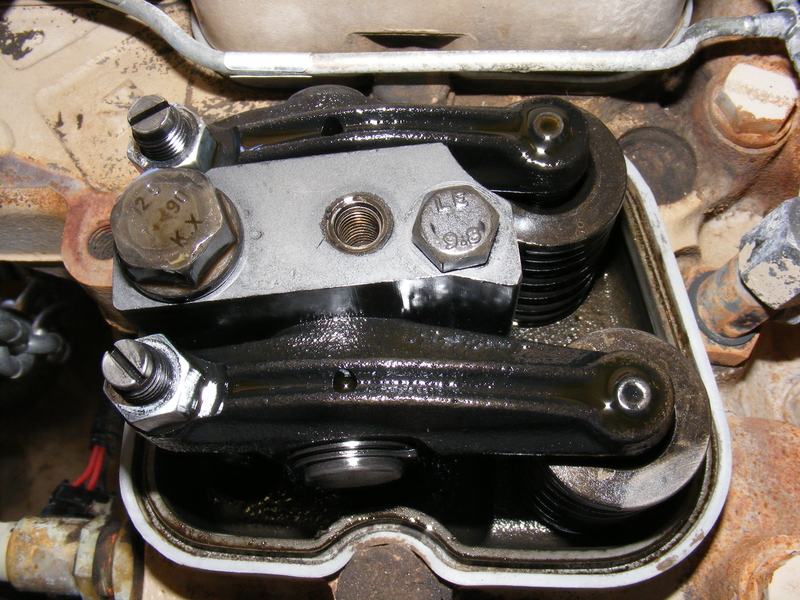
In the last installment I was talking about mods and repairs to get the engine ready for the swap. I forgot to show pics of the inside of the crankcase and rocker boxes. I don't know how many miles this engine had on it, but it definitely had it's oil changed at proper intervals. In fact, it was likely changed more often than needed judging by the level of cleanliness:
  Of course, while I had the valve covers off I went ahead and adjusted the valves. I also bumped the timing from 12.3° to 15°. This requires removal of the injector lines and #1 delivery valve holder from the injector pump. Removal of the timing cover isn't necessary, but it definitely made the job easier: 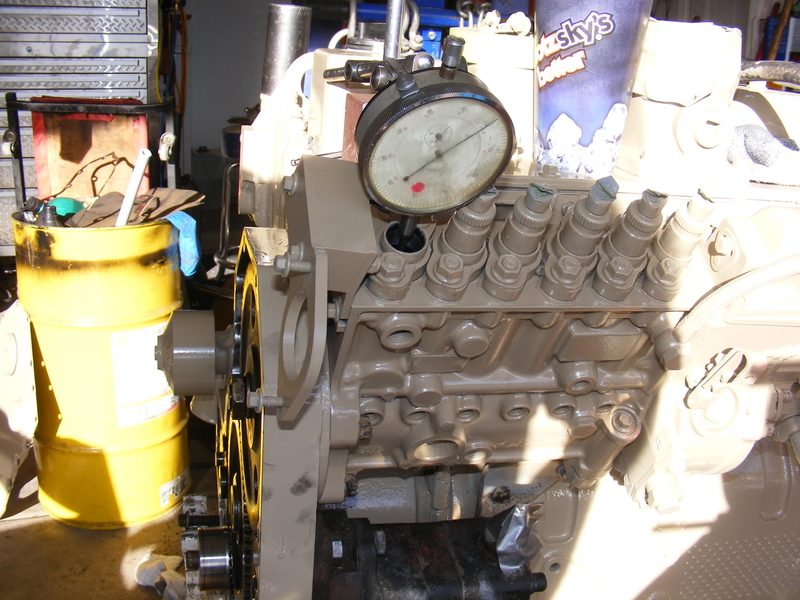 I won't go into details, but suffice it to say that plunger lift (indicated with the dial indicator) correlates to a certain amount of timing advance. It's a pretty simple procedure really. By advancing the timing I gained power AND economy. A win-win. In my previous post where I showed a pic of a turbo rebuild kit there were also steel braided teflon AN hoses and a bag of fittings. The fuel, turbo oil, and IP oil feed lines were pretty beat, and stock Cummins replacements were ridiculously high priced, so I replaced them with lines I had built. This required converting the fuel and turbo oil feed fittings to AN, and even then it was still substantially cheaper than buying just the hoses from Cummins. Here's the IP fuel feed line in place, along with a new fuel filter: 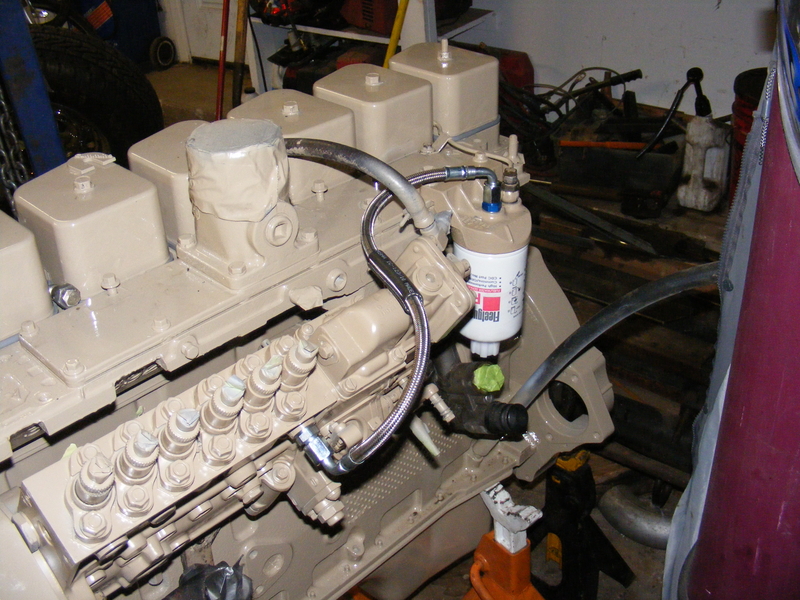 I also installed the IP oil feed line (the small -3 line in the pic with the turbo parts). Oil lubrication, as opposed to fuel lubrication, is one of the reasons the P7100 pump has the reputation for being as tough as an Army boot. Way back when, I had a V6 Camaro that I turbocharged. Before I sold that car I reverted it back to stock, and I sold off most of the parts. However, I still had the wastegate and the variable pressure regulator valve used to control it. I decided it would be cool to tie the turbo's internal wastegate shut and run the external gate. That way I could adjust the boost as needed, and the dual ported external gate would better compensate for altitude... in theory. It also would look cool, right? Right! I picked a spot on the exhaust manifold between the two discharge plenums where I wanted to mount the wastegate and welded the mild steel flange in place with Eutectic 680 rod. I used a lot of preheat, welded 1" long stringer beads, and peened the welds with a needle scaler in order to prevent cracking. It must've worked, because it remains crack-free to this day. Next, I cut a 1-½" round hole with a hole saw. Then I used a drill to cut away the part connected to the center divider until the holesaw-cut part came free. I cleaned up the cuts a bit with a rotary file, drilled and tapped the 5/16" coarse thread holes for the wastegate mounting bolts. At that point I ended up with this: 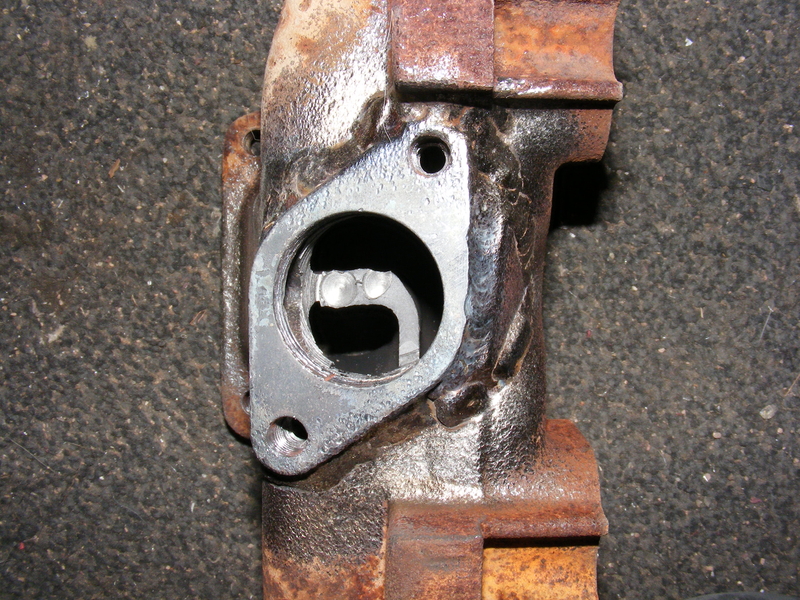 After milling the mounting flange flat I bolted the wastegate on with stainless steel bolts: 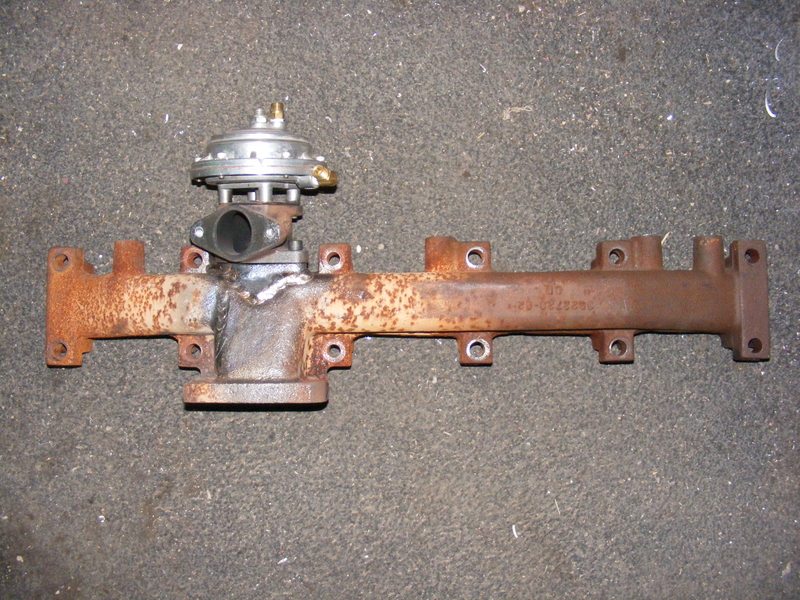 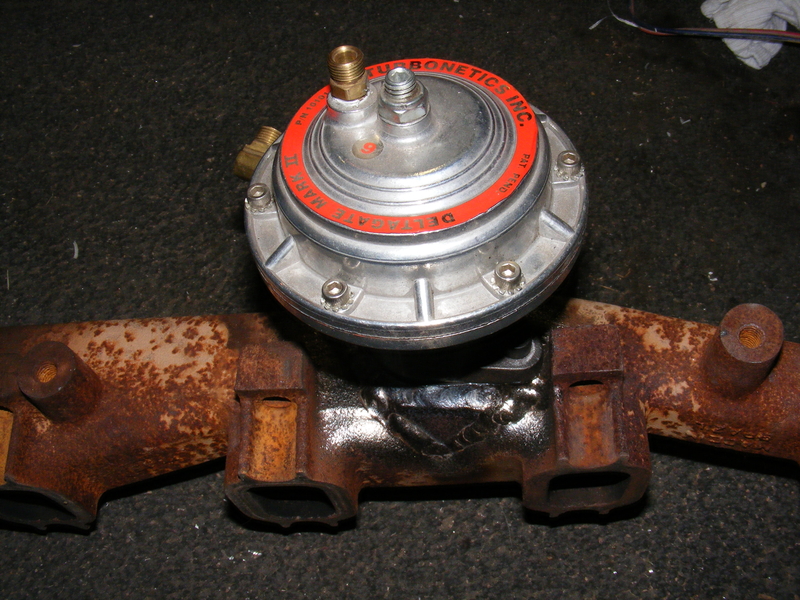 After painting and baking the manifold and bolting it to the engine with new stainless steel bolts (anti-siezed of course) it looks even better: 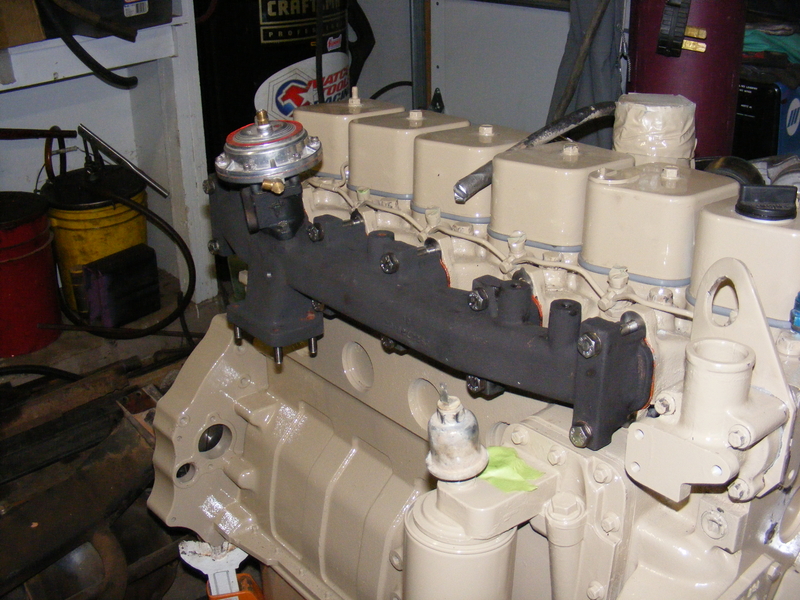 While I was at it, I cleaned, painted, and baked the turbo cast iron parts since they looked like rusty pieces of you-know-what: 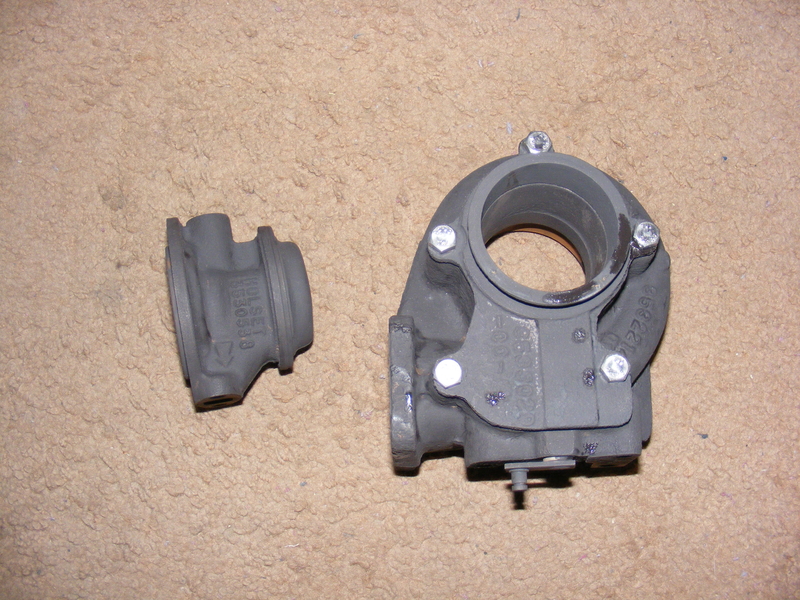 In this first incarnation I had decided to use an SM465 4 speed manual with 3.42 gears in the axle to eliminate the need for overdrive. The common manual trans for a Cummins swap is the NV4500, but I didn't like the 4500 for numerous reasons (just wait till later in the saga - you're gonna laugh your asses off ). The 465 has a big 1-1/2" input shaft available for it, and along with an NV4500 bellhousing and South Bend clutch it was an easy matter to get it to bolt up to the Cummins: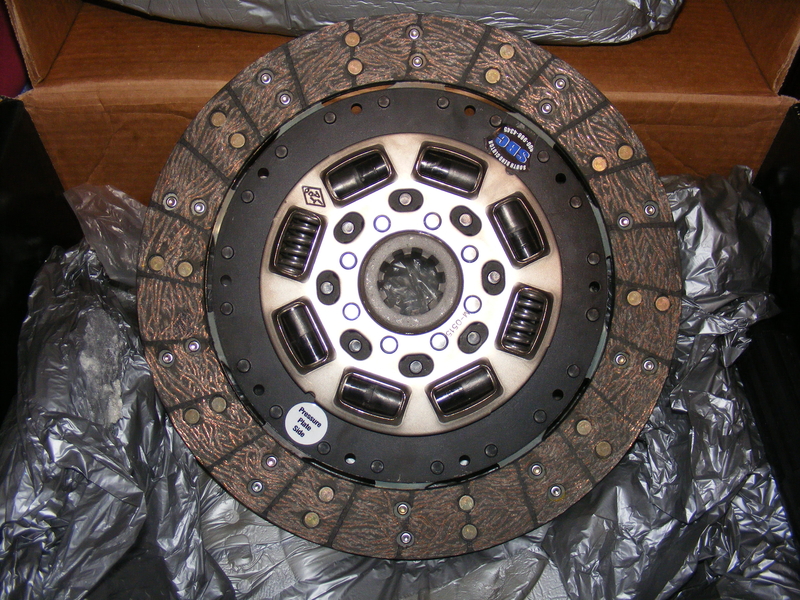 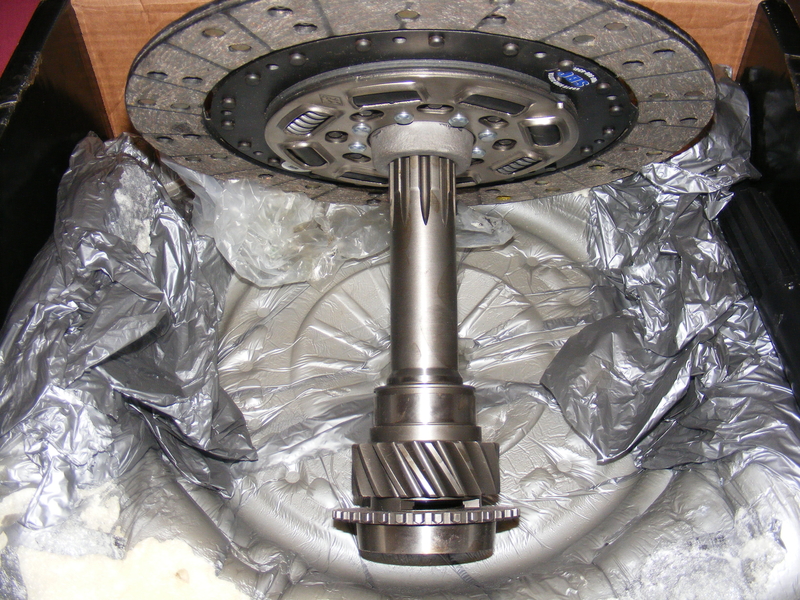 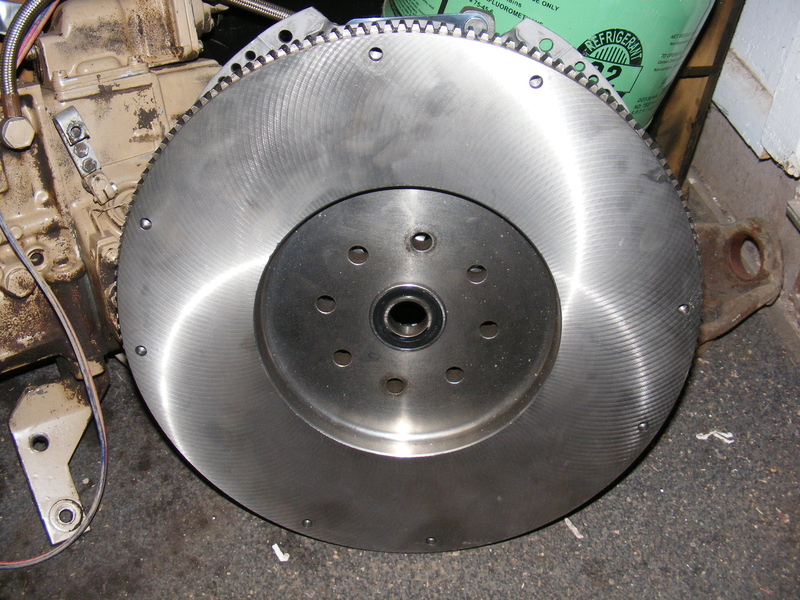 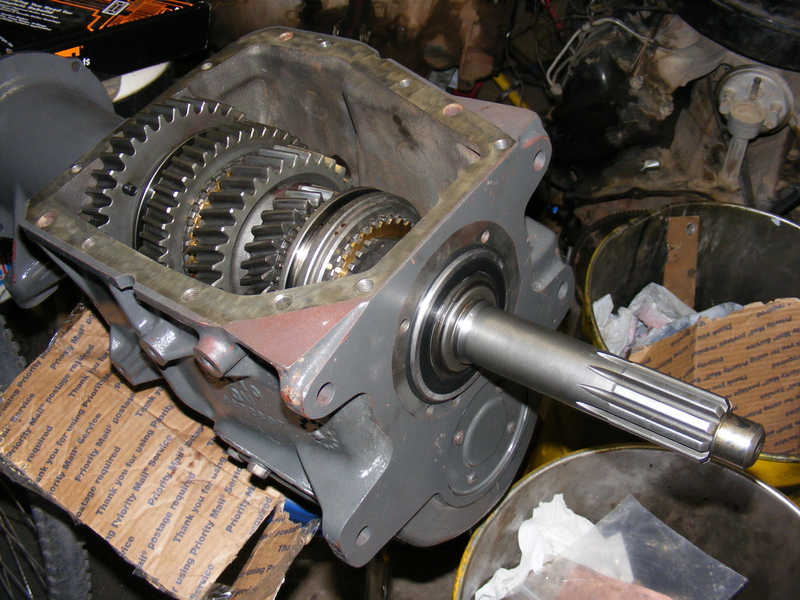 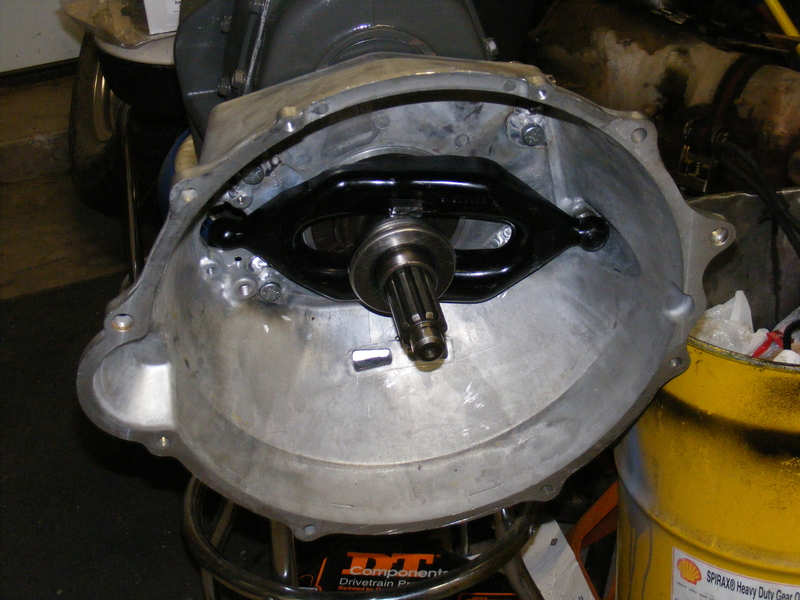 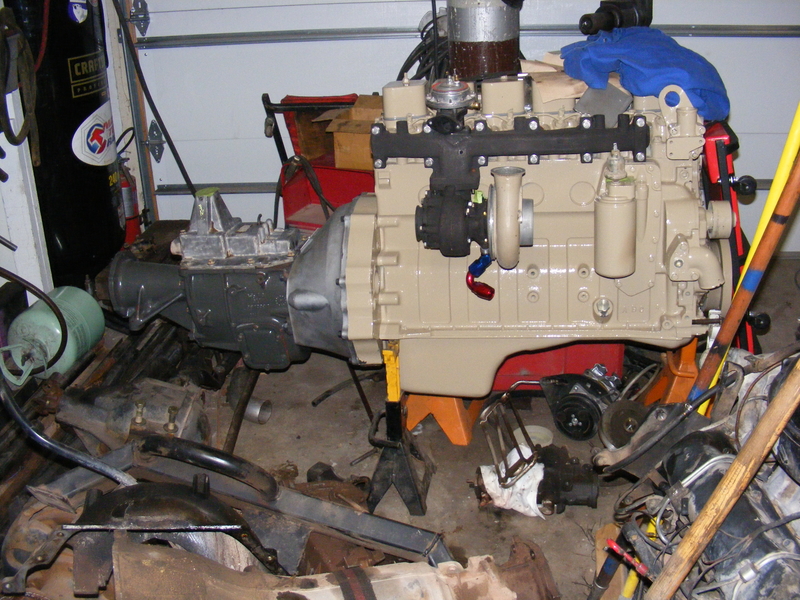 In that last pic you can see the turbo is assembled and mounted to the manifold. I had the turbo rotating assembly balance-checked at the turbo shop and it was perfect, so there were no show-stoppers. The last minor doo-dad I made for the turbo setup was an AN drain fitting for the block. The stock drain is simply a pressed in pipe, and I wanted to use -12 AN, so I turned down a -12AN male to male pipe, pressed a piece of 3/4" OF steel onto it, and ended up with a fitting that would press into the block and give me the -12AN drain port that I wanted: 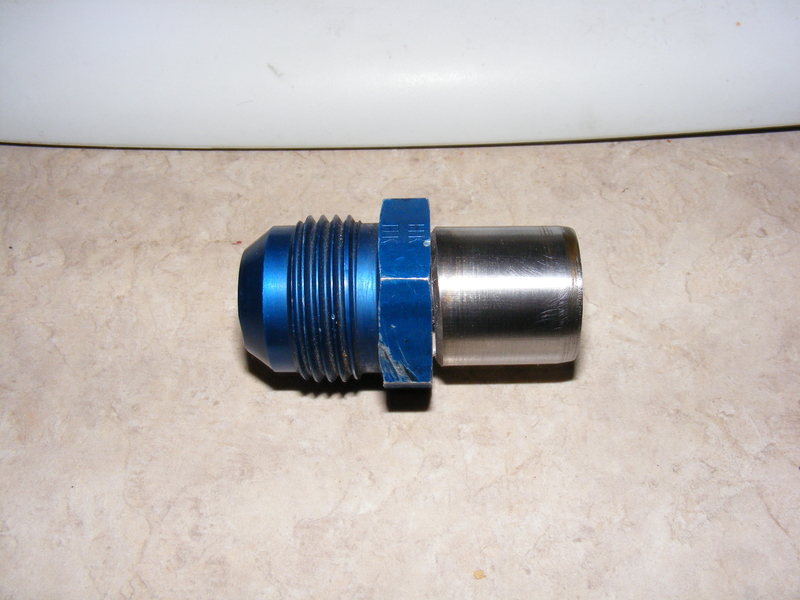 At this point the engine was ready to mount into the truck. Things like accessory mounts were still needed, but I wanted to put the engine in the truck before I designed the mounts. Stay tuned for the next episode appropriately titled   
__________________
1991 V1500 Blazer (Silverado), 5.9L 12V P-pumped Cummins (5x .012 sac injectors, #6 fuel plate, WH1C with external 38mm wastegate running 30psi), NV4500 with 1-⅜" input shaft, SBC Con-O clutch, NP205, HAD, 4.10 D61/14BFF spinning 37" Nitto Exo's "I got a shotgun, a rifle, and a four wheel drive and a country boy can survive." |
|
|
|
|
01-21-2016, 02:04 PM
|
#7 |
|
Registered User
Join Date: Oct 2015
Location: SouthWest, PA
Posts: 15
|
Re: A K5 Cummins Conversion: The saga continues...
Awesome Build. Great attention to details. I need to do stronger cross-members in mine like you have. Too many hard launches has tweaked mine just a tad.
Keep the pics coming!
__________________
1970 C/10 | Short Bed | 2wd | 12-Valve Cummins 6BT | 47RH Auto Instagram | usetheBFH Coal Chute http://c10forum.com/forum/showthread.php?t=19671http:// |
|
|
|
|
01-21-2016, 10:56 PM
|
#8 | ||
|
Registered User
Join Date: Jan 2016
Location: Mesa, AZ
Posts: 60
|
Re: A K5 Cummins Conversion: The saga continues...
Quote:
Quote:

__________________
1991 V1500 Blazer (Silverado), 5.9L 12V P-pumped Cummins (5x .012 sac injectors, #6 fuel plate, WH1C with external 38mm wastegate running 30psi), NV4500 with 1-⅜" input shaft, SBC Con-O clutch, NP205, HAD, 4.10 D61/14BFF spinning 37" Nitto Exo's "I got a shotgun, a rifle, and a four wheel drive and a country boy can survive." |
||
|
|
|
|
01-22-2016, 02:36 AM
|
#9 |
|
Registered User
Join Date: Jan 2016
Location: Mesa, AZ
Posts: 60
|
Re: A K5 Cummins Conversion: The saga continues...
The next thing I addressed was the turbo oil drain. When I pulled the boost tube off during the reseal there was a fair bit of oil on the inside. The oil could be due to one or more reasons: Maybe the turbo seals aren't sealing? Maybe there is too much oil feed? Maybe my drain didn't have a steep enough slope?
I decided to address the latter two potential issues. If the turbo seals aren't working I will need either a new turbo (HE351VE would be sweet!) or more new parts for my WH1C. Now, the problem with fixing the drain is that I would have to redo the right side motor mount in order for the drain line to have a straight shot. Since I wan't really happy with the mounts anyway I figured I may as well replace them both. The previous mounts, using urethane spring bushings, absorbed engine vibes quite well so I saw no reason not to use the spring bushings in the new mounts. I liked the tube mounts Todd built for the LQ4 engine in his Jeep, so I figured I would make tube mounts as well. This is what I ended up with: 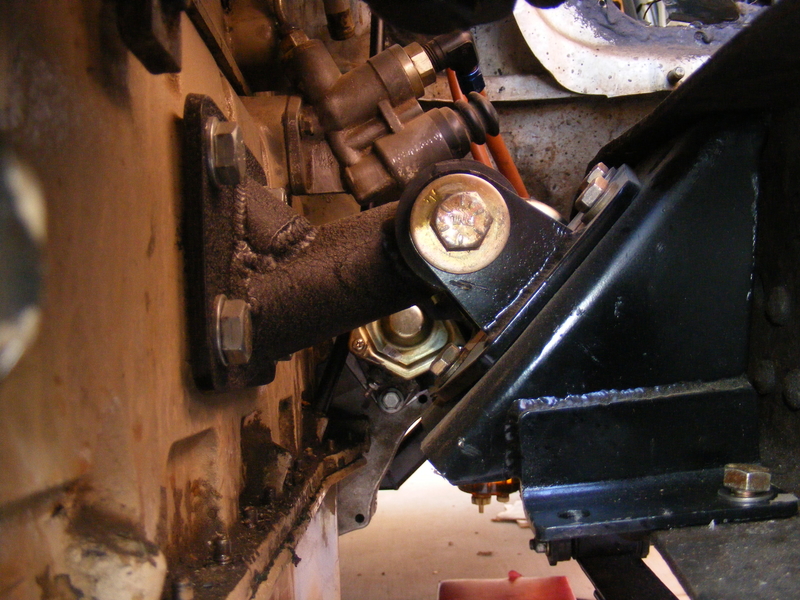 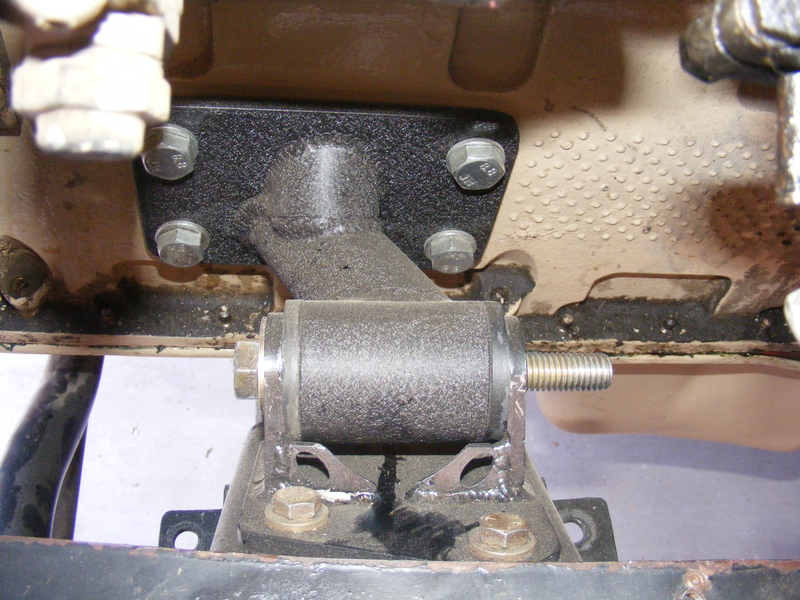 The tube between the engine-side plate and the bushing is 1-¾" .120" wall 4130, with a wedge of the same welded in as a gusset. Assuming the welds don't crack it should be plenty strong. Here is the right side mount along with the new turbo drain plumbing: 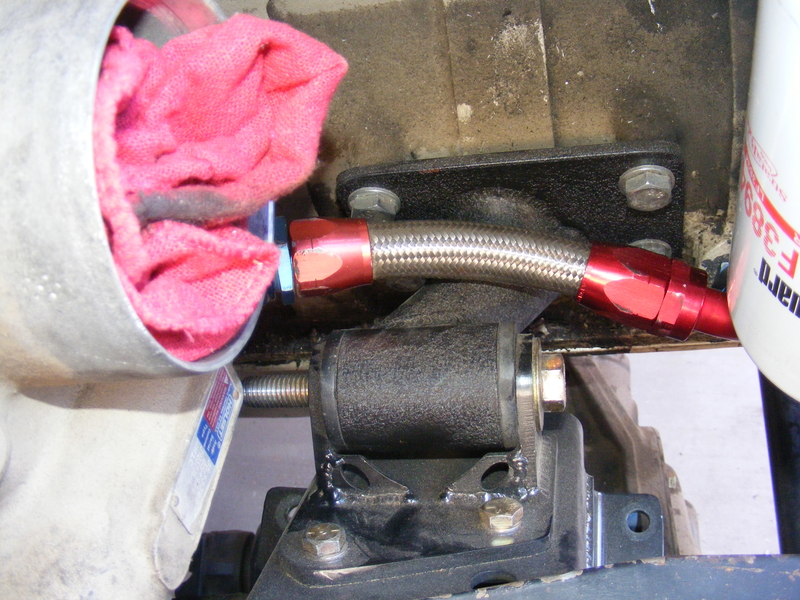  Along with the mounts proper I also modified the frame-side mount perches and made a new crossmember that better ties both sides together:  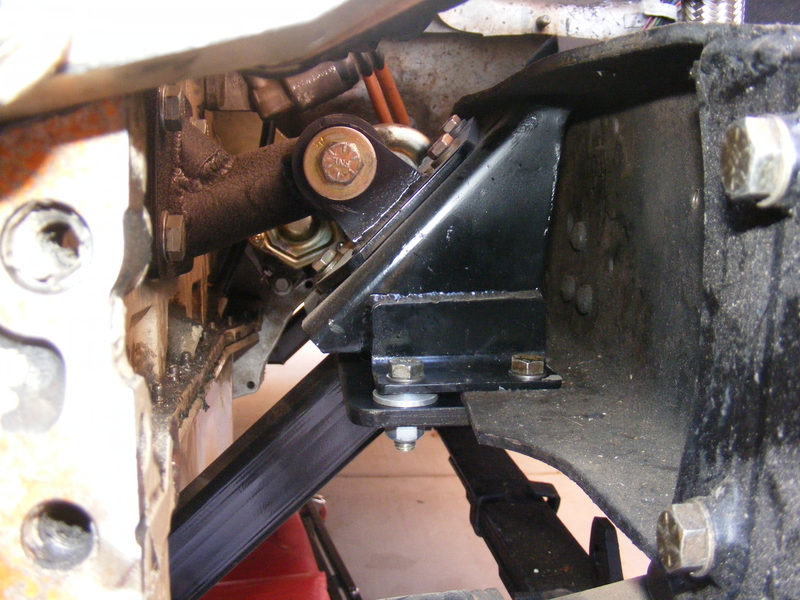 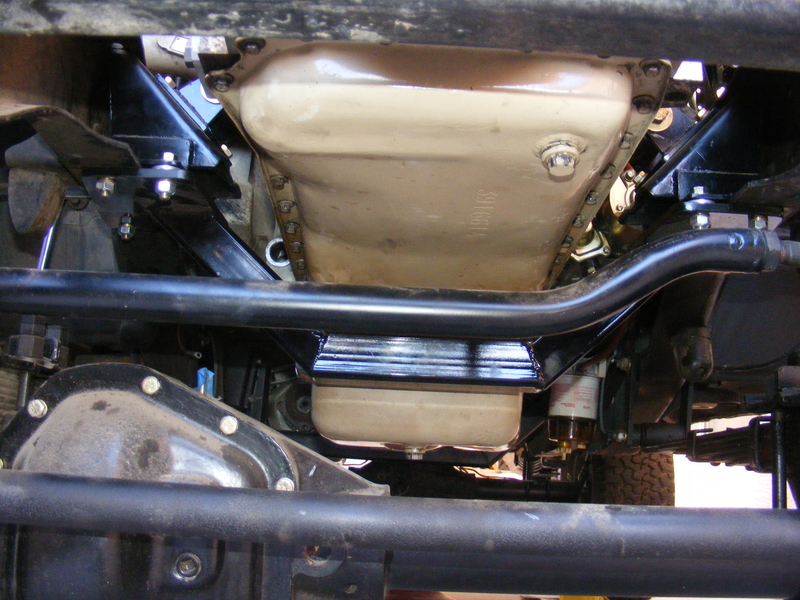 In the last pic you can also see my drag link. The bends were needed for oil pan clearance when the right side is at full stuff. It still hasn't been fully tested..... The crossmember works great though. I can jack one side up and there is no frame twist or flex. The other item I addressed was the turbo feed line. I made a new one using reuseable fittings and steel braided Teflon hose since the old one had rubbed on something and got frayed in one spot. What you can't see is the fitting going into the turbo that restricts the feed to the same size orifice as the stock banjo fitting.  In stock form the fuel and brake lines run down the passenger (right) side of the truck. Unfortunately, the Cummins also runs it's exhaust down the right side. I figured this was as good a time as any to put new fuel lines down the drivers side frame rail. I decided to use the same reinforced nylon diesel fuel line used in MD and HD trucks, tractors,, etc. It's inexpensive and tough. I didn't care for the use of brass compression fittings though, so I used barbed AN fittings. What I did was heat the end of the hose with a heat gun to soften it a bit, them press it onto the barb. I also put an HNBR o-ring between the first and second barb before pressing the hose on to ensure there would be no air leaks. Air leaks would be A Bad Thing. 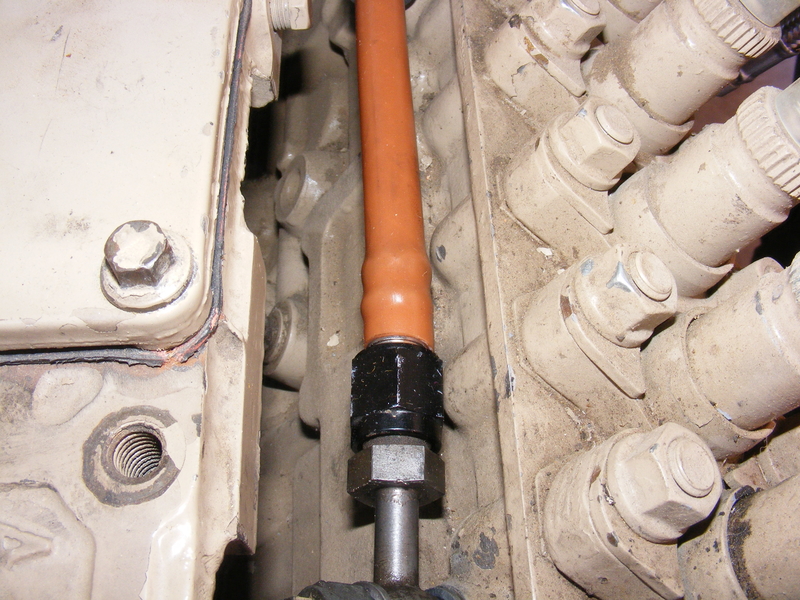 That is the return line which doesn't need 3/8" ID tubing, but I liked the idea of having just one size of fuel line. Here's the return line dropping down, and you can see the supply line going into the lift pimp: 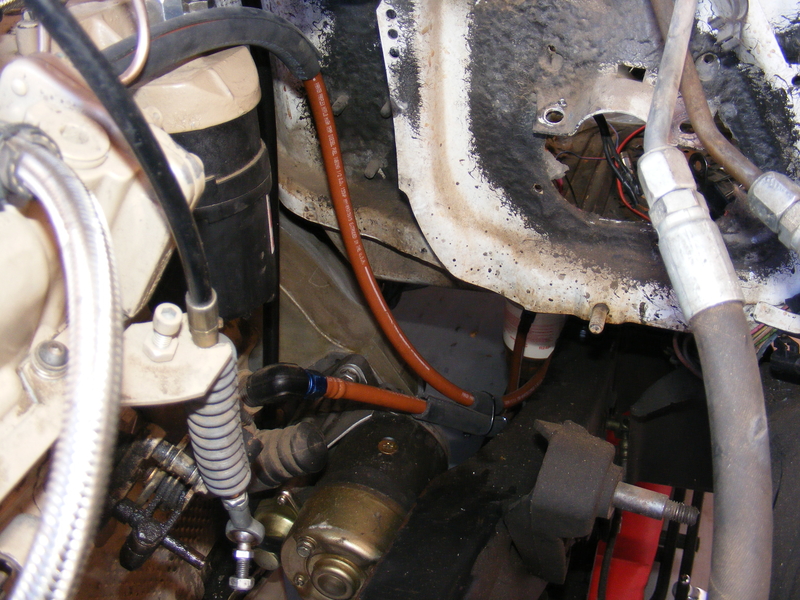 The supply line comes straight from the Racor filter, which I relocated to the frame rail: 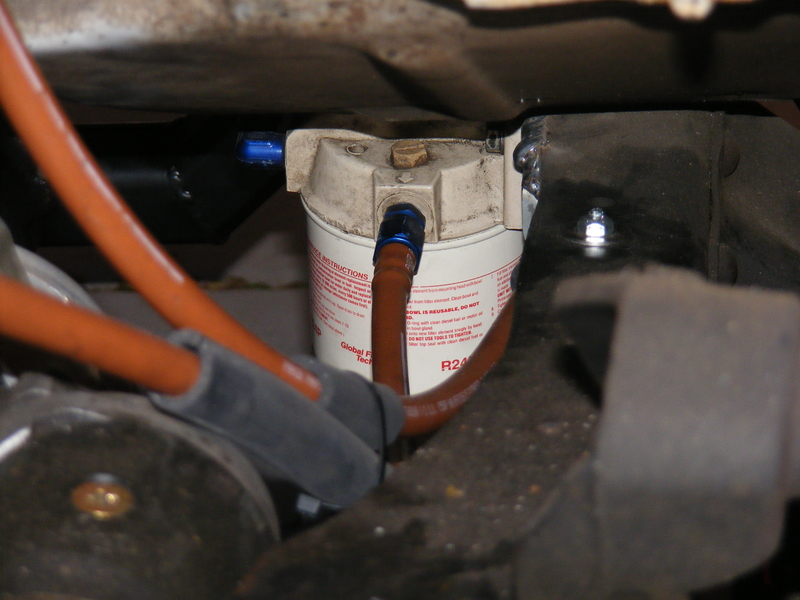 Here's a better look at the Racor. It will certainly need a heavy skid plate to protect the plastic bowl, but being positioned on the frame rail means it is siphon fed from the tank so I can open the water drain or even change the filter without letting air into the system: 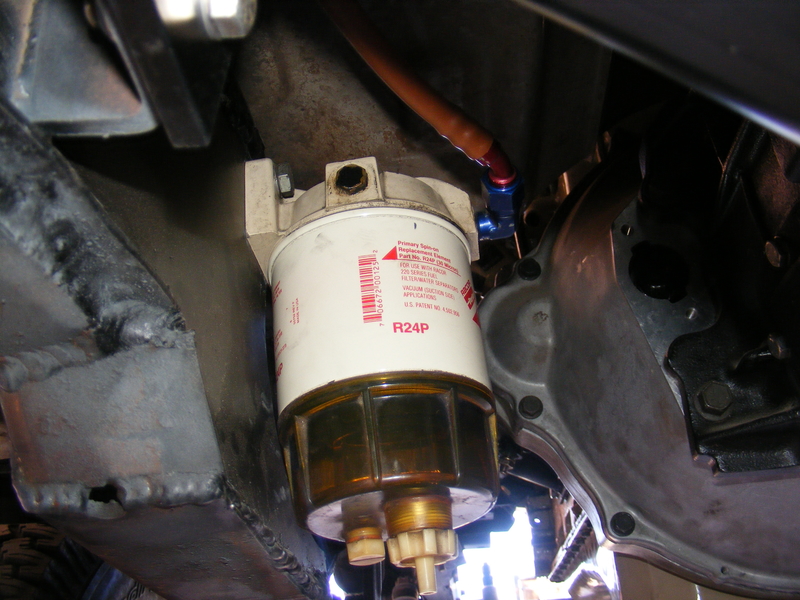 I used plenty of Adel clamps to secure the lines: 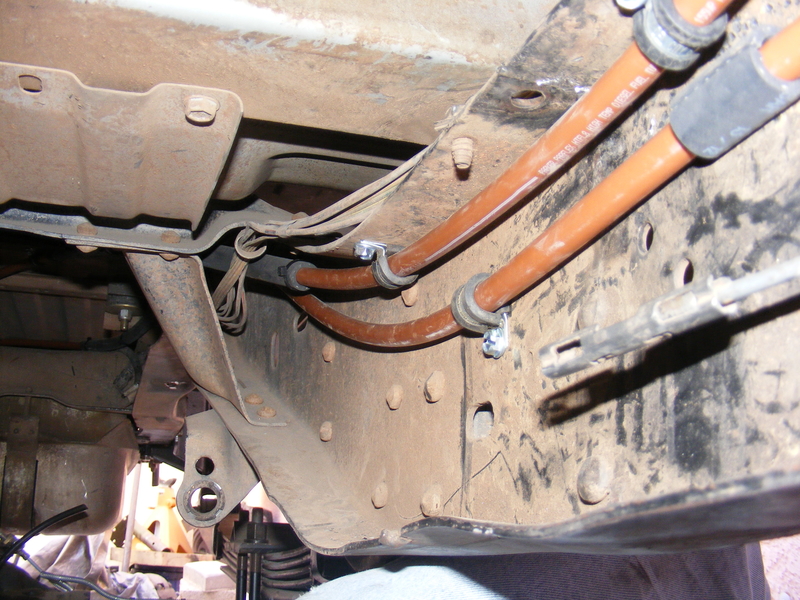 I also got the trans and t-case installed. Maybe I didn't look hard enough, but I didn't find anyone who made the wide truck trans mounts in urethane, and the parts store rubber ones are crap, so I used another spring bushing: 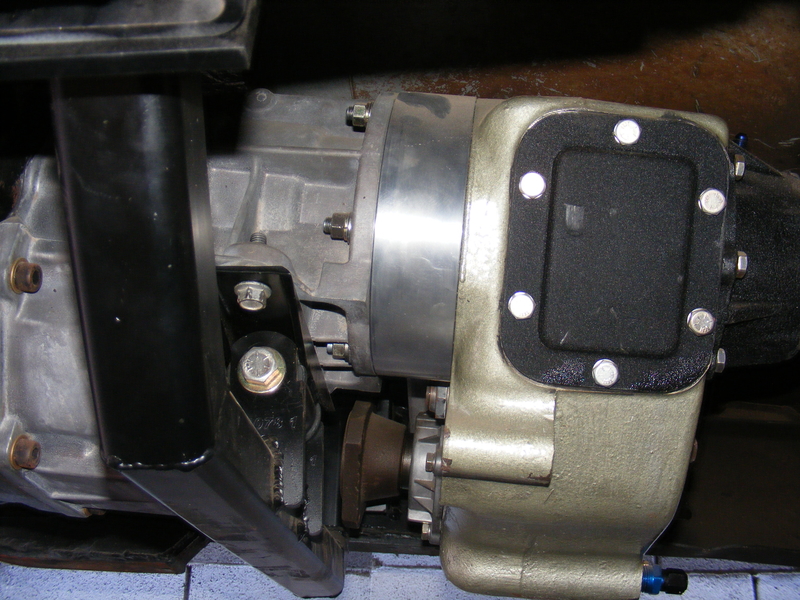 I also needed a new clutch master cylinder mount since the old one went with the old master when I sold off the 465 setup: 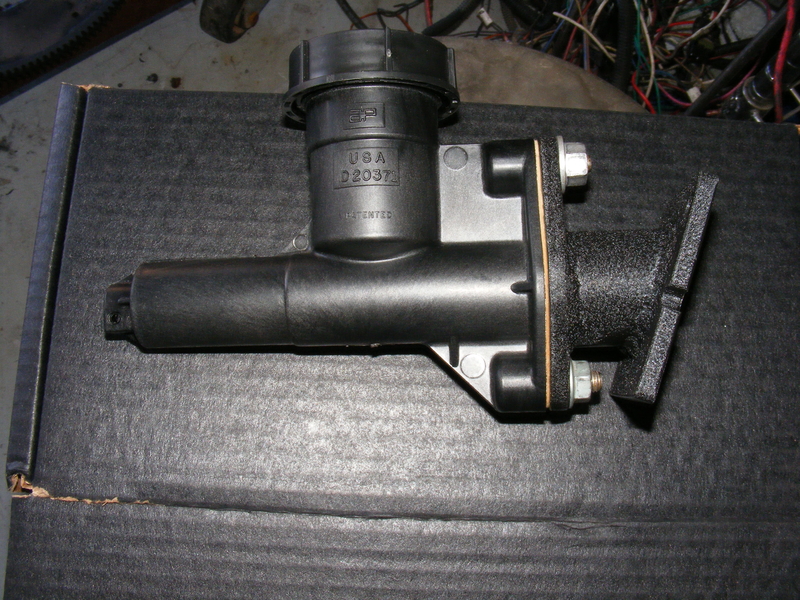 One real annoying item was my clutch pedal squeak. I ended up pulling both the clutch and brake pedals and replacing the bushings. I also eliminated the stock-type clutch rod and replaced it with one made from tube and using a Heim joint to attach the rod to the pedal. Major improvement! That's it for now, but stay tuned; I ain't done yet!
__________________
1991 V1500 Blazer (Silverado), 5.9L 12V P-pumped Cummins (5x .012 sac injectors, #6 fuel plate, WH1C with external 38mm wastegate running 30psi), NV4500 with 1-⅜" input shaft, SBC Con-O clutch, NP205, HAD, 4.10 D61/14BFF spinning 37" Nitto Exo's "I got a shotgun, a rifle, and a four wheel drive and a country boy can survive." |
|
|
|
|
01-26-2016, 02:09 AM
|
#10 |
|
Registered User
Join Date: Jan 2016
Location: Mesa, AZ
Posts: 60
|
Re: A K5 Cummins Conversion: The saga continues...
Not having a running truck didn't stop me from making it up to the North Kaibab plateau. Here's some pics off the southwest side:
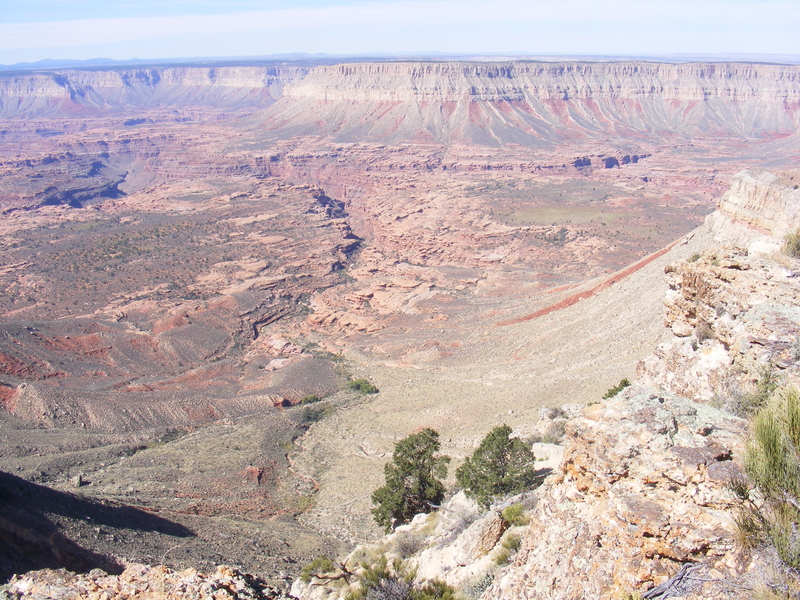  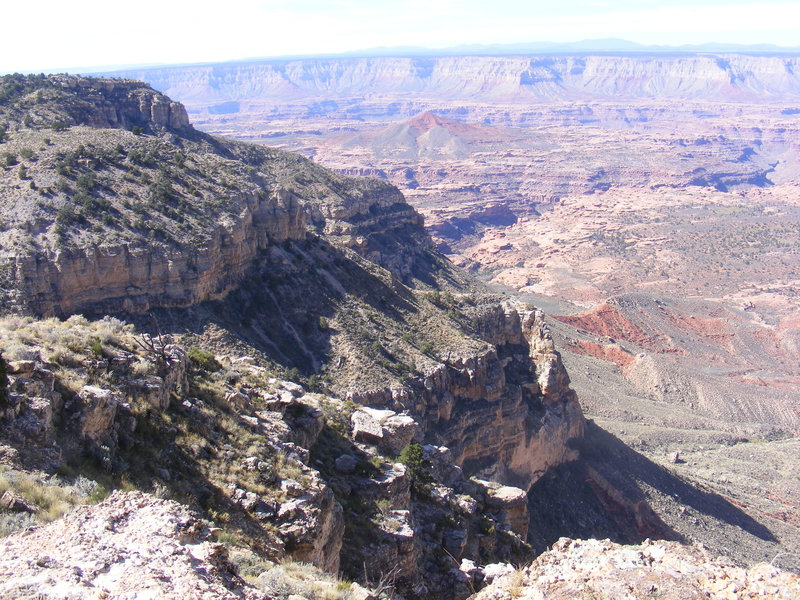 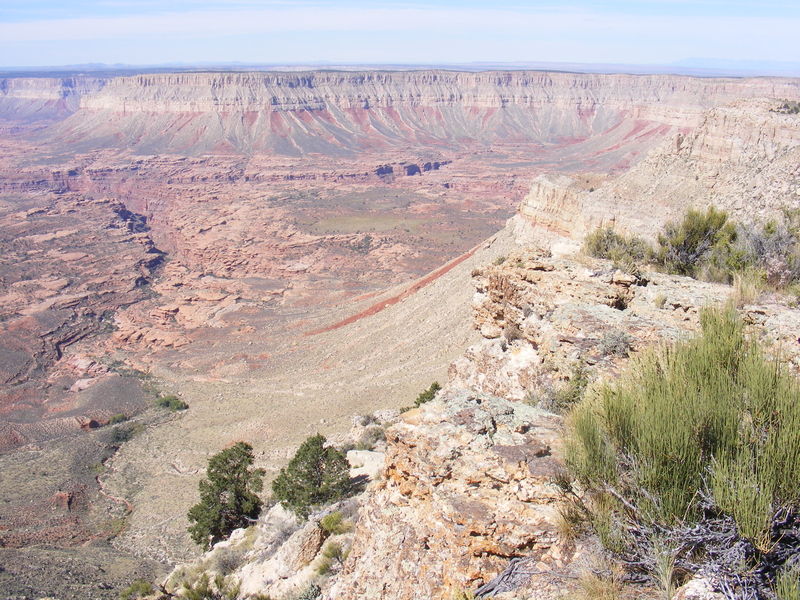  That was an enjoyable trip, except for one thing: since I didn't have my own vehicle I couldn't go exploring wherever I wanted. This made me double my efforts to get my ride going. That North Kaibab trip was in October of last year, and I made up my mind that my truck would be driveable by Christmas. Time to get on it! At some point earlier in 2015 I had redone my fuel tank pickup. It still had the old TBI in-tank assembly, and I had simply removed the TBI pump and welded a short inlet pipe to the pump holder with a piece of hose coupling the whole mess. I had used fuel injection hose designed to be submerged in gasoline and it was still in excellent shape, but I wanted to eliminate rubber hose from the inside of the tank. I ended up replacing the supply, return, and vent tubes with one-piece stainless steel tubes. I also added an extra ¼" dip tube for a future add-on. All tubes were brazed into the stock unit after the original tubes were drilled out, and then had steel AN fittings brazed onto their ends for fuel line connections. I also put an anti-vortex cap on the suction dip tube. Here's a pic of the top of the tank with the fuel lines hooked up: 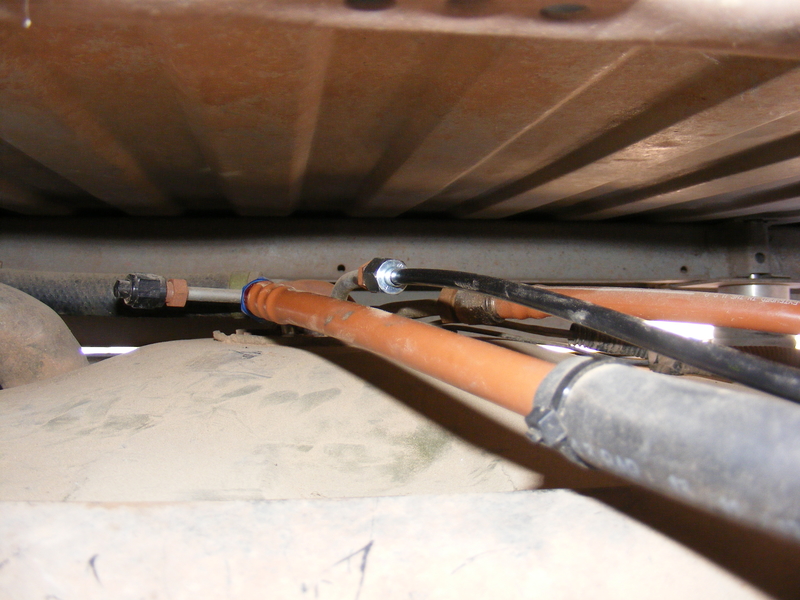 The line on the left is the supply (suction), the next to the right is the vent, and the one farthest to the right is the return. The capped fitting on the left is a ¼" dip tube for a future add-on. I should note that the vent line is ¼" air brake line that I heated and flared, allowing to to be directly attached with the same flare nut and backer used for metal tubing. Due to the positioning of the fittings I had to bring the supply and vent lines in down the center of the tank. This left them hanging in space above the axle, so I fabbed a simple aluminum bracket to support the lines: 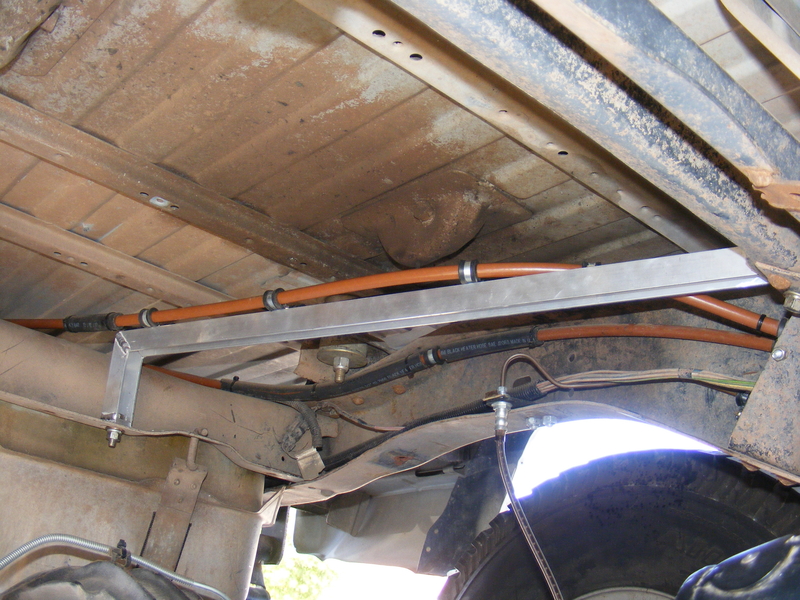 I built a new PS reservoir (filler neck machined by Todd): 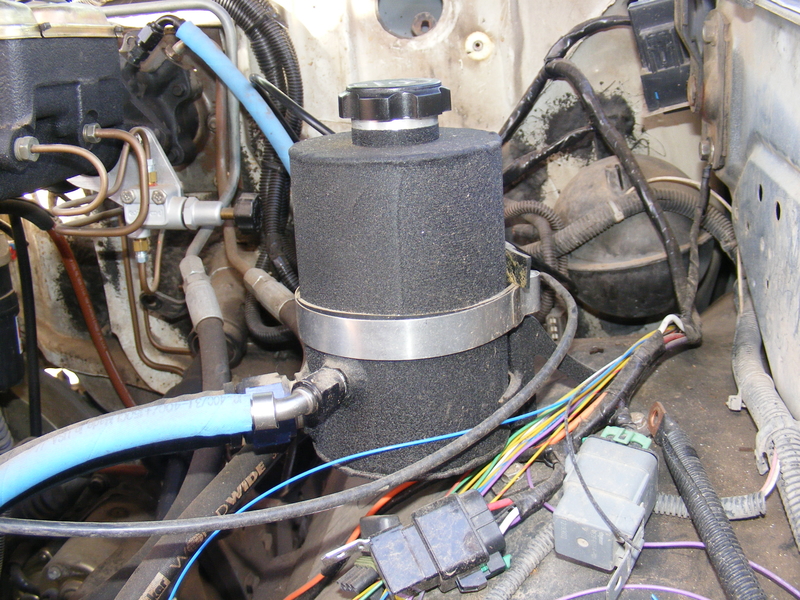 and added a PS fluid filter: 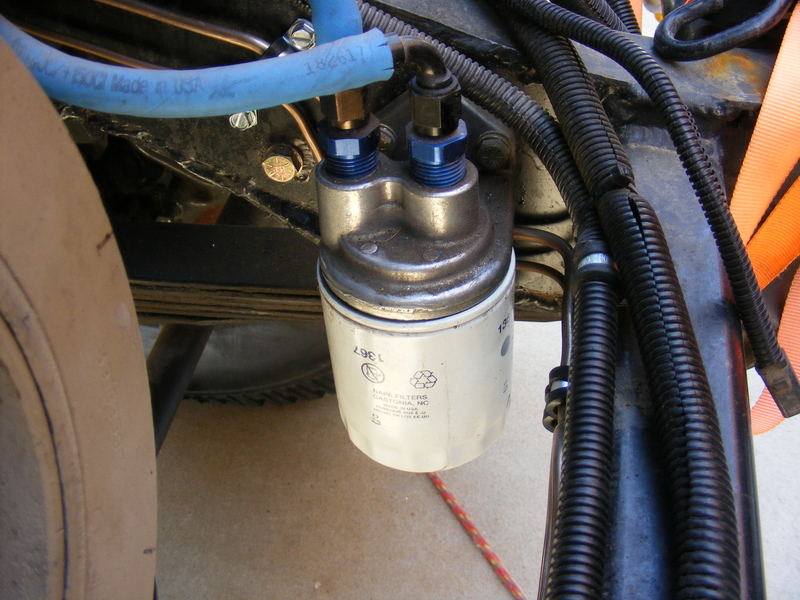 I've had it with push-on hose though. It likes to split the outer sheath, as you can see in that last pic. It doesn't seem to do any harm, but it looks like crap. Since the fittings aren't any cheaper I see no reason to use them over the regular reuseable AN fittings. I intend to replace them with reuseable fittings and Starlite hose over time. The next item to tackle was my accessory belt setup. I wasn't happy with the amount of wrap on the AC and fan drive, so I needed to do something about that. I kept most of what I had already built, but I added one idler pulley and moved the tensioner: 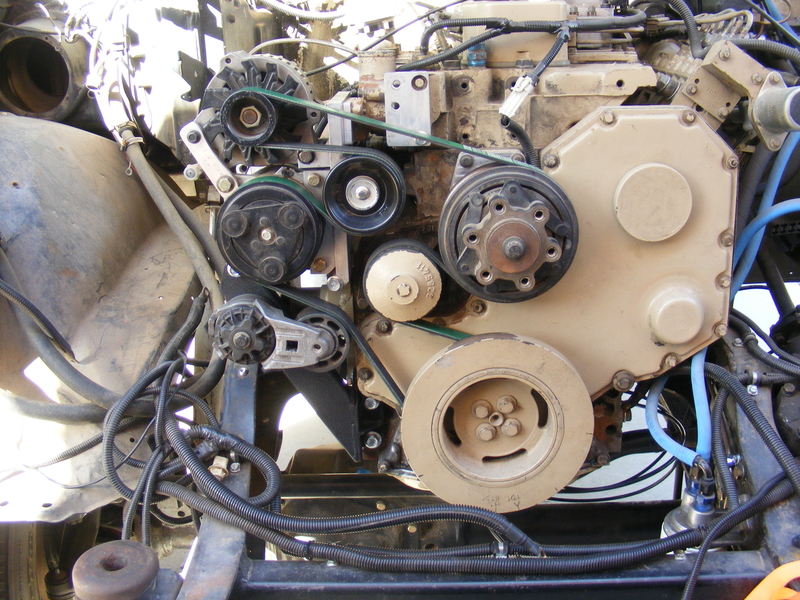 The tensioner bracket meant that the stock lower water neck wouldn't work, so I made a new one out of a piece of ½" plate and a piece of 2" DOM which is turned down to 1-¾" to accept a common size hose: 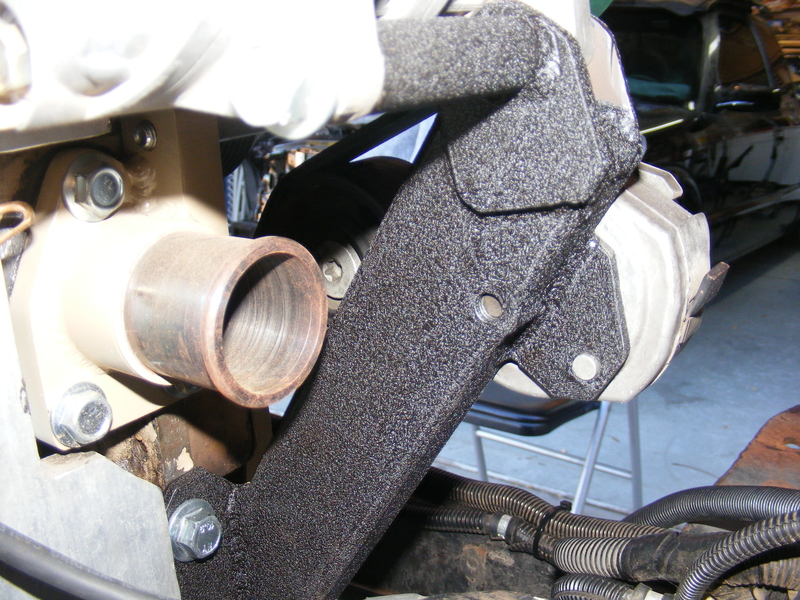 My previous fan pulley mount was the stock jobbie that came on the engine, slotted and hacked to move it as far down and to the drivers side as possible. This time around I got Todd to build me a new one: 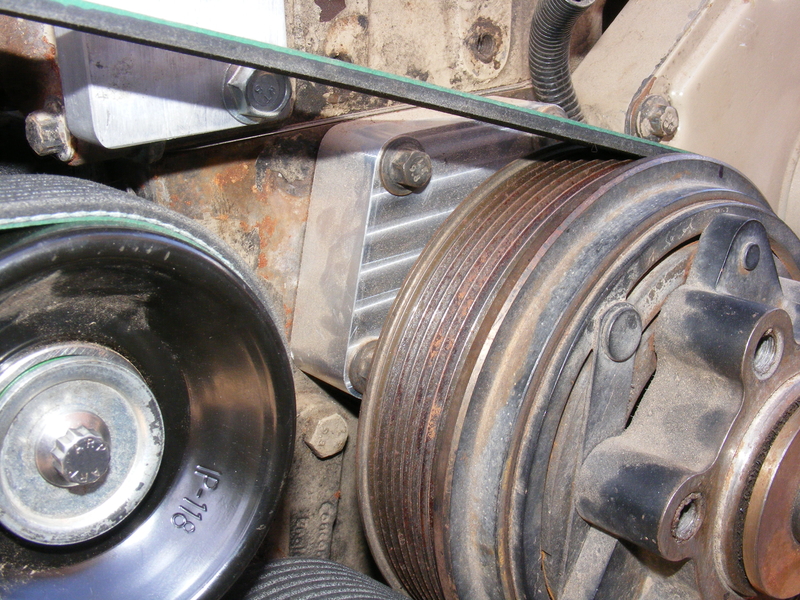 Next up: more plumbing... yay....
__________________
1991 V1500 Blazer (Silverado), 5.9L 12V P-pumped Cummins (5x .012 sac injectors, #6 fuel plate, WH1C with external 38mm wastegate running 30psi), NV4500 with 1-⅜" input shaft, SBC Con-O clutch, NP205, HAD, 4.10 D61/14BFF spinning 37" Nitto Exo's "I got a shotgun, a rifle, and a four wheel drive and a country boy can survive." |
|
|
|
|
02-03-2016, 03:41 AM
|
#11 |
|
Registered User
Join Date: Jan 2016
Location: Mesa, AZ
Posts: 60
|
Re: A K5 Cummins Conversion: The saga continues...
I promised plumbing, so here we go! I already mentioned that I moved the fuel lines to the drivers side frame rail due to the fact that the exhaust runs down the passenger side, and the lift pump is located on the drivers side of the engine. Likewise, I decided to relocate the brake lines to the drivers side frame rail
I would have preferred to use stainless steel for the brake lines, but it requires expensive tools to double flare, so I chose to use cupronickel line instead. Cupronickel is typically 90% copper 10% nickel, although I have found some alloys that also included iron. In any case, the purpose of the nickel is to prevent the copper from work hardening and cracking. OE's used the stuff many years ago, but they went to steel due to cost.. Anyway, I am using the same 1 ton master cylinder and hydroboost that I had on before. I eliminated the stock prop valve/RWAL unit because it didn't proportion properly with rear disk brakes. I replaced it with an adjustable unit from Wilwood, mounted to a custom bracket: 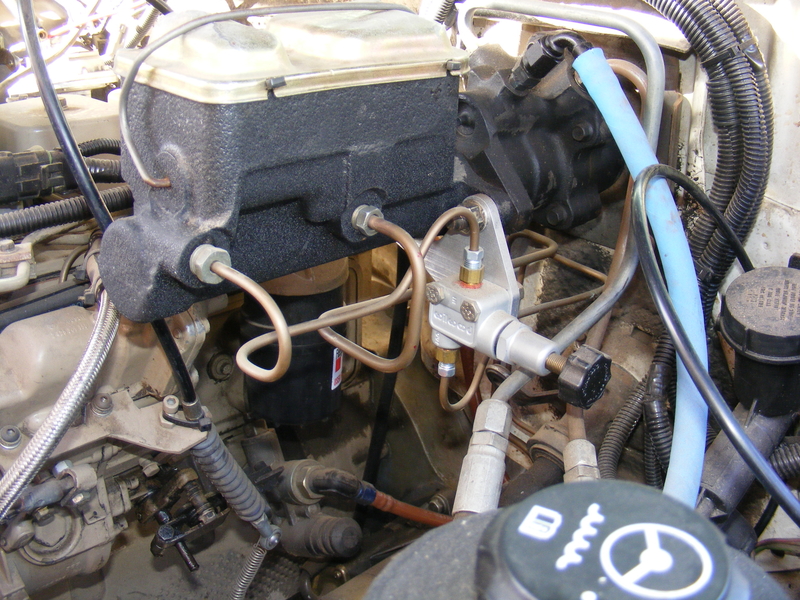 The hard lines run down the firewall, then transition to a pair of Teflon soft lines to bridge the body-to-frame gap. Here is where the hard lines reconnect on the frame side: 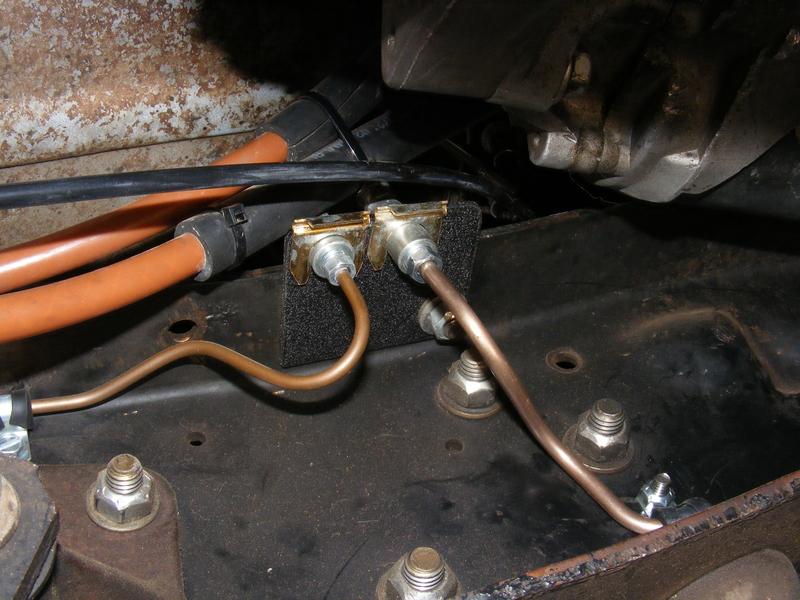 The line on the left is 3/16" and goes to the rear brakes. The line on the right is ¼" and goes to the front. The 3/16" line had to pass through the boxed section of frame, but there was no way to clamp it in there and it was too long of a span to have unsupported. I solved the problem by running it through a piece of ⅜" stainless tubing with flared ends (to avoid cutting into the soft cupronickel) and supporting the more rigid stainless tube at both ends:  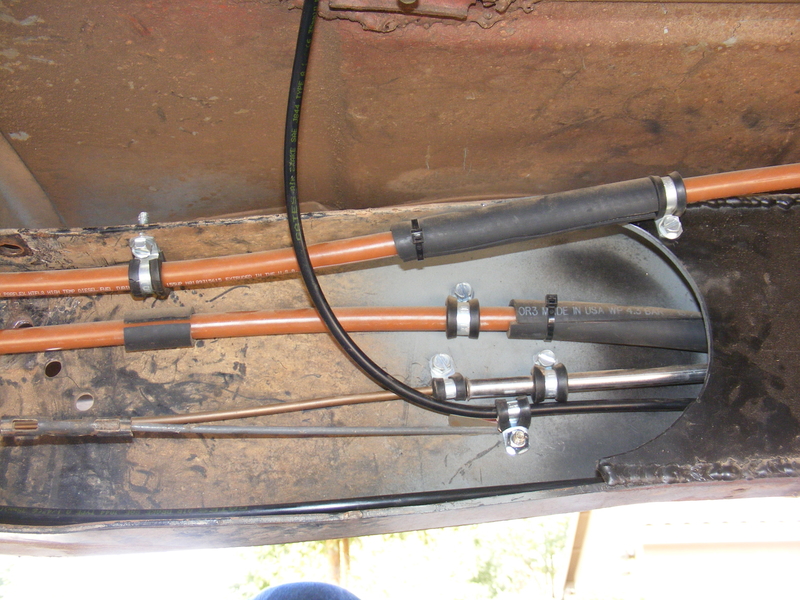 Bracket that drops rear Teflon line to the axle: 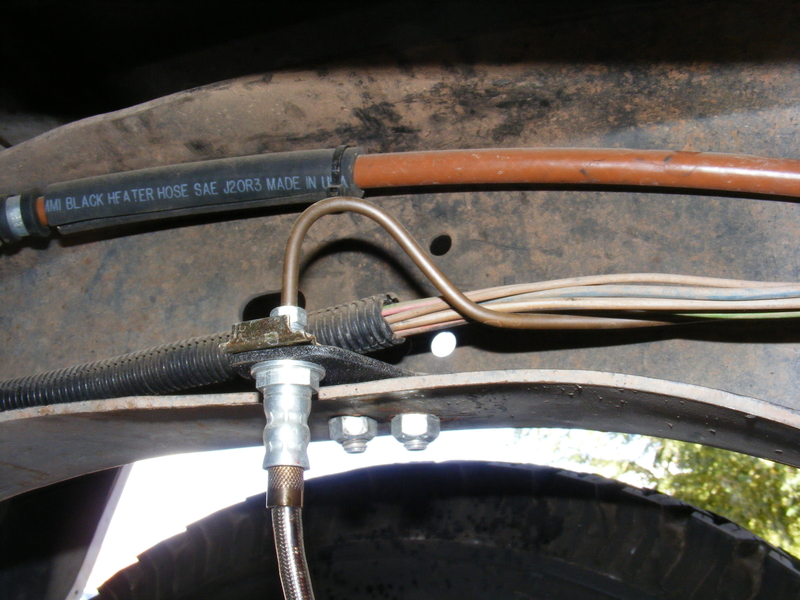 Up front, the ¼" line heads to a tee on the front crossmember. You also see the 3/16" line feeding the drivers side caliper, with plenty of Adel clamps retaining everything:  Tee on front crossmember with 3/16" lines heading off to each front caliper: 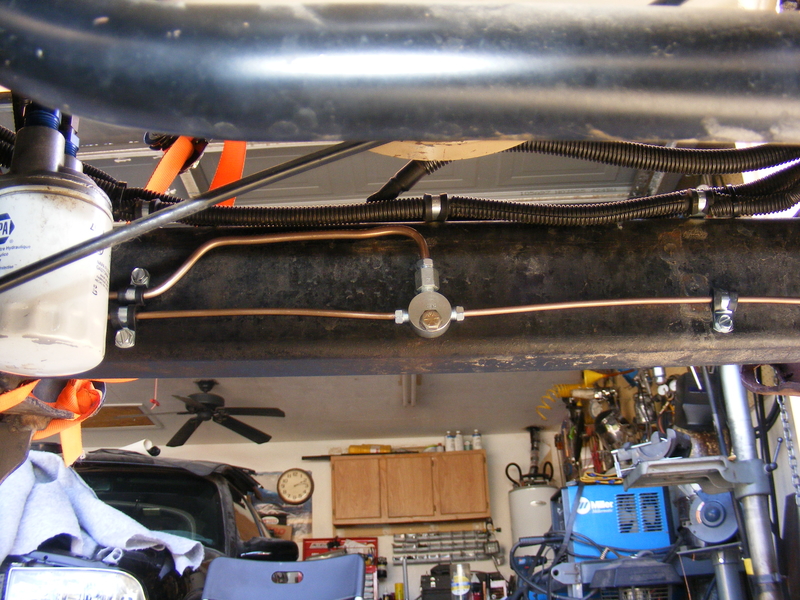 Caliper hoses are new. I used Teflon brake hose rather than rubber: 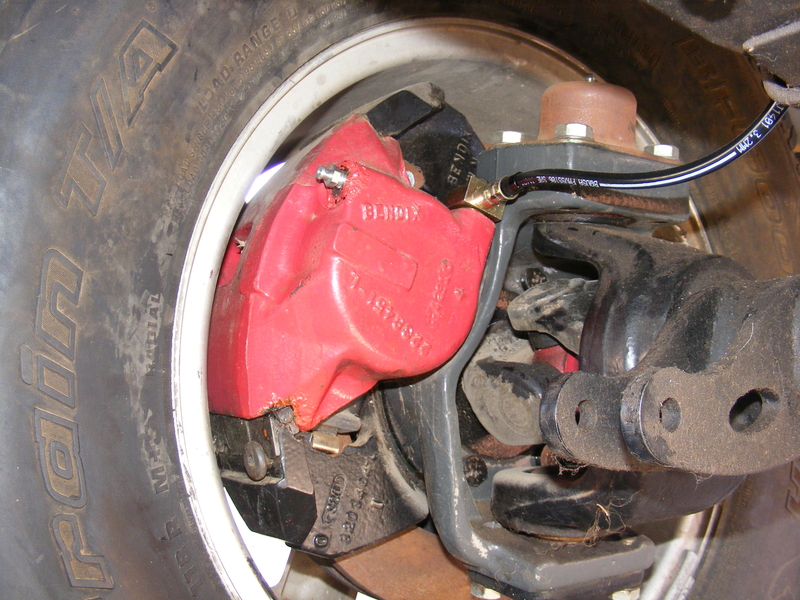 I also got vent lines hooked up. I used ¼" air brake line for the vent tubes and connected them with either AN fittings or, in the case of the transmission and axles, using an intermediate rubber hose: 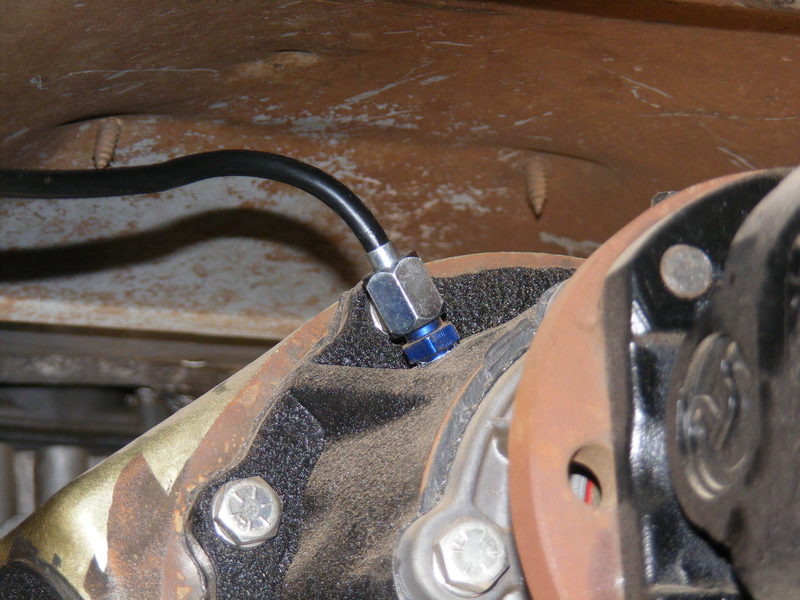 So that's it for now. Nothing exciting, but it's amazing just how much time this all takes...
__________________
1991 V1500 Blazer (Silverado), 5.9L 12V P-pumped Cummins (5x .012 sac injectors, #6 fuel plate, WH1C with external 38mm wastegate running 30psi), NV4500 with 1-⅜" input shaft, SBC Con-O clutch, NP205, HAD, 4.10 D61/14BFF spinning 37" Nitto Exo's "I got a shotgun, a rifle, and a four wheel drive and a country boy can survive." |
|
|
|
|
02-05-2016, 02:15 AM
|
#12 |
|
meowMEOWmeowMEOW
Join Date: Sep 2009
Location: MKE WI
Posts: 7,128
|
Re: A K5 Cummins Conversion: The saga continues...
This was an interesting read, and it triggered every one of my OCD alarms haha. All the stuff featured in your swap was the stuff that ends up making my skin crawl; seals, splines, leaks, more seals, splines, opening any type of gearbox at all. I swear, any project I'm doing that results in opening up any gearbox (trans, steering gear, transfer case) and I'm ready to bow out.
You really went to lengths to fix some of that stuff but it looks like you have the organization and the patience to figure it out and make it happen. Nice going.
__________________
'66 Short Step / SD Tuned / Big Cam LQ4 / Backhalfed /Built 4l80e / #REBUILDEVERYTHING |
|
|
|
|
02-09-2016, 02:28 AM
|
#13 | ||
|
Registered User
Join Date: Jan 2016
Location: Mesa, AZ
Posts: 60
|
Re: A K5 Cummins Conversion: The saga continues...
Quote:
 Quote:
__________________
1991 V1500 Blazer (Silverado), 5.9L 12V P-pumped Cummins (5x .012 sac injectors, #6 fuel plate, WH1C with external 38mm wastegate running 30psi), NV4500 with 1-⅜" input shaft, SBC Con-O clutch, NP205, HAD, 4.10 D61/14BFF spinning 37" Nitto Exo's "I got a shotgun, a rifle, and a four wheel drive and a country boy can survive." |
||
|
|
|
|
03-01-2016, 04:09 AM
|
#14 |
|
Registered User
Join Date: Jan 2016
Location: Mesa, AZ
Posts: 60
|
Re: A K5 Cummins Conversion: The saga continues...
One thing I really wanted to add during this revamp was an intercooler. I knew it would help fuel economy a bit, but mainly it would help keep EGTs in check during long pulls up a grade. It would also be necessary if I wanted to utilize my new injectors and #6 fuel plate. However, in order to fit an air-to-air intercooler I would have to put the radiator back to the stock position, which would in turn mean i would have to procure an un-molested core support and somehow finding a fan that would fit in the meager space available. The alternative would be to run a liqud-to-air IC, but that means more parts. and potentially less efficiency. What to do?
Here's what I did: 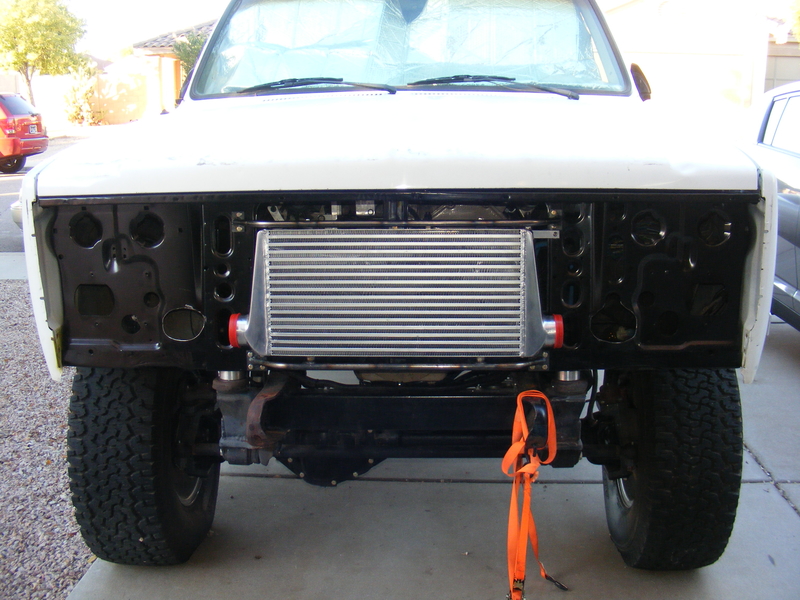 Yup, I returned to an unmolested core support, built brackets, and stuffed a 12"x24"x3" core IC in front. Now, as I mentioned, this would mean I need to find a fan that will fit in the narrow space between the big radiator and the engine. Said fan needs to be able to pull a lot more air than the 6.2 fan was able to muster. I found just the fan:  I had to get it nice and close to the engine accessories in order to maximize space between it and the radiator:  I sanded the core support and IC mounting brackets, primed em, and sprayed 'em with PPG acrylic urethane: 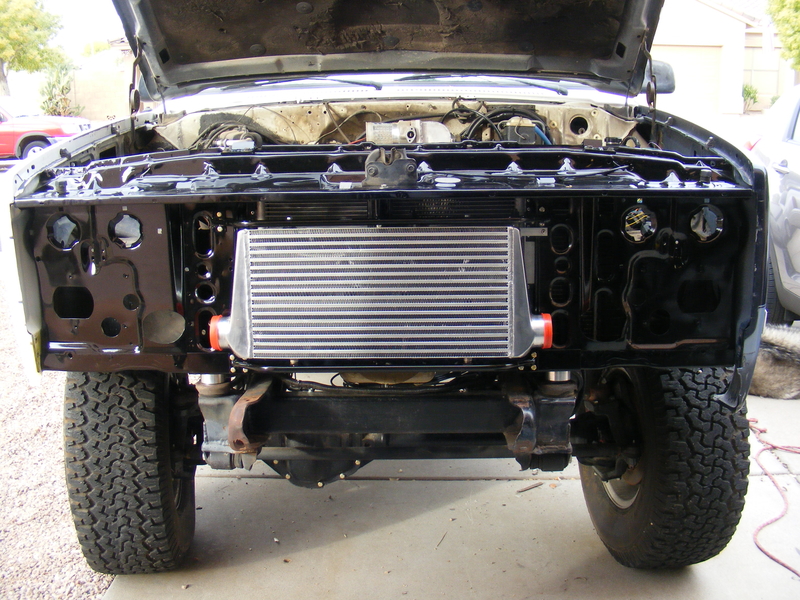 Right behind the IC and between it and the condenser I fitted a Long stacked-plate cooler for the PS fluid. Here you can see it peeking out the side: 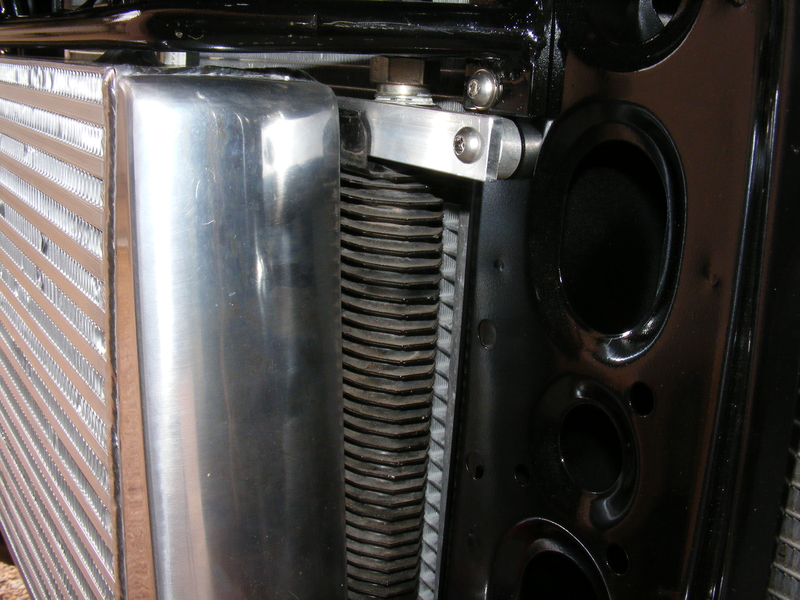 Here it is with the big radiator (late 90's 454 radiator). There isn't a ton of room between the fan and radiator, but it's enough: 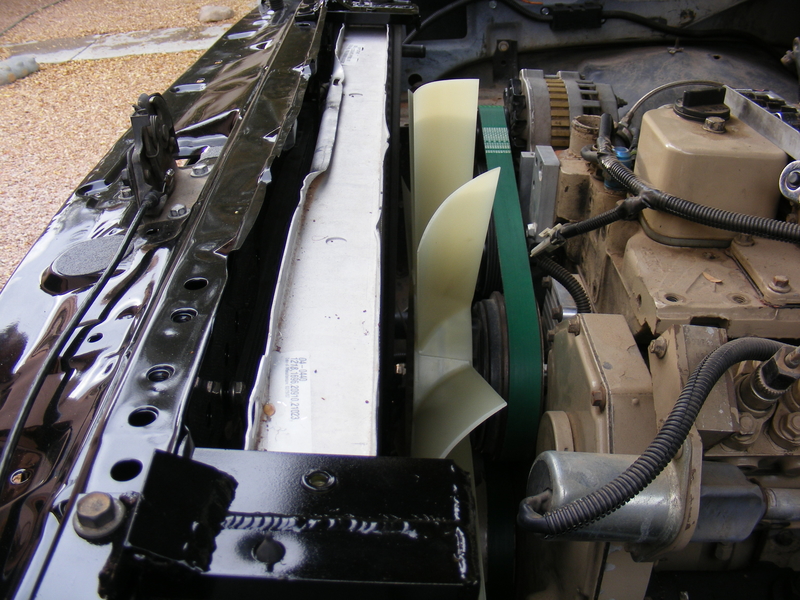 Here's another view. Yup, there's a condenser in there too! 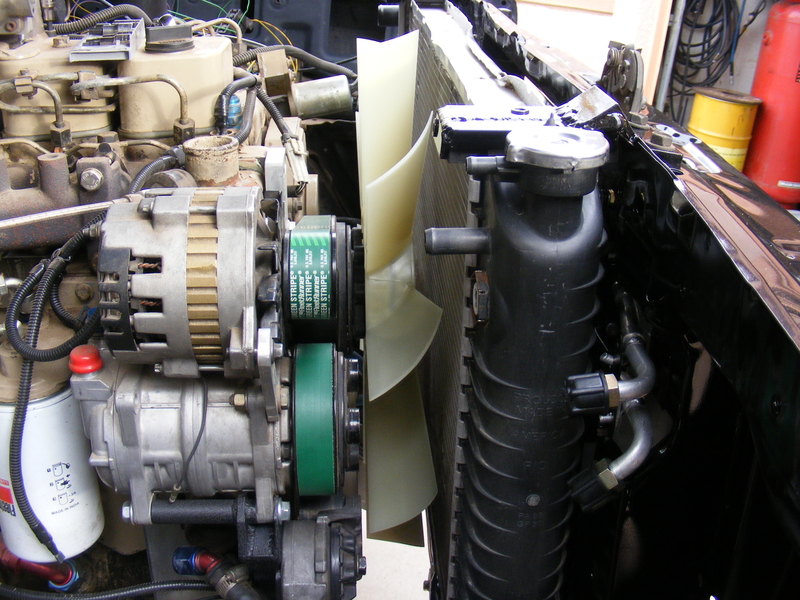 Another issue created by the addition of the IC is an inlet elbow on the intake manifold. The aftermarket ones were a bit too pricey for my taste, so I had settled on building one. At some point I started playing with the old one I had made, and it looked like it could work if the plumbing would clear the brake master cylinder. After some checking and double checking I decided it would work, so I cleaned it up, sprayed it with my usual wrinkle black, and baked it. Here's the finished product: 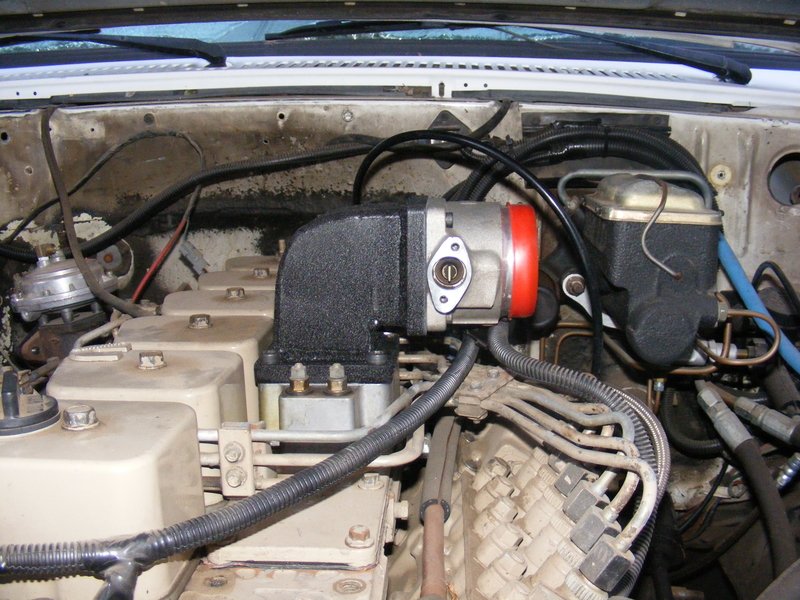 Next up: exhaust! My favoritest thing! [/sarcasm]
__________________
1991 V1500 Blazer (Silverado), 5.9L 12V P-pumped Cummins (5x .012 sac injectors, #6 fuel plate, WH1C with external 38mm wastegate running 30psi), NV4500 with 1-⅜" input shaft, SBC Con-O clutch, NP205, HAD, 4.10 D61/14BFF spinning 37" Nitto Exo's "I got a shotgun, a rifle, and a four wheel drive and a country boy can survive." |
|
|
|
|
03-01-2016, 09:54 PM
|
#15 |
|
Registered User
Join Date: Dec 2006
Location: SLC, UT
Posts: 706
|
Re: A K5 Cummins Conversion: The saga continues...
Awesome work! Can't wait to see future progress!
|
|
|
|
|
03-02-2016, 12:46 AM
|
#16 |
|
Registered User
Join Date: Dec 2013
Location: Northern, MT
Posts: 569
|
Re: A K5 Cummins Conversion: The saga continues...
Nice work. A lot of information in so very few posts. Keep it up and keep us posted.

__________________
1987 GMC R2500 SC 454 T400 1988 Chevy R30 CC DRW 12 valve Cummins NV4500 GearVendors |
|
|
|
|
03-02-2016, 03:24 AM
|
#17 | ||
|
Registered User
Join Date: Jan 2016
Location: Mesa, AZ
Posts: 60
|
Re: A K5 Cummins Conversion: The saga continues...
Quote:
Quote:
__________________
1991 V1500 Blazer (Silverado), 5.9L 12V P-pumped Cummins (5x .012 sac injectors, #6 fuel plate, WH1C with external 38mm wastegate running 30psi), NV4500 with 1-⅜" input shaft, SBC Con-O clutch, NP205, HAD, 4.10 D61/14BFF spinning 37" Nitto Exo's "I got a shotgun, a rifle, and a four wheel drive and a country boy can survive." |
||
|
|
|
|
03-04-2016, 11:52 AM
|
#18 |
|
Registered User
Join Date: Nov 2001
Location: Concord,NC,USA
Posts: 743
|
Re: A K5 Cummins Conversion: The saga continues...
Thank you very much for taking the time to post all of that great info!
What is that fan off of? Thanks! BBB |
|
|
|
|
03-05-2016, 12:13 AM
|
#19 | ||
|
Registered User
Join Date: Jan 2016
Location: Mesa, AZ
Posts: 60
|
Re: A K5 Cummins Conversion: The saga continues...
Quote:
Hopefully some of it can be of use to others who are contemplating a Cummins swap in a swuare body.Quote:
Poke that part number into Amazon or Ebay (or a search engine for that matter) and you should get some hits. It's 22" in diameter and about 2-1/4" wide. I've already cranked it up and even at idle it moves a butt-load of air!
__________________
1991 V1500 Blazer (Silverado), 5.9L 12V P-pumped Cummins (5x .012 sac injectors, #6 fuel plate, WH1C with external 38mm wastegate running 30psi), NV4500 with 1-⅜" input shaft, SBC Con-O clutch, NP205, HAD, 4.10 D61/14BFF spinning 37" Nitto Exo's "I got a shotgun, a rifle, and a four wheel drive and a country boy can survive." |
||
|
|
|
|
04-06-2016, 11:37 PM
|
#20 |
|
6>8 Plugless........
 Join Date: Sep 2007
Location: Prairie City, Ia
Posts: 17,138
|
Re: A K5 Cummins Conversion: The saga continues...
Max awesome build! I started reading it when you originally started posting it but I was having issues getting the pics to load. They still show just x's right now. Stupid computer.
__________________
Ryan 1972 Chevy Longhorn K30 Cheyenne Super, 359 Inline 6 cylinder, Auto Trans, Tilt, Diesel Tach/Vach, Buckets, Rare Rear 4-link and air ride option Build Thread 1972 GMC Sierra Grande Longhorn 4x4 1972 Chevy Cheyenne Super K20 Long Step side tilt, tach, tow hooks, AC, 350 4 speed 1972 C10 Suburban Custom Deluxe 1969 Chevy milk truck 1971 Camaro RS 5.3 BTR STG3 Cam Super T10 1940 Ford 354 Hemi 46RH Ford 9" on air ride huge project Tired of spark plugs? Check this out. |
|
|
|
|
04-07-2016, 12:32 AM
|
#21 |
|
Registered User
Join Date: Jan 2016
Location: Mesa, AZ
Posts: 60
|
Re: A K5 Cummins Conversion: The saga continues...
That's what you get for running Internet Exploder
Serious mode on: Has anyone else had issues with pics loading?
__________________
1991 V1500 Blazer (Silverado), 5.9L 12V P-pumped Cummins (5x .012 sac injectors, #6 fuel plate, WH1C with external 38mm wastegate running 30psi), NV4500 with 1-⅜" input shaft, SBC Con-O clutch, NP205, HAD, 4.10 D61/14BFF spinning 37" Nitto Exo's "I got a shotgun, a rifle, and a four wheel drive and a country boy can survive." |
|
|
|
|
04-07-2016, 09:53 AM
|
#22 |
|
Registered User
Join Date: Feb 2012
Location: Mud Lake, Idaho
Posts: 346
|
Re: A K5 Cummins Conversion: The saga continues...
I use firefox, they load ok but they take a while with my lightning fast 1m internet connection.
__________________
http://67-72chevytrucks.com/vboard/s...d.php?t=588707 |
|
|
|
|
04-08-2016, 03:37 AM
|
#23 | |
|
Registered User
Join Date: Jan 2016
Location: Mesa, AZ
Posts: 60
|
Re: A K5 Cummins Conversion: The saga continues...
Quote:
__________________
1991 V1500 Blazer (Silverado), 5.9L 12V P-pumped Cummins (5x .012 sac injectors, #6 fuel plate, WH1C with external 38mm wastegate running 30psi), NV4500 with 1-⅜" input shaft, SBC Con-O clutch, NP205, HAD, 4.10 D61/14BFF spinning 37" Nitto Exo's "I got a shotgun, a rifle, and a four wheel drive and a country boy can survive." |
|
|
|
|
|
04-07-2016, 03:13 PM
|
#24 |
|
6>8 Plugless........
Join Date: Sep 2007
Location: Prairie City, Ia
Posts: 17,138
|
Re: A K5 Cummins Conversion: The saga continues...
It very well could be IE causing the problem. Junk stuff.
__________________
Ryan 1972 Chevy Longhorn K30 Cheyenne Super, 359 Inline 6 cylinder, Auto Trans, Tilt, Diesel Tach/Vach, Buckets, Rare Rear 4-link and air ride option Build Thread 1972 GMC Sierra Grande Longhorn 4x4 1972 Chevy Cheyenne Super K20 Long Step side tilt, tach, tow hooks, AC, 350 4 speed 1972 C10 Suburban Custom Deluxe 1969 Chevy milk truck 1971 Camaro RS 5.3 BTR STG3 Cam Super T10 1940 Ford 354 Hemi 46RH Ford 9" on air ride huge project Tired of spark plugs? Check this out. |
|
|
|
|
07-10-2016, 01:47 AM
|
#25 |
|
Registered User
Join Date: Nov 2010
Location: Alabama
Posts: 739
|
Re: A K5 Cummins Conversion: The saga continues...
Good looking build with attention to detail!
What front springs are you running? |
|
|
|
|
| Bookmarks |
|
|


 \\ MY YOUTUBE CHANNEL


 Hybrid Mode
