
|
|
|
 11-15-2012, 12:16 AM
|
#1 |
|
Registered User
Join Date: May 2005
Location: Washington
Posts: 848
|
Re: [PROJECT] Laidout53 Part II
Wow thanks guys!!
__________________
[PROJECT] FnLow69- 69 C-10 Full frame & layin' doors [PROJECT] Laidout53 - 53' Dodge Pickup, Full Kustom Build [PROJECT] "Hot Rod" 1931 Model A Bonneville style "Dream as if you'll live forever, Live as if you'll die today" ~ James Dean |

|

|
|
11-15-2012, 01:04 AM
|
#2 |
|
Registered User
 Join Date: Aug 2005
Location: Hillsboro Oregon
Posts: 6,449
|
Re: [PROJECT] Laidout53 Part II
What part of WA are you in?
Posted via Mobile Device |
|
|
|
|
11-18-2012, 03:01 AM
|
#3 |
|
Registered User
Join Date: May 2005
Location: Washington
Posts: 848
|
Re: [PROJECT] Laidout53 Part II
Gig Harbor
__________________
[PROJECT] FnLow69- 69 C-10 Full frame & layin' doors [PROJECT] Laidout53 - 53' Dodge Pickup, Full Kustom Build [PROJECT] "Hot Rod" 1931 Model A Bonneville style "Dream as if you'll live forever, Live as if you'll die today" ~ James Dean |
|
|
|
|
11-19-2012, 03:29 AM
|
#4 |
|
Registered User
Join Date: May 2005
Location: Washington
Posts: 848
|
Re: [PROJECT] Laidout53 Part II
Update time!
After cutting the old firewall out i realized the the floor boards need some rust repair and the lower corners on the firewall need to be rebuilt. So I decided to go ahead and make need floorboards (under support/cab mountincluded) and inner kickboard supports along with rebuilding the corners. I started with the passenger side first. Heres the pictures with the descriptions... First i removed old firewall and then i reinstalled the motor with the new 5sp trans and modified the trans mount to be removable.   (in 5th with some clearance, will be making new shifter)   Next i clearances the firewall and tacked on a flange   Then I braced the door jam and then i completely cut the floor out. Before   Rebuilding  Cab under support(Old versus New)    Starting the floorboard     Then came time to make the upper peice that connects to the firewall  Then i fab'd a new inner kickboard panel  Next I welded the firewall flange and doghouse part fully  And here is on side ready to be drilled for spot welds and to be welded in place.   Then im on to the other side and then Ill build a new removable trans tunnel and the cab will be 95% done. Justin
__________________
[PROJECT] FnLow69- 69 C-10 Full frame & layin' doors [PROJECT] Laidout53 - 53' Dodge Pickup, Full Kustom Build [PROJECT] "Hot Rod" 1931 Model A Bonneville style "Dream as if you'll live forever, Live as if you'll die today" ~ James Dean |
|
|
|
|
11-20-2012, 12:51 PM
|
#5 |
|
Registered User
Join Date: Apr 2008
Location: Redmond, WA
Posts: 679
|
Re: [PROJECT] Laidout53 Part II
Ah man. All these new pics and all I'm seeing is "Sorry, this pic removed or deleted."

|
|
|
|
|
11-20-2012, 01:54 PM
|
#6 | |
|
Account Suspended
Join Date: Aug 2010
Location: richmond ill
Posts: 376
|
Re: [PROJECT] Laidout53 Part II
Quote:
Posted via Mobile Device |
|
|
|
|
|
11-20-2012, 01:55 PM
|
#7 |
|
Registered User
Join Date: May 2005
Location: Washington
Posts: 848
|
Re: [PROJECT] Laidout53 Part II
Ya im just now seeing that to, Ill figure that out. it wasnt me....

__________________
[PROJECT] FnLow69- 69 C-10 Full frame & layin' doors [PROJECT] Laidout53 - 53' Dodge Pickup, Full Kustom Build [PROJECT] "Hot Rod" 1931 Model A Bonneville style "Dream as if you'll live forever, Live as if you'll die today" ~ James Dean |
|
|
|
|
11-20-2012, 02:04 PM
|
#8 |
|
Registered User
Join Date: May 2005
Location: Washington
Posts: 848
|
Re: [PROJECT] Laidout53 Part II
Ok, they should be back up real soon! I exceeded my bandwith for photobucket...
__________________
[PROJECT] FnLow69- 69 C-10 Full frame & layin' doors [PROJECT] Laidout53 - 53' Dodge Pickup, Full Kustom Build [PROJECT] "Hot Rod" 1931 Model A Bonneville style "Dream as if you'll live forever, Live as if you'll die today" ~ James Dean |
|
|
|
|
11-21-2012, 01:29 AM
|
#9 |
|
Registered User
Join Date: May 2005
Location: Washington
Posts: 848
|
Re: [PROJECT] Laidout53 Part II
Since i dont know how to edit post #290 heres the update. If a mod can delete that post i would appreciate it, Thanks....
 After cutting the old firewall out i realized the the floor boards need some rust repair and the lower corners on the firewall need to be rebuilt. So I decided to go ahead and make need floorboards (under support/cab mountincluded) and inner kickboard supports along with rebuilding the corners. I started with the passenger side first. Heres the pictures with the descriptions... First i removed old firewall and then i reinstalled the motor with the new 5sp trans and modified the trans mount to be removable. 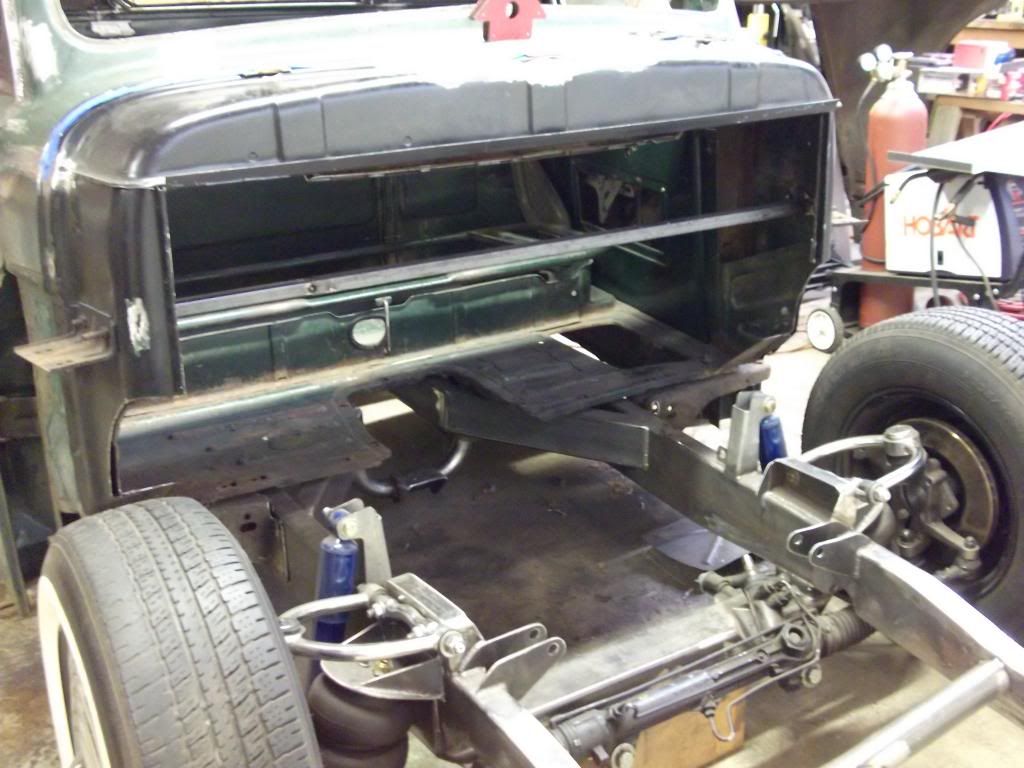 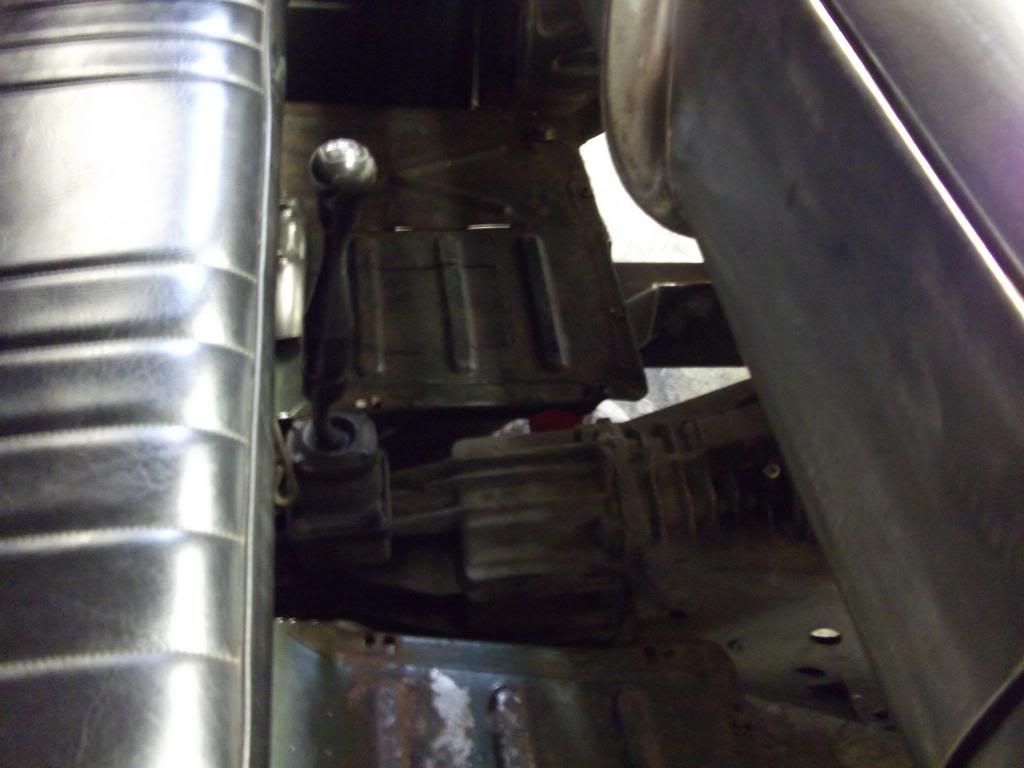 (in 5th with some clearance, will be making new shifter) 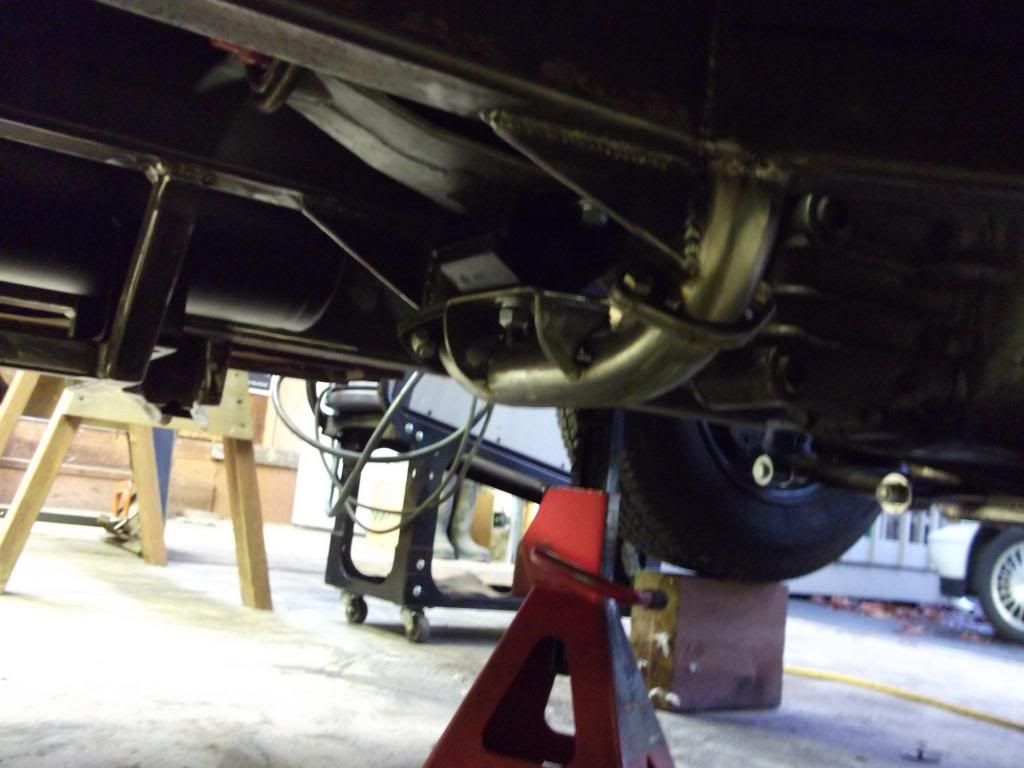 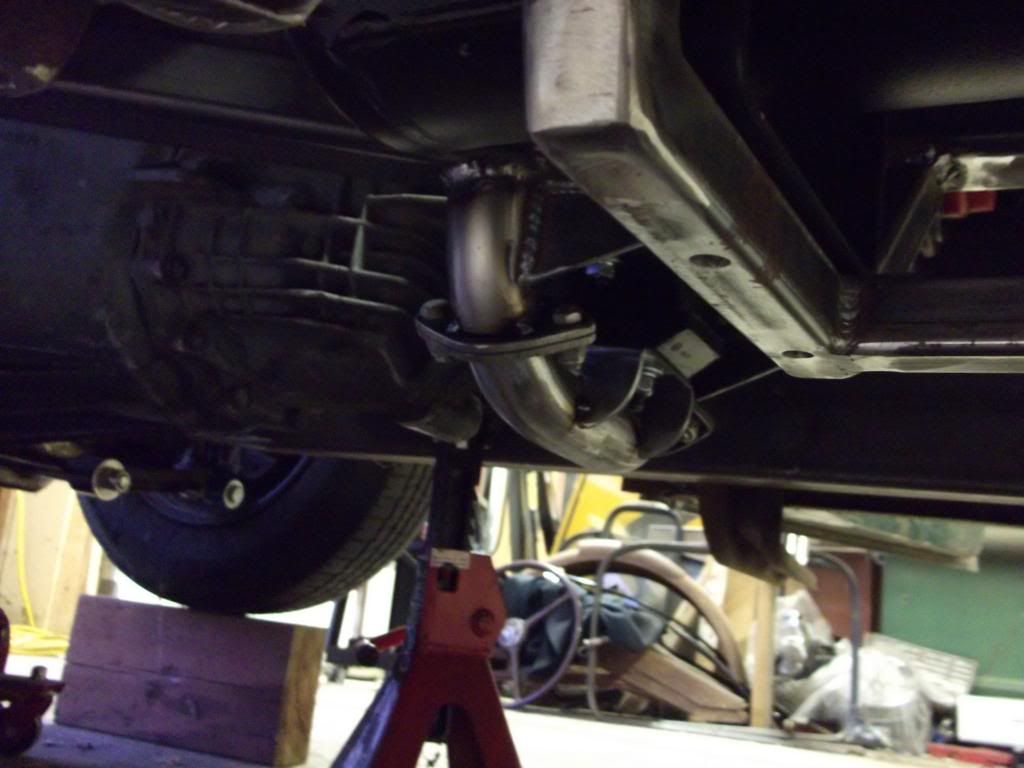 Next i clearanced the firewall and tacked on a flange 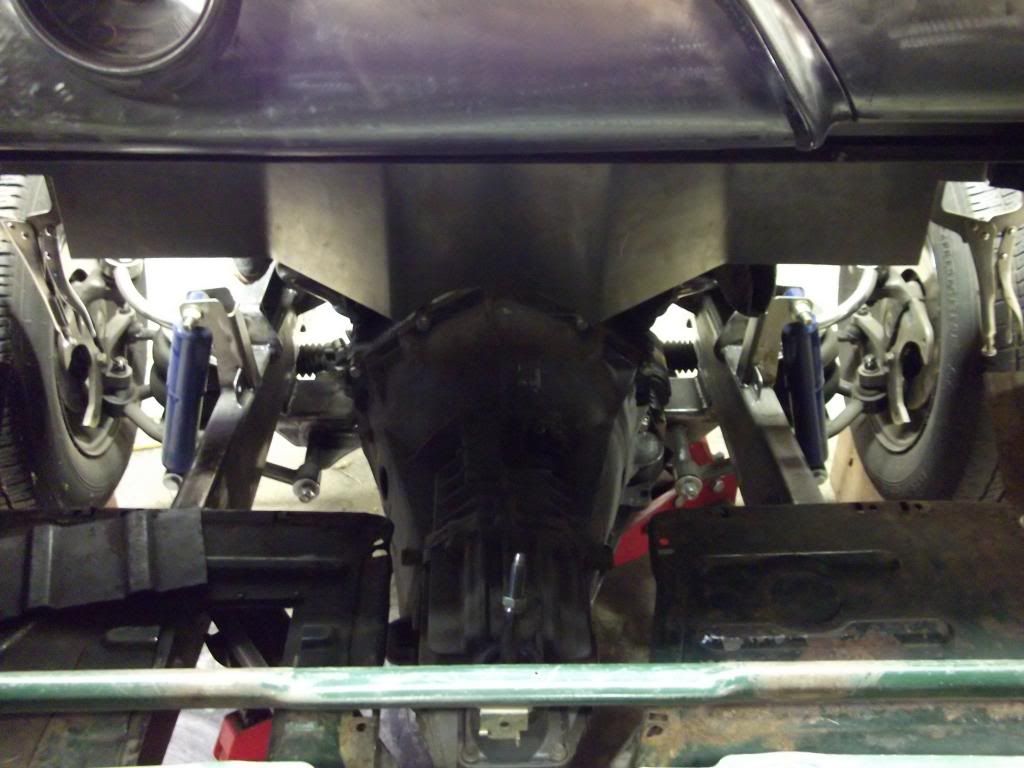 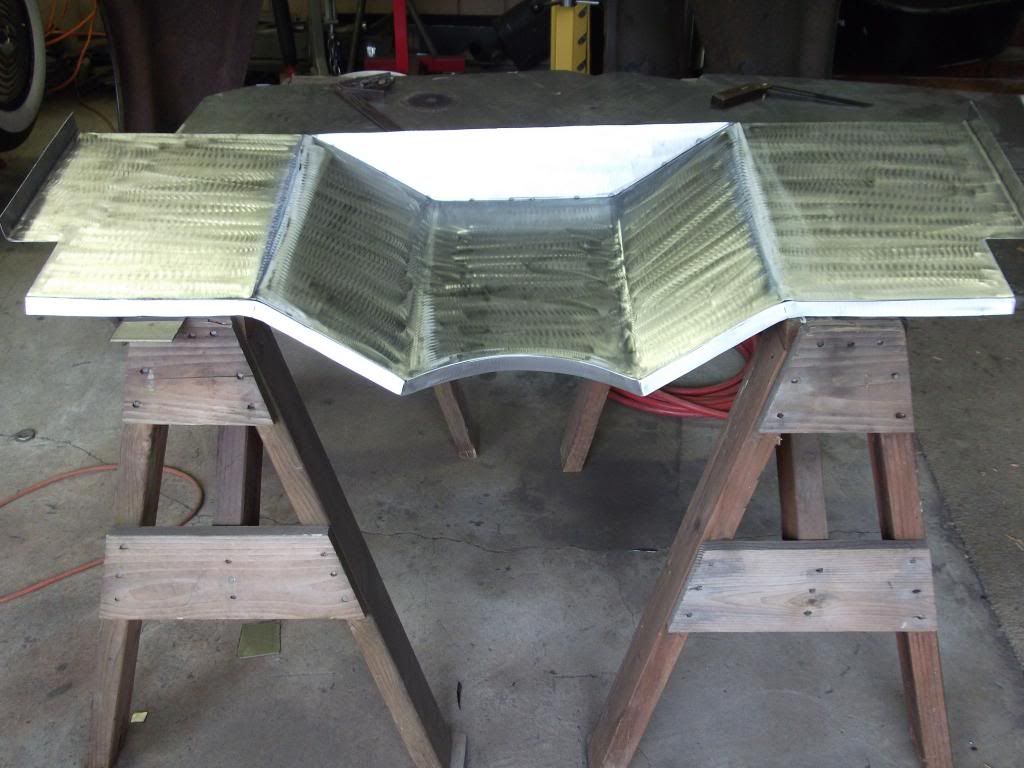 Then I braced the door jam and then i completely cut the floor out. Before 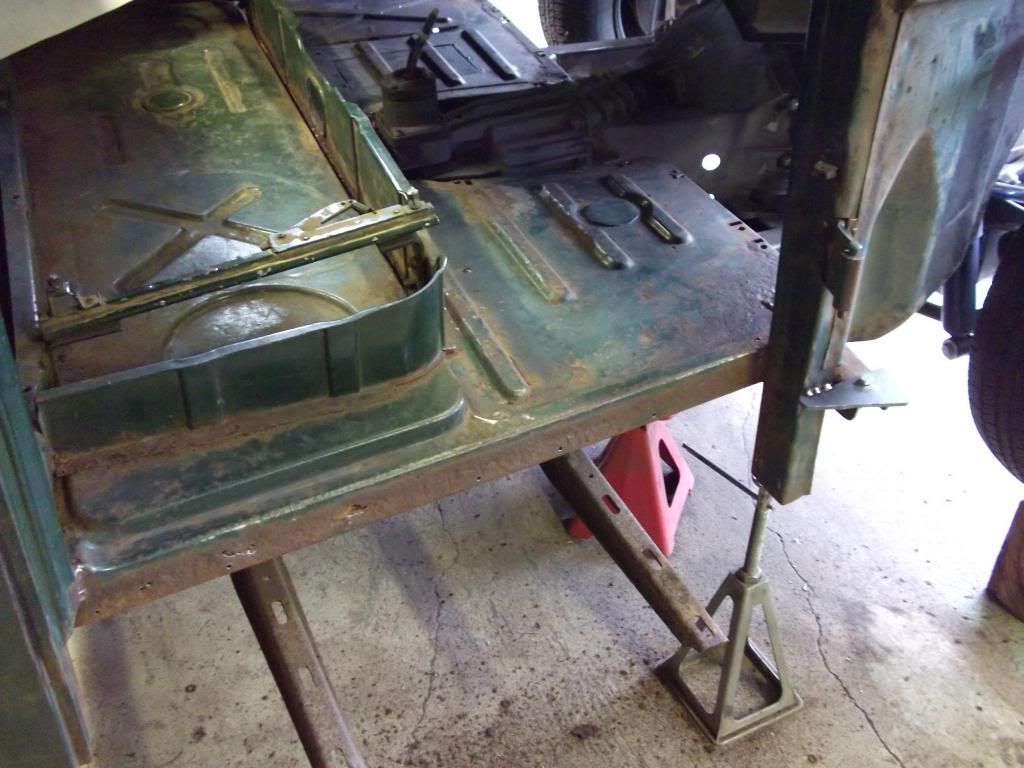 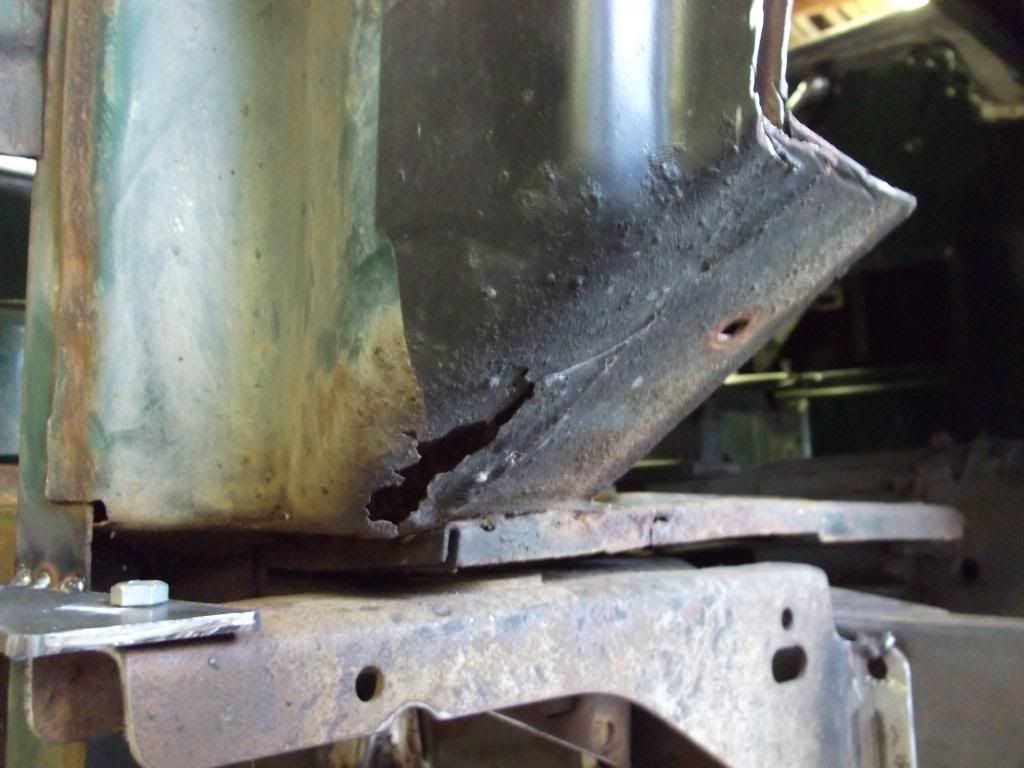 Rebuilding 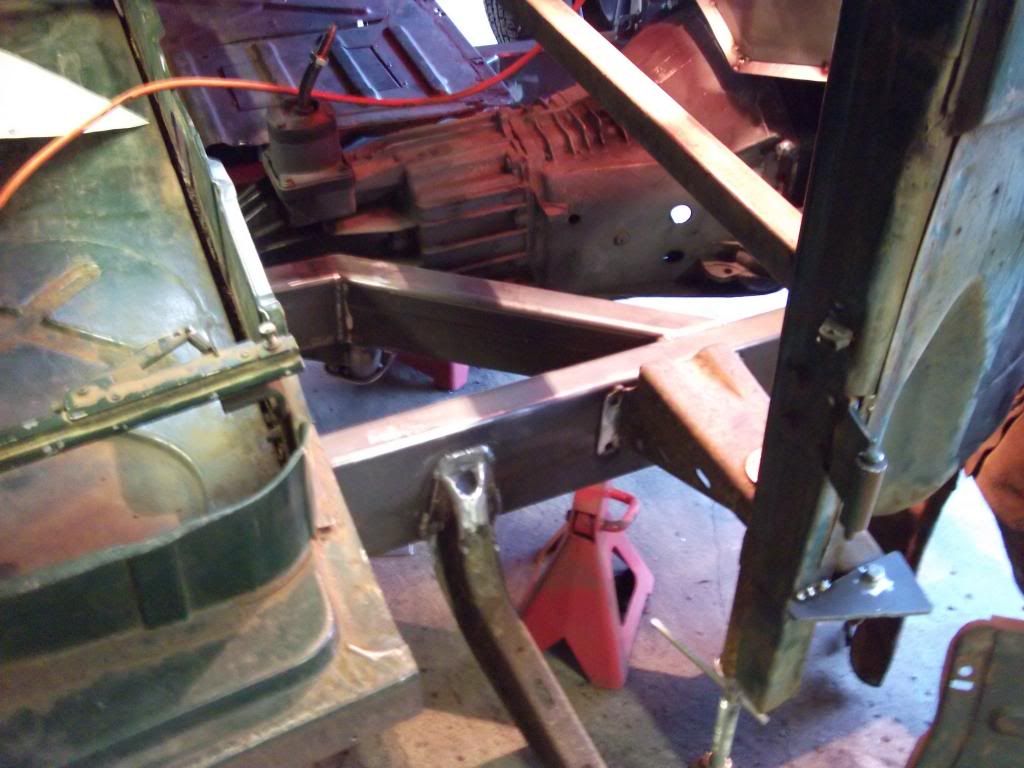 Cab under support(Old versus New) 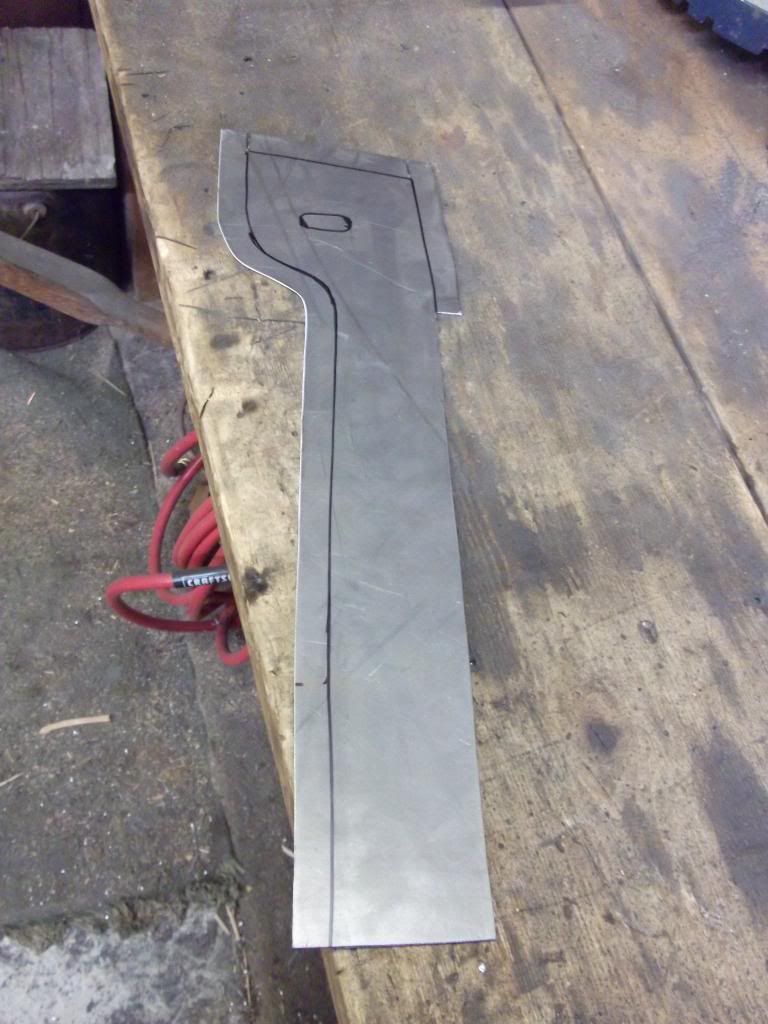 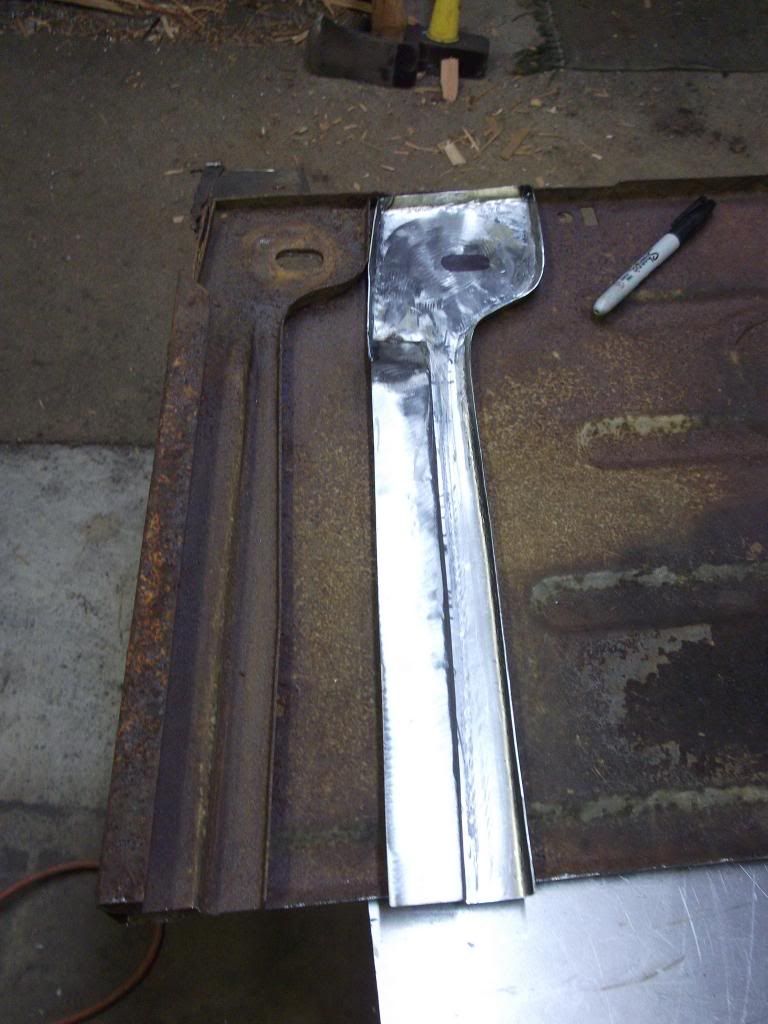 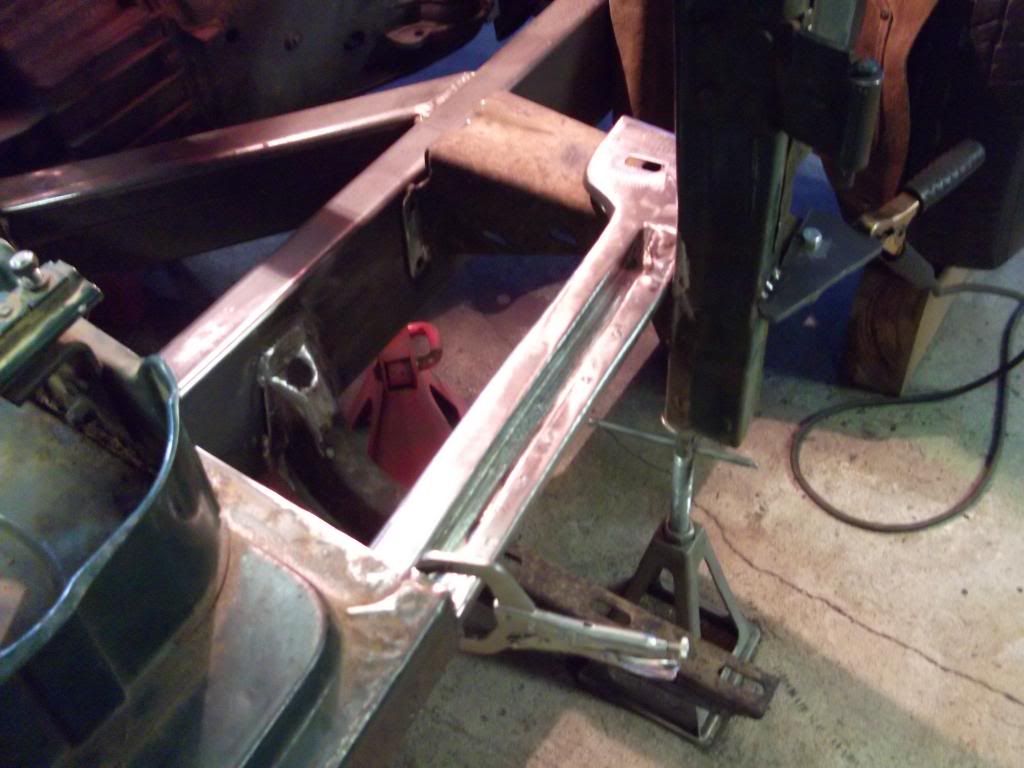 Starting the floorboard  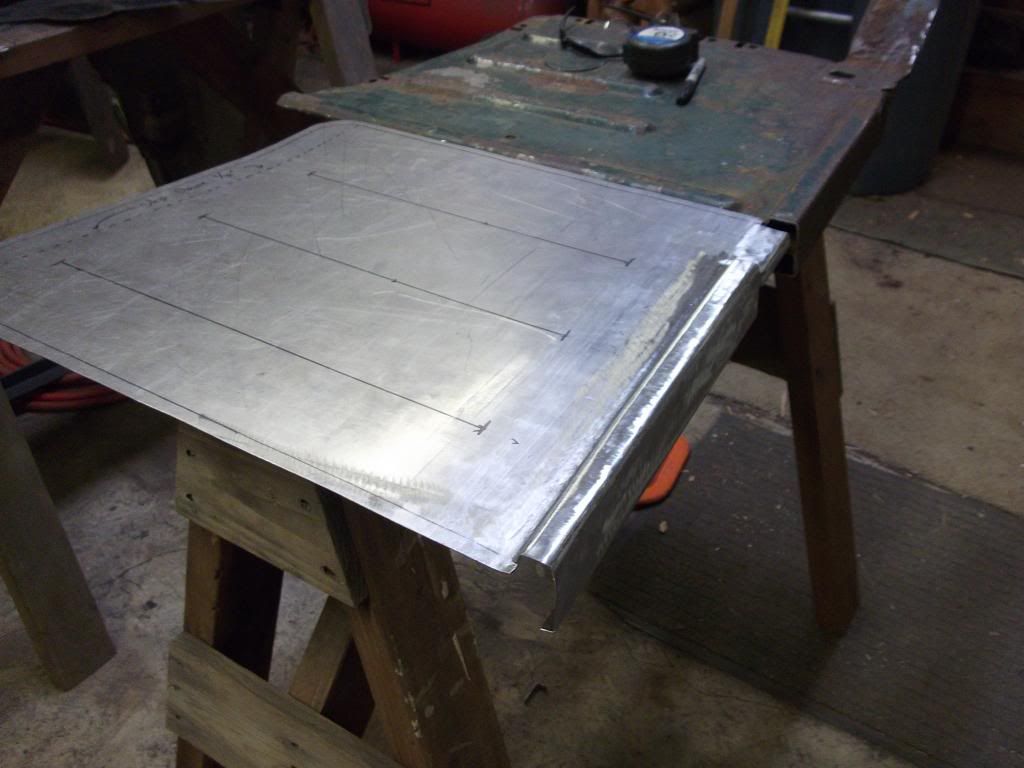 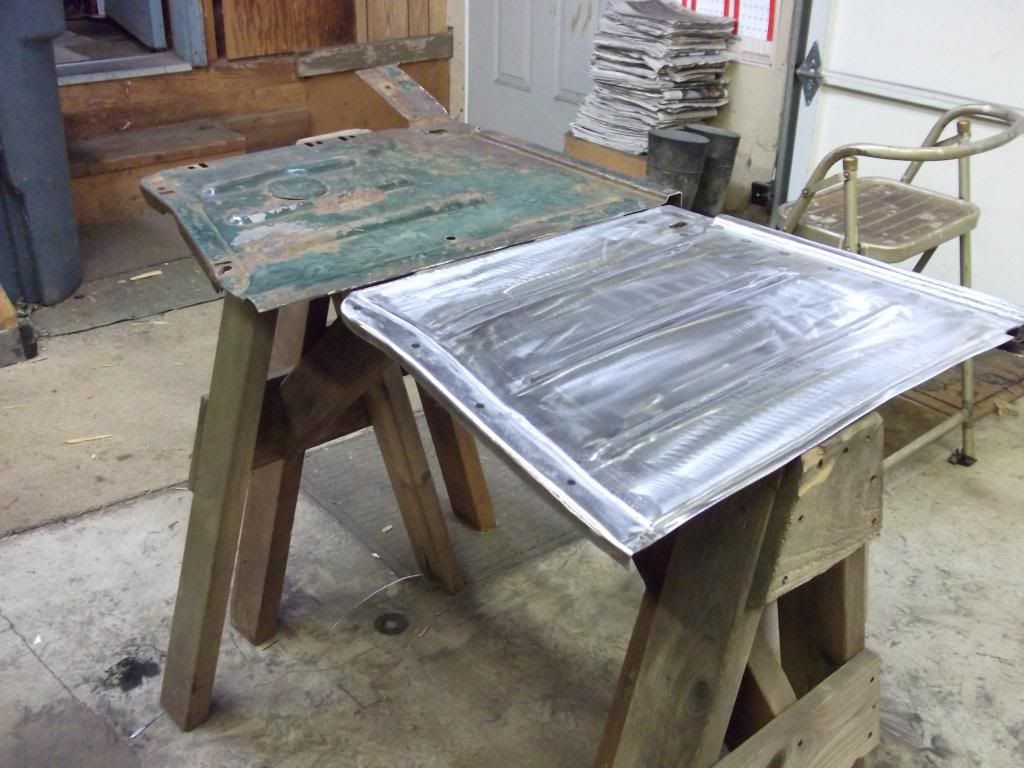 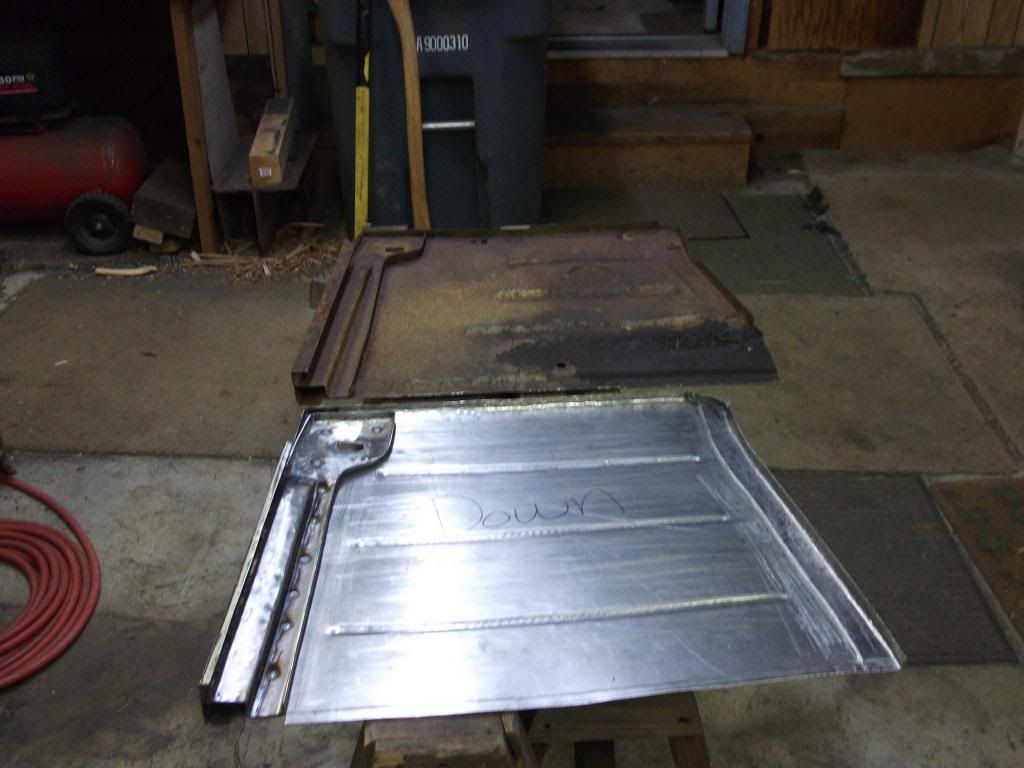 Then came time to make the upper peice that connects to the firewall 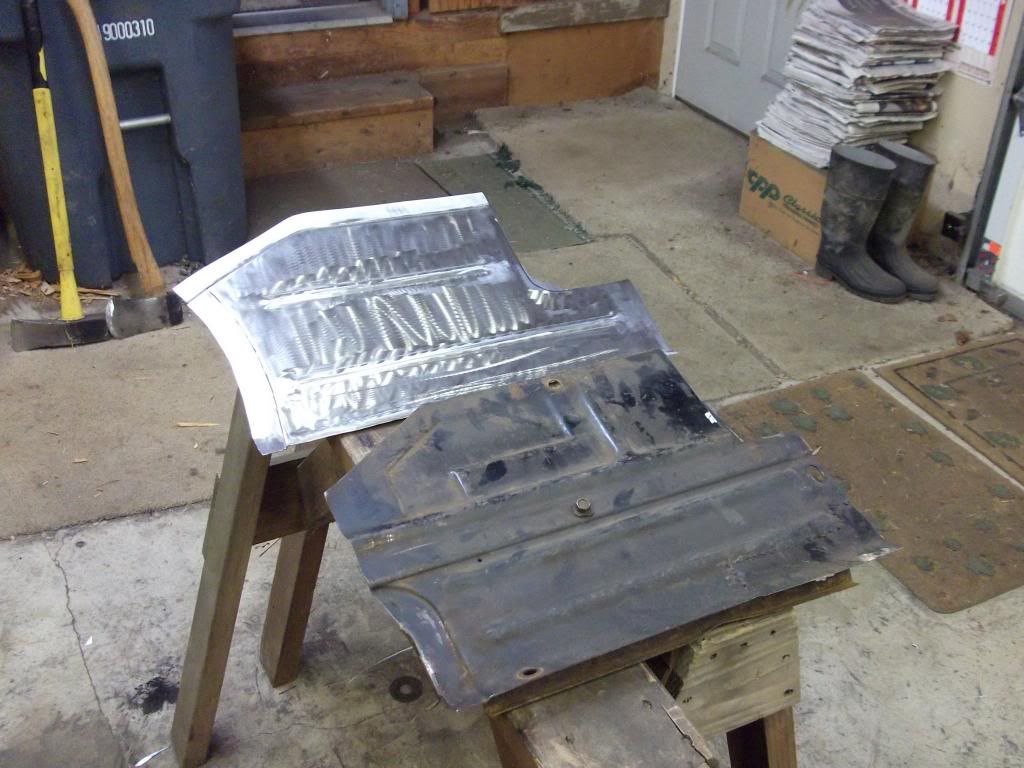 Then i fab'd a new inner kickboard panel 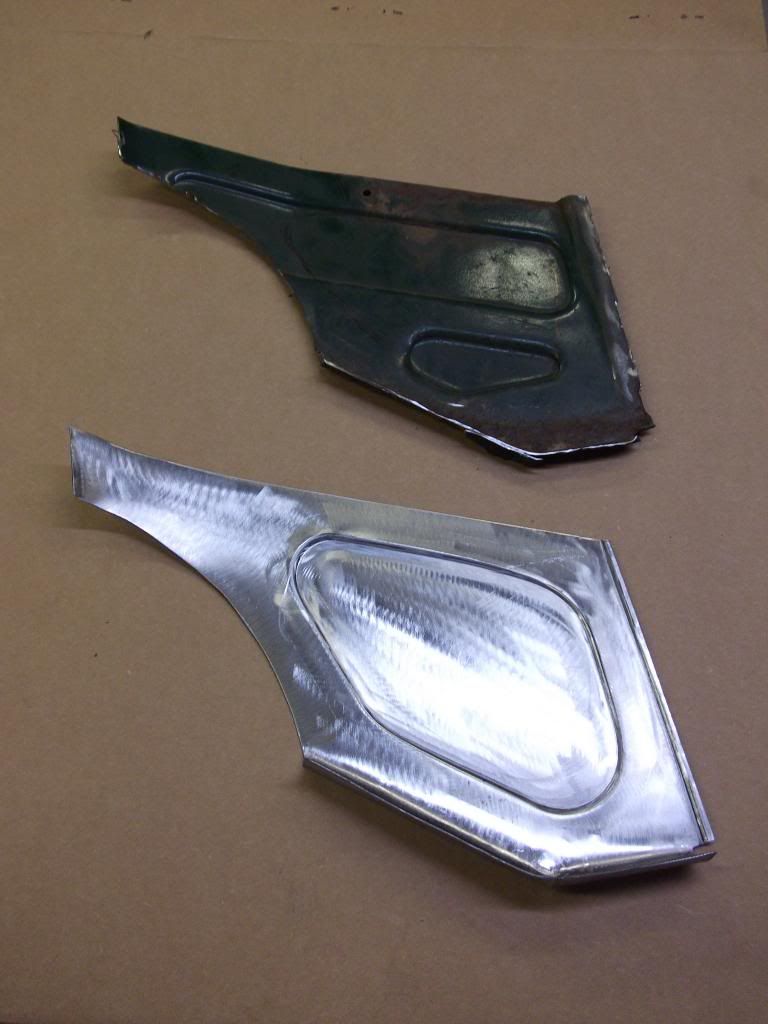 Next I welded the firewall flange and doghouse part fully 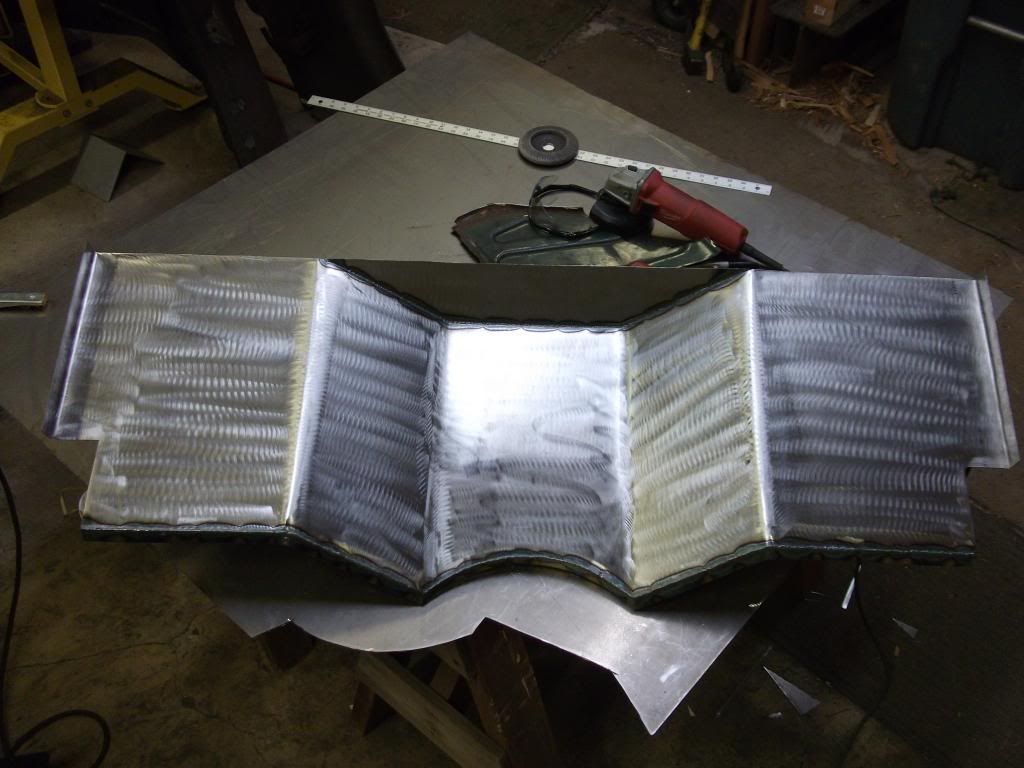 And here is on side ready to be drilled for spot welds and to be welded in place. 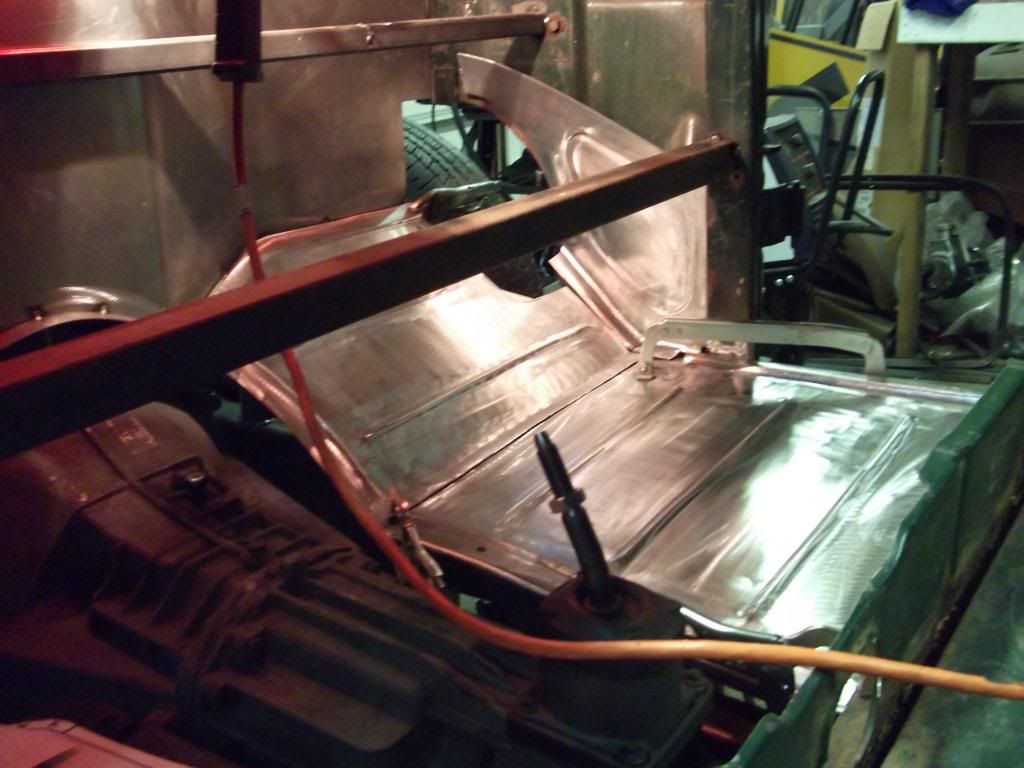 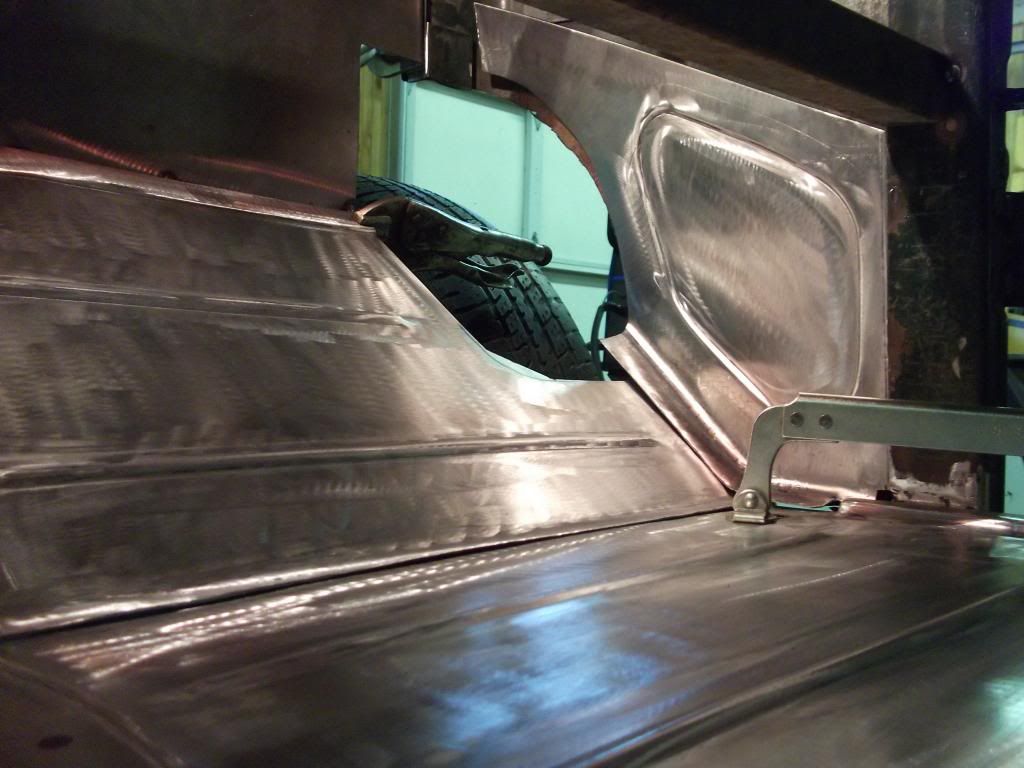 Then I'm on to the other side and then Ill build a new removable trans tunnel and the cab will be 95% done.
__________________
[PROJECT] FnLow69- 69 C-10 Full frame & layin' doors [PROJECT] Laidout53 - 53' Dodge Pickup, Full Kustom Build [PROJECT] "Hot Rod" 1931 Model A Bonneville style "Dream as if you'll live forever, Live as if you'll die today" ~ James Dean |
|
|
|
|
11-21-2012, 12:50 PM
|
#10 |
|
Junk Yartist
Join Date: Jul 2009
Location: Greeley, CO
Posts: 2,203
|
Re: [PROJECT] Laidout53 Part II
Freakin awesome!
Posted via Mobile Device
__________________
-Jeremy YOU ONLY FAIL IF YOU STOP TRYING 70 Crew Cab Build Link 70 GMC Suburban 4X4 build thread 95 Yukon Daily Driver Rebuilding an NP205 |
|
|
|
|
11-21-2012, 01:02 PM
|
#11 |
|
67cheby
 Join Date: Sep 2008
Location: siloam springs ar 72761
Posts: 17,890
|
Re: [PROJECT] Laidout53 Part II
WOW, looks great ! i think it would look good to roll a couple panels into that firewall also, just to break up the flat a little .
|
|
|
|
|
11-21-2012, 01:32 PM
|
#12 | ||
|
Registered User
Join Date: May 2005
Location: Washington
Posts: 848
|
Re: [PROJECT] Laidout53 Part II
Quote:
Quote:
__________________
[PROJECT] FnLow69- 69 C-10 Full frame & layin' doors [PROJECT] Laidout53 - 53' Dodge Pickup, Full Kustom Build [PROJECT] "Hot Rod" 1931 Model A Bonneville style "Dream as if you'll live forever, Live as if you'll die today" ~ James Dean |
||
|
|
|
|
11-21-2012, 01:42 PM
|
#13 |
|
67cheby
Join Date: Sep 2008
Location: siloam springs ar 72761
Posts: 17,890
|
Re: [PROJECT] Laidout53 Part II
cool ! i understand ! beautiful work !
|
|
|
|
|
11-21-2012, 07:21 PM
|
#14 |
|
Registered User
Join Date: Apr 2008
Location: Redmond, WA
Posts: 679
|
Re: [PROJECT] Laidout53 Part II
Wow! Your reproduction of the floor pieces is incredible! Nice work!
(and thanks for fixing the pics!) |
|
|
|
|
11-21-2012, 08:14 PM
|
#15 |
|
Registered User
Join Date: Aug 2005
Location: Hillsboro Oregon
Posts: 6,449
|
Re: [PROJECT] Laidout53 Part II
Love the roller work. Nicely done!
|
|
|
|
|
11-21-2012, 10:27 PM
|
#16 | ||
|
Registered User
Join Date: May 2005
Location: Washington
Posts: 848
|
Re: [PROJECT] Laidout53 Part II
Quote:
Quote:
__________________
[PROJECT] FnLow69- 69 C-10 Full frame & layin' doors [PROJECT] Laidout53 - 53' Dodge Pickup, Full Kustom Build [PROJECT] "Hot Rod" 1931 Model A Bonneville style "Dream as if you'll live forever, Live as if you'll die today" ~ James Dean |
||
|
|
|
|
11-22-2012, 12:19 AM
|
#17 |
|
Registered User
Join Date: May 2005
Location: Washington
Posts: 848
|
Re: [PROJECT] Laidout53 Part II
Got the Passenger side done except for the wheel tub, need the proper size tires for those.
Got all the rust in the cab/firewall corner replaced Before After  Next I drilled a bunch of spot weld holes in the upper floor piece and got to welding the floor and kick panel in. 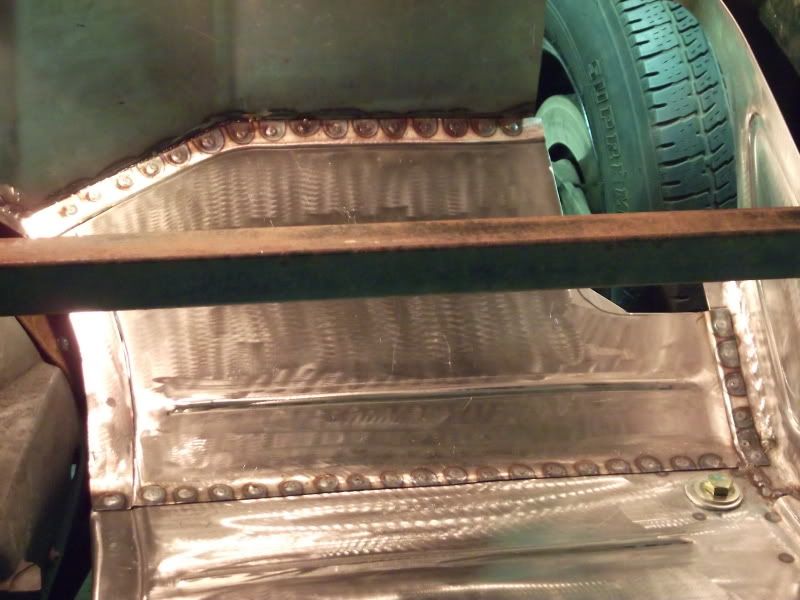  Finished cutting out and replacing the rust in the floor edge under the seat mount 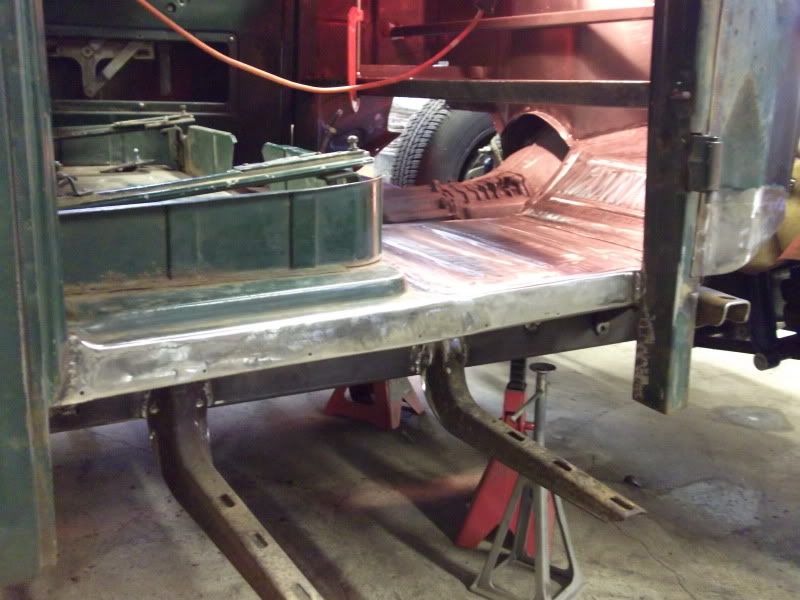 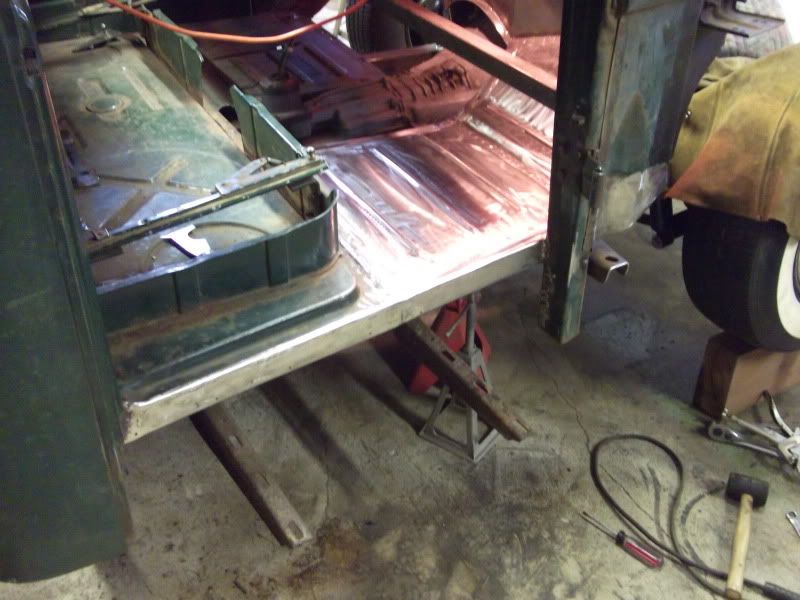 then started to fab a new "rocker" panel  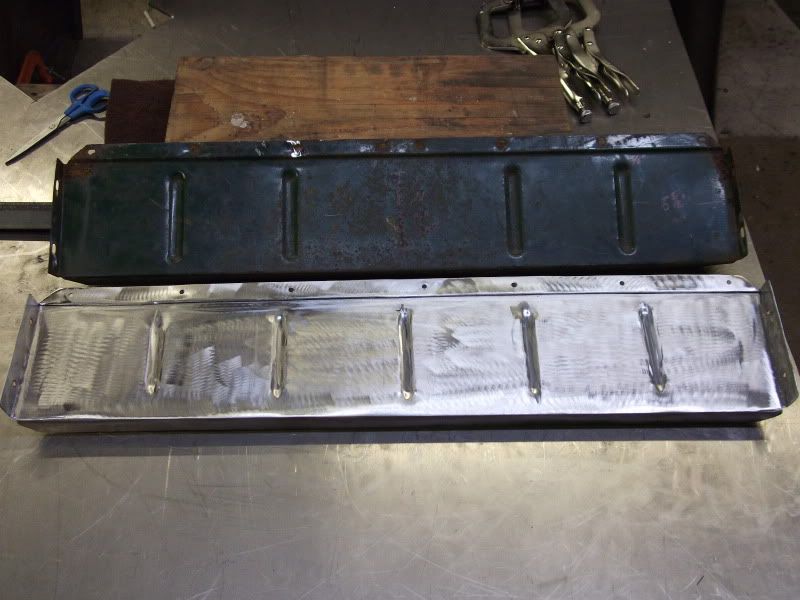 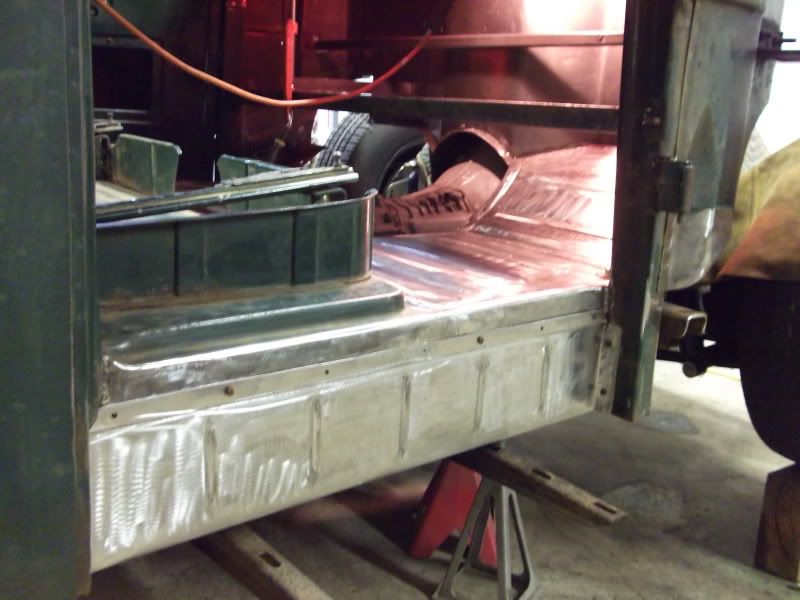 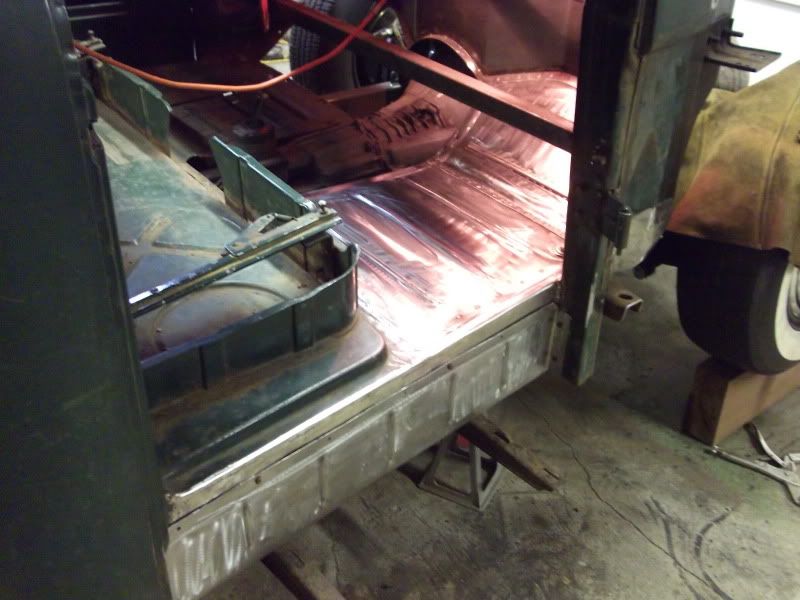 That concludes the passenger side for now, on to the driver side on friday. Happy thanksgiving to everyone!! Justin
__________________
[PROJECT] FnLow69- 69 C-10 Full frame & layin' doors [PROJECT] Laidout53 - 53' Dodge Pickup, Full Kustom Build [PROJECT] "Hot Rod" 1931 Model A Bonneville style "Dream as if you'll live forever, Live as if you'll die today" ~ James Dean |
|
|
|
|
11-24-2012, 02:28 PM
|
#18 |
|
Registered User
Join Date: May 2005
Location: Washington
Posts: 848
|
Re: [PROJECT] Laidout53 Part II
Started on the other side yesterday, pictures too come....
__________________
[PROJECT] FnLow69- 69 C-10 Full frame & layin' doors [PROJECT] Laidout53 - 53' Dodge Pickup, Full Kustom Build [PROJECT] "Hot Rod" 1931 Model A Bonneville style "Dream as if you'll live forever, Live as if you'll die today" ~ James Dean |
|
|
|
|
11-24-2012, 04:16 PM
|
#19 |
|
Account Suspended
Join Date: Aug 2010
Location: richmond ill
Posts: 376
|
Re: [PROJECT] Laidout53 Part II
looking good
|
|
|
|
|
11-25-2012, 02:48 PM
|
#20 |
|
Registered User
Join Date: May 2005
Location: Washington
Posts: 848
|
Re: [PROJECT] Laidout53 Part II
Thanks R.A.D!
__________________
[PROJECT] FnLow69- 69 C-10 Full frame & layin' doors [PROJECT] Laidout53 - 53' Dodge Pickup, Full Kustom Build [PROJECT] "Hot Rod" 1931 Model A Bonneville style "Dream as if you'll live forever, Live as if you'll die today" ~ James Dean |
|
|
|
|
11-25-2012, 08:10 PM
|
#21 |
|
PROJECT 7DEUCE
Join Date: Dec 2002
Location: GRANTS PASS OR
Posts: 21,590
|
Re: [PROJECT] Laidout53 Part II
Nice work on the floor.... Any plans to get back on the chevy?
__________________
GO BIG GREEN GO DUCKSMEMBER #6377 72 k-5 daily driver 6'' lift 35'' 350-350-205 slowly getting rust free. Project "7DEUCE" check out my build http://67-72chevytrucks.com/vboard/s...d.php?t=267665 Tim Powell..R.I.P EastSideLowlife..... R.I.P.. |
|
|
|
|
11-25-2012, 11:42 PM
|
#22 |
|
Registered User
Join Date: May 2005
Location: Washington
Posts: 848
|
Re: [PROJECT] Laidout53 Part II
Thanks, Yep Ill be back on the chevy when i get this one done...
__________________
[PROJECT] FnLow69- 69 C-10 Full frame & layin' doors [PROJECT] Laidout53 - 53' Dodge Pickup, Full Kustom Build [PROJECT] "Hot Rod" 1931 Model A Bonneville style "Dream as if you'll live forever, Live as if you'll die today" ~ James Dean |
|
|
|
|
11-26-2012, 12:01 AM
|
#23 |
|
Registered User
Join Date: Mar 2010
Location: Piper, KS
Posts: 683
|
Re: [PROJECT] Laidout53 Part II
Nice fab and metal work. Keep it up.
Posted via Mobile Device |
|
|
|
|
11-26-2012, 12:52 AM
|
#24 | |
|
Registered User
Join Date: May 2005
Location: Washington
Posts: 848
|
Re: [PROJECT] Laidout53 Part II
Quote:
__________________
[PROJECT] FnLow69- 69 C-10 Full frame & layin' doors [PROJECT] Laidout53 - 53' Dodge Pickup, Full Kustom Build [PROJECT] "Hot Rod" 1931 Model A Bonneville style "Dream as if you'll live forever, Live as if you'll die today" ~ James Dean |
|
|
|
|
|
11-26-2012, 12:53 AM
|
#25 |
|
Registered User
Join Date: May 2005
Location: Washington
Posts: 848
|
Re: [PROJECT] Laidout53 Part II
Well yesterday I started making the new floor on the drivers side and got it finished today, except for the rust in the corner like on the other side. Next up will be the transmission hump. Need to get some sheet metal this week so i can start on it.
Heres the pictures, I wont bore you guys with during constuction pictures( mostly cus i didnt take any). Just flip the patterns and trace then cross your fingers that it looks the same... 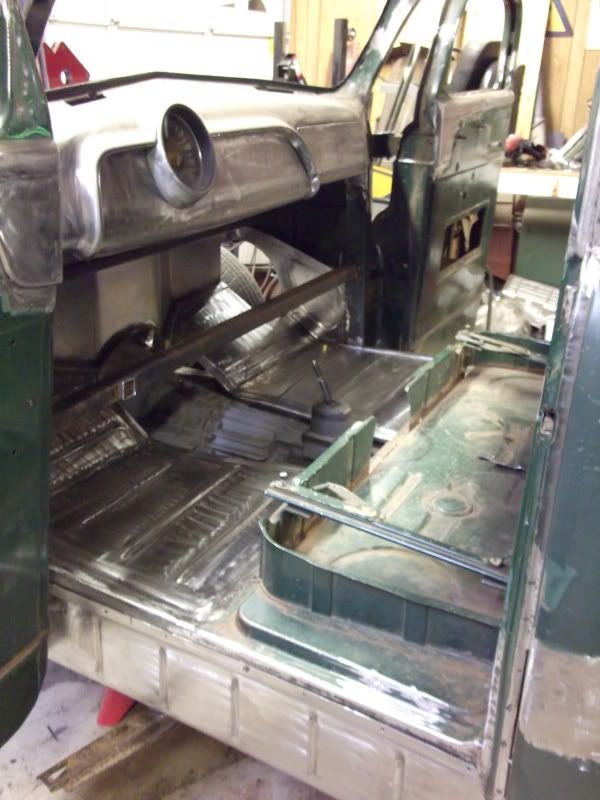 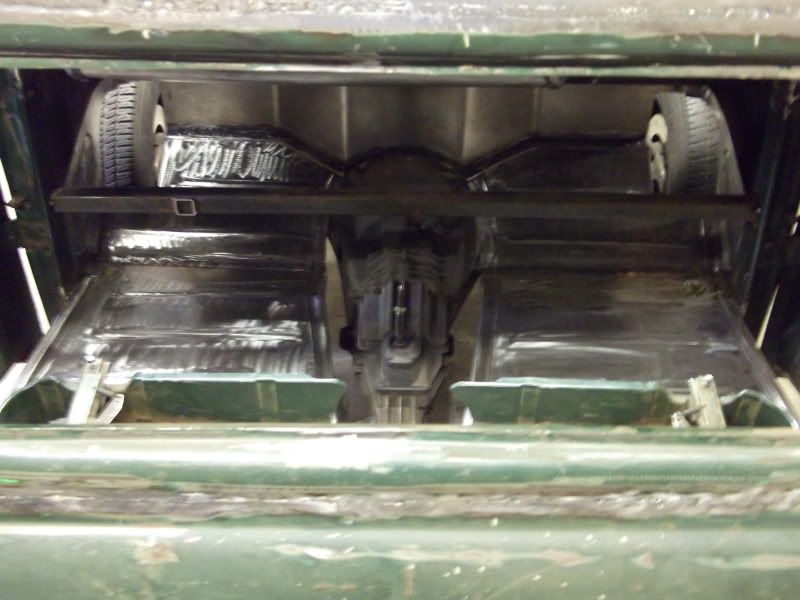 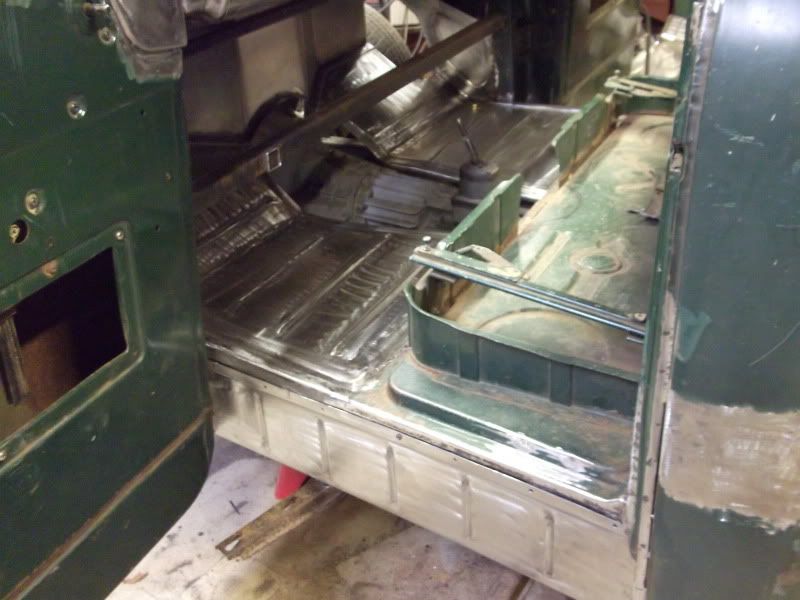 View from the other side 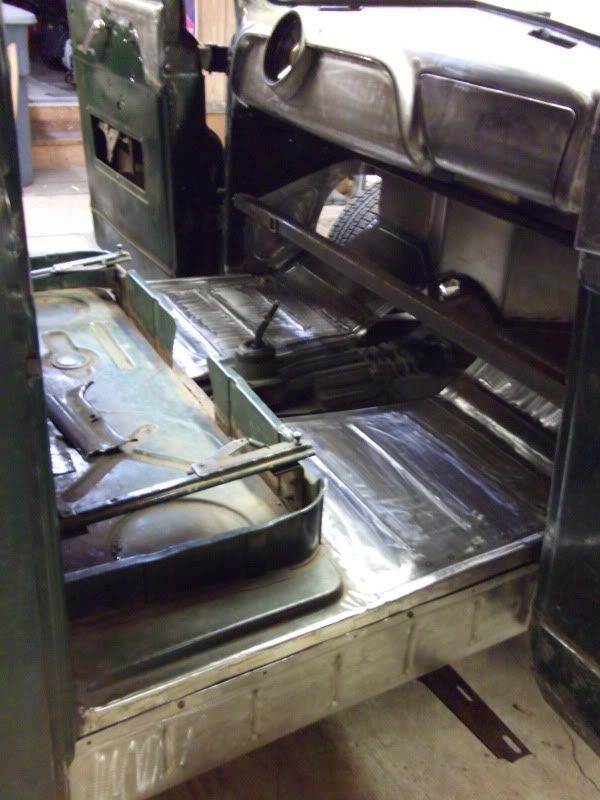 Justin
__________________
[PROJECT] FnLow69- 69 C-10 Full frame & layin' doors [PROJECT] Laidout53 - 53' Dodge Pickup, Full Kustom Build [PROJECT] "Hot Rod" 1931 Model A Bonneville style "Dream as if you'll live forever, Live as if you'll die today" ~ James Dean |
|
|
|
 |
| Bookmarks |
|
|


 Hybrid Mode
