
|
Register or Log In To remove these advertisements. |
|
|
|
|||||||
 |
|
|
Thread Tools | Display Modes |
 07-06-2014, 01:03 AM
|
#1 |
|
Senior Member
Join Date: May 2004
Location: johnstown, NY
Posts: 2,393
|
MIG welding tips & techniques
I was asked in my build thread to share MIG welding techniques, so here ya go. These are the specific steps I took to achieve a better looking MIG weld on thicker plate (as opposed to sheet metal.) If you try the following steps, post some pictures. We can all learn from each other!
I used 1/8th plate to form a T-joint. By the way, these tests in the welding world are called "coupons." Weird, I know On these tests, I was using .030 wire, CFH set to 20. Make sure your welder is on and you are holding the trigger down when you set your flow rate. The idea here is to do at least six different tests using different welder settings in order to compare your results. Do as many as you like until you find your welders sweet spot. It's different from machine to machine. For the record, I'm using a Hobart Handler 180, which is a 220V machine. Test 1: Set your voltage and wire speed at the recommended settings on your welder. I'm going to share my specific welder setting so you can better understand the various tests, but as I previously said, the settings will be different depending on your welder. So on my welder, the recommended setting is 3/60 (3 voltage, 60 wire speed) Run a bead at least 3" long. Make sure you label the piece so you can keep track of your changes. 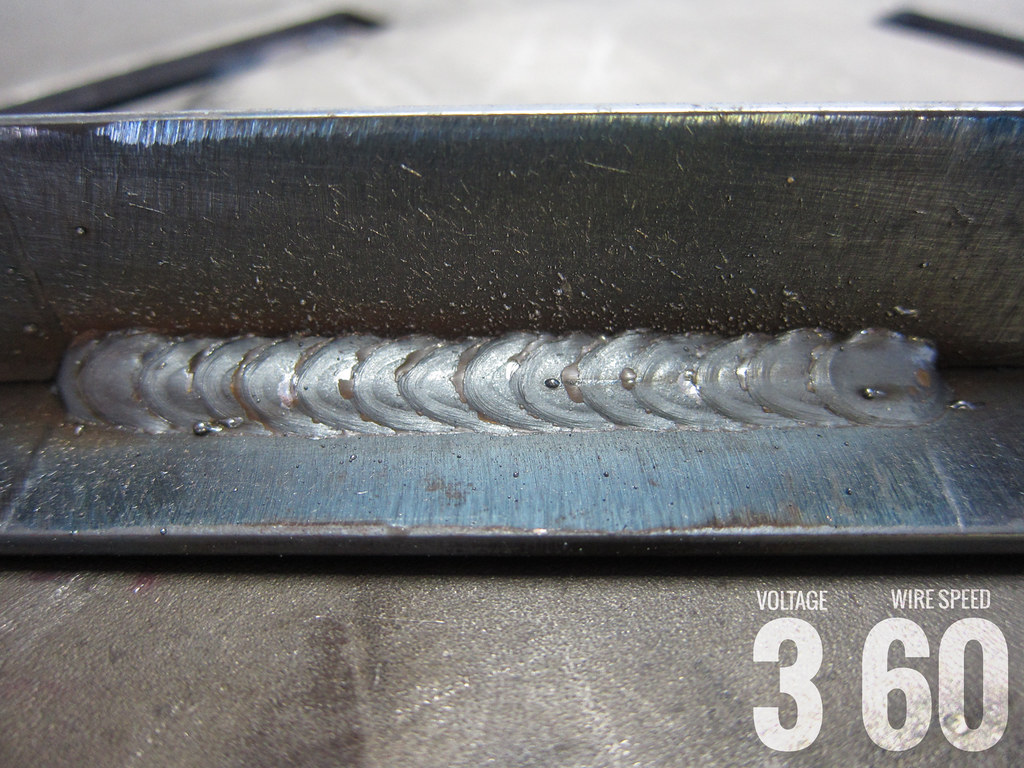 Test 2: Now you will change one setting at a time. Start with lowering the wire speed. On my welder, I lowered wire speed from 60 to 50, so 3/50. When you lower wire speed or voltage, you will need to SLOW DOWN on your travel speed. Speed is something you are going to have to also experiment with, but to get a ballpark idea, these 3 inch beads take me about 24 seconds to complete, so that is 8 seconds per inch. Again, this is just for reference.  Test 3: Lower wire speed another step: 3/40  Test 4: Step down voltage and start with factory recommended wire speed, so 2/60. Here you can see wire speed is too fast as there are issues with the toe not properly fusing.  Test 5: Step down wire speed, 2/50. Again, the toe is not the greatest, but its better than the above test.  Test 6: Step down wire speed, 2/40. This is the sweet spot (appearance-wise) for my welder with my specific travel speed.  With all the above tests, you should see a significant change in weld appearance(some good, some bad) and amount of spatter. You will hear the sound of the weld change from test to test. You want a smooth, consistent sound. When it starts to pop and crackle, one of the settings is off. This will also be evident with increased spatter. Ok, that was the easy part to explain. Now for the technique part. By the way, this whole discussion is something that has been discussed on the internet for years, just google "MIG like TIG" and be prepared for endless debate. I don't intend this thread to turn into a debate on weld strength. The strength factor is something that you will have to get comfortable with. There are rudimentary destructive hammer tests you can do to your coupons, as well as more technical tests using dyes to test penetration. If this is of concern to you(which it should be), you could research more about these tests, or you can simply use the techniques I am explaining on nonstructural, cosmetic welded areas. Use these techniques on things you feel appropriate, and where you feel comfortable. This write-up is meant to encourage you to experiment with your welder. For a long time, I used a back and forth weave pattern. You are probably familiar with this. I now do what I'll call the overlapping oval pattern. You are going to travel from left to right, making overlapping, counter-clockwise ovals with the gun at 45 degree angle. I did a video of this technique using pen and paper. When you overlap the ovals, you are essentially going to be pushing the molten puddle back into itself with the wire. How far you overlap is going to dictate how far apart the ripples are. As a ballpark, start with a 50% overlap.  This is really obvious (and the hard part) but I'll say it anyway. In order to get a good looking weld, you need to be really steady, smooth, and be consistent with the size of the ovals you are making. If you slow down or speed up or move too far in one direction, that all will affect the robotic look of an appealing looking weld. Again, this may sound obvious, but you need to see what you are doing! You need to see the molten puddle to be able to manipulate it. For the longest time, I had trouble being able to see really well. You can try two simple things to aid in seeing. The first was an eye opener for me. (pun intended!) I was at the welding supply store and noticed these magnifiers that are placed in your helmet. These things are GREAT. There are various strengths, allowing you to see what you are doing really close up. Try them, you won't be disappointed.   The second thing is lighting. Even though you are producing a very bright arc when you weld, if you shine some sort of construction working light on what you are welding, the light will still aid you in being able to see better. That's about it. Let me know if you have any questions, and if you give it a try, post pictures. Happy welding! |

|

|
|
07-06-2014, 08:56 AM
|
#2 |
|
Registered User
 Join Date: May 2014
Location: Pittsburgh, PA
Posts: 712
|
Re: MIG welding tips & techniques
Good info, thanks. Unfortunately my welds never look that good. I seem to always have to much spatter no matter what I do and can never seem to find that sweet spot (I only have a 110v Lincoln 140c)
I'm just hoping that my truck doesn't start dropping parts as I'm driving down the street :-)
__________________
Bill 2004 Chevy Silverado Z71 Ext Cab 1500 1972 Chevy K-10 SOLD 1967 Chevelle SS |
|
|
|
|
07-06-2014, 09:28 AM
|
#3 |
|
Registered User
Join Date: Nov 2012
Location: Whidbey Island/Edmonds,WA
Posts: 360
|
Re: MIG welding tips & techniques
Good stuff. I'm also stuck with a 110 buzz box. I'm learning as I go, but I'm also not welding anything that needs a true bond in a critical area. I'll call in the big guys. I tried to explain to the boss that one call would pay for a 220v welder, but whatever.
I haven't needed to weld anything but the exhaust on my truck, and hopefully won't need to anytime soon. I appreciate the pointers, and I'll remember them next time I plug in.
__________________
If I have to be on 4 wheels, It has to be a classic Chevy 1967 c10 Longbed (Hawghauler/Icy weather transport) 2003 BMW K1200GT (Rain bike) 2007 Softail Deuce (Sun bike) 2009 Ultra Classic Electra Glide (Everything else bike) |
|
|
|
|
07-06-2014, 10:09 AM
|
#4 |
|
Senior Member
Join Date: May 2004
Location: johnstown, NY
Posts: 2,393
|
Re: MIG welding tips & techniques
Guys, these results are not specific to a 220V machine. You can absolutely make killer welds with the more popular 110V welders.
|
|
|
|
|
07-06-2014, 10:22 AM
|
#5 |
|
Registered User
Join Date: Jul 2005
Location: AL
Posts: 1,828
|
Re: MIG welding tips & techniques
Josh, thank you for taking time to post this info..
__________________
" |
|
|
|
|
07-06-2014, 11:13 AM
|
#6 |
|
Registered User
Join Date: Aug 2011
Location: Montrose, CO
Posts: 972
|
Re: MIG welding tips & techniques
Man, those are some nice welds! Thanks for taking the time to do this very well documented with excellent pictures thread.
|
|
|
|
|
07-06-2014, 11:26 AM
|
#7 |
|
Registered User
Join Date: Apr 2001
Location: DALLAS,TX
Posts: 21,933
|
Re: MIG welding tips & techniques
Nice write-up.
__________________
67SWB-B.B.RetroRod 64SWB-Recycle 89CCDually-Driver/Tow Truck 99CCSWB Driver All Fleetsides @rattlecankustoms in IG Building a small, high rpm engine with the perfect bore, stroke and rod ratio is very impressive. It's like a highly skilled Morrocan sword fighter with a Damascus Steel Scimitar..... Cubic inches is like Indiana Jones with a cheap pistol. |
|
|
|
|
07-06-2014, 12:13 PM
|
#8 |
|
Registered User
Join Date: Jul 2007
Location: Fall River California
Posts: 2,026
|
Re: MIG welding tips & techniques
Thanks for the tips! My welds are ugly, they've all held (so far) but man they're embarrassing! I'm going to try a little more practice with your tips. Thanks again!
__________________
http://smg.photobucket.com/albums/v655/aaronhero/ |
|
|
|
|
07-06-2014, 12:16 PM
|
#9 |
|
56 - autocross
Join Date: Apr 2010
Location: Camarillo, Ca
Posts: 1,121
|
Re: MIG welding tips & techniques
Thanks for the instruction. I appreciate it. Those are beautiful welds. Did you ever tell us which one is the best in your opinion? Are you telling us that you are the mig like tig guy?
|
|
|
|
|
07-06-2014, 01:51 PM
|
#10 | |||||
|
Senior Member
Join Date: May 2004
Location: johnstown, NY
Posts: 2,393
|
Re: MIG welding tips & techniques
Quote:
Quote:
Quote:
Quote:
Quote:
|
|||||
|
|
|
|
07-06-2014, 02:17 PM
|
#11 | |
|
56 - autocross
Join Date: Apr 2010
Location: Camarillo, Ca
Posts: 1,121
|
Re: MIG welding tips & techniques
Quote:
|
|
|
|
|
|
07-06-2014, 02:17 PM
|
#12 | |
|
56 - autocross
Join Date: Apr 2010
Location: Camarillo, Ca
Posts: 1,121
|
Re: MIG welding tips & techniques
Quote:
|
|
|
|
|
|
07-06-2014, 06:27 PM
|
#13 | |
|
Senior Member
Join Date: May 2004
Location: johnstown, NY
Posts: 2,393
|
Re: MIG welding tips & techniques
Quote:
|
|
|
|
|
|
07-06-2014, 06:51 PM
|
#14 |
|
Truck junkie
 Join Date: May 2006
Location: Reno NV
Posts: 697
|
Re: MIG welding tips & techniques
Good writeup. Here are a couple of flux core 110 welds since I saw 110 mentioned. I set up the same way, The methods here work just as well with 110 solid wire or flux. The dirty one is a Crawler bumper I built a year ago he never painted you can see by the right side of the lower pic how much the speed and technique alter the bead even with the same setup. I had the truck bed on blocks and it wasn't quite high enough. I started on the right and was one handing because of a block in my way you can't see. As I moved left I was able to use my regular technique.
Last edited by Oldtruckfanatic; 07-06-2014 at 07:11 PM. |
|
|
|
|
07-06-2014, 07:43 PM
|
#15 | |
|
Registered User
Join Date: Apr 2001
Location: DALLAS,TX
Posts: 21,933
|
Re: MIG welding tips & techniques
Quote:
Get me all scrunched up under a vehicle, w/poor lighting, & awkward positioning, & my welds look like crap.
__________________
67SWB-B.B.RetroRod 64SWB-Recycle 89CCDually-Driver/Tow Truck 99CCSWB Driver All Fleetsides @rattlecankustoms in IG Building a small, high rpm engine with the perfect bore, stroke and rod ratio is very impressive. It's like a highly skilled Morrocan sword fighter with a Damascus Steel Scimitar..... Cubic inches is like Indiana Jones with a cheap pistol. |
|
|
|
|
|
07-06-2014, 08:42 PM
|
#16 |
|
Senior Member
Join Date: May 2004
Location: johnstown, NY
Posts: 2,393
|
Re: MIG welding tips & techniques
Agreed...being in an awkward position is a whole different ball game.
Thanks for sharing, those welds look solid! |
|
|
|
|
07-07-2014, 09:51 AM
|
#17 |
|
Registered User
Join Date: Jan 2007
Location: vernon b.c.
Posts: 3,022
|
Re: MIG welding tips & techniques
What role does the setting of the gas have with your welds,say set at 15 or 20,I think is for cooling but how does the different settings change your weld
|
|
|
|
|
07-07-2014, 10:55 AM
|
#18 |
|
Truck junkie
Join Date: May 2006
Location: Reno NV
Posts: 697
|
Re: MIG welding tips & techniques
It isn't to cool the weld and its a bad idea in the majority of cases to do anything to speed cooling of a weld. In fact in certain situations we do things to slow it down. Shielding gas it what its called and it does exaxtly that. Your molten pool of metal will react with the components In the atmosphere around it and cause several problems with the weld. Shielding gas is inert and is meant to flood the area around the arc and weld pool to keep the atmospheric gasses out of the weld. Changing the flow rate mainly serves as a tool since different joint types and positions change how the shielding gas covers an area. Take for instance an inside corner and a butt joint. The inside corner creates a dam in effect that helps contain the shielding gas and also helps block drafts that may blow away the shielding gas where a flat butt joint does not. Upping the flow rate can help maintain good coverage in situations where you're welding overhead or on a flat surface or where slight drafts might be present. There are probably better ways to explain it but hopefully this helps.
Last edited by Oldtruckfanatic; 07-07-2014 at 11:16 AM. |
|
|
|
|
07-07-2014, 01:33 PM
|
#19 | |
|
meowMEOWmeowMEOW
Join Date: Sep 2009
Location: MKE WI
Posts: 7,128
|
Re: MIG welding tips & techniques
Quote:
You can jack gas pressure up slightly if you walking at an extreme angle at high speed to extend the reach of it, but even then you can get too far from the tip to actually make a good clean arc.
__________________
'66 Short Step / SD Tuned / Big Cam LQ4 / Backhalfed /Built 4l80e / #REBUILDEVERYTHING  |
|
|
|
|
|
07-07-2014, 02:22 PM
|
#20 | |
|
Registered User
Join Date: May 2014
Location: Pittsburgh, PA
Posts: 712
|
Re: MIG welding tips & techniques
Quote:
 Bill
__________________
Bill 2004 Chevy Silverado Z71 Ext Cab 1500 1972 Chevy K-10 SOLD 1967 Chevelle SS |
|
|
|
|
|
07-07-2014, 02:38 PM
|
#21 | |
|
Registered User
Join Date: Jul 2009
Location: San Jose Ca
Posts: 2,871
|
Re: MIG welding tips & techniques
Quote:
Remember that your settings will vary tremendously based on your joint and direction. Hottest>Lowest = Inside corner joint> butt joint > outside corner joint. Flat vs downhill and so on. The joint prep is just as important as the technique. If your gap changes then your weld appearance will change as well. Here are two beads I was just messing with. The top bead had the same travel speed but the metal was bowed a bit so the gap changed in the middle. The bottom bead is an inverted outside corner joint (trying to practice new positions).  Here is another inverted outside corner joint (after some practice). I was trying for that "mig like tig" and walked the puddle out a bit too far. You can see the lack of overlap/fill. 
__________________
David Used parts build: http://67-72chevytrucks.com/vboard/s...d.php?t=638991 My brother's Nova: http://www.67-72chevytrucks.com/vboa...d.php?t=727985 Rear suspension rework: http://www.67-72chevytrucks.com/vboa...d.php?t=750557 Instagram: myfabguy |
|
|
|
|
|
07-07-2014, 04:50 PM
|
#22 |
|
Senior Member
Join Date: May 2004
Location: johnstown, NY
Posts: 2,393
|
Re: MIG welding tips & techniques
Wow, lots of replies today. Good info guys.
|
|
|
|
|
07-07-2014, 05:54 PM
|
#23 |
|
Registered User
Join Date: Feb 2009
Location: slurrey, bc.
Posts: 1,134
|
Re: MIG welding tips & techniques
on the topic of gas... depending on how much.. er.. tip stick out you run? can change how much gas you need. i always run my tips far in so i pretty much rest the nozzle on what im welding to get the correct wire stick out.
also what kind of gas it is will change your settings also.. whether it be straight c02, or c25, or if your rich trimix... i always run c25 at about 15 cfh when im inside outside ie welding on my truck i crank it to 25 - 30.. just cuz if a tiny burst of wind come through it can mess up a nice bead. for the mig like tig crowd a steady speed is paramount doesnt matter if it's done with a whip or big o's or e/c's..
__________________
-'73 c/10 - Low with Go - will be complete... probably never. -'90 2wd Blazer - well... soon enough anyways. -'84 SWB - the daily gas guzzler. |
|
|
|
|
07-07-2014, 06:04 PM
|
#24 |
|
meowMEOWmeowMEOW
Join Date: Sep 2009
Location: MKE WI
Posts: 7,128
|
Re: MIG welding tips & techniques
I'd like to add a sentiment to the 110v vs 220v discussion. I have a Hobart 210 MVP, which does both.
While I agree you can have good welds on 110v, the EASE of good welds, comes on 220v. I find with 110, you spend more time trying to set the machine, and less time welding. I can set a 220 machine a little too hot, but make it up with travel speed (its Tig logic, but it works). 110 also runs a higher risk of crap-wiring. Many people ignore the fact that the 110 line to the garage might be an afterthought to the house wiring...especially if you live in an old (1920's) suburb as I do. IT also increases the likelyhood of someone using an extension cord. Most (99%) of extension cords are not thick or shielded enough to carry the power a welder needs. It WILL run, but you will never have good welds.
__________________
'66 Short Step / SD Tuned / Big Cam LQ4 / Backhalfed /Built 4l80e / #REBUILDEVERYTHING |
|
|
|
|
07-08-2014, 06:56 AM
|
#25 |
|
Senior Member
Join Date: May 2004
Location: johnstown, NY
Posts: 2,393
|
Re: MIG welding tips & techniques
Mongoose, that looks great. Give us some details on your technique.
|
|
|
|
|
| Bookmarks |
|
|


 \\ MY YOUTUBE CHANNEL


 Linear Mode

