Had a little time today, so I decided to finish the cab mounts. My C-20, like most, had broken rear cab mounts. I'm usually 100% supportive of anything GM did back in the day, but whoever designed the rear cab mounts on the C-20 and heavier trucks really missed the mark. It's like they are designed to fail. I looked around and found out that you can send your mounts out to Steele Rubber and have then re-vulcanized, but like I said before, I'm not a fan of the design. Tony Smith makes a really nice retrofit kit that utilizes 1/2 ton-style mounts, but I didn't want to spend hardly any money. Brad came up with an idea that fit my plan perfectly. A modification that can be done at home for next to nothing.
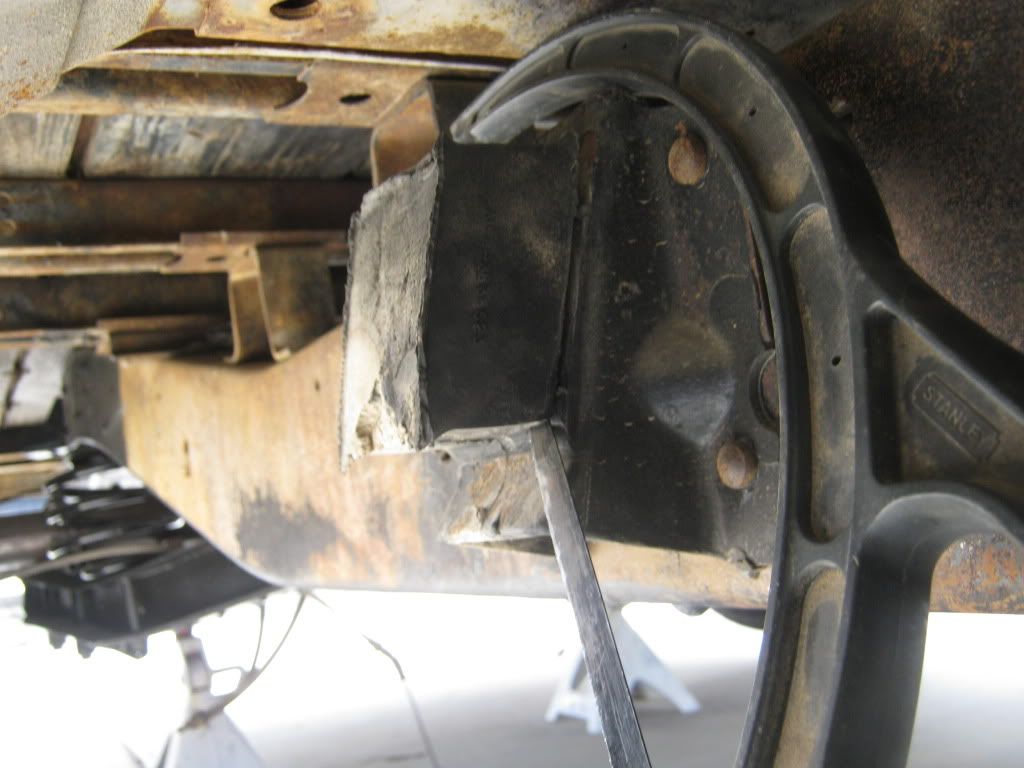
As you can see, my mounts were shot:

The first thing to do was to separate the rubber from the mount. A hacksaw or a Sawzall (preferred) works great. Make sure you support the cab before you do this:
Once you get the pieces separated, you have to do the lovely task of getting the rest of the rubber off. The only way to do this is to get your torch and burn it off. Yeah, it's a nasty job, but it's really the only way you can do it. Continue to heat the rubber until it can be scraped off. The remaining rubber can be wisked off with a large wire brush. Get the rubber hot, and then hit it with the brush while it's still molten. The mount has to be clean in order to weld on it, which will come later.
After the "arm" of the mount is removed and cleaned, I placed it back into position and made a measurement of the gap where the rubber block used to reside. It winds up being around 1.5". I determined that the best way to secure the arm and the riveted mount on the frame was to replace the rubber with steel. I wound up going to my local steel yard and bought some scrap steel, 3" wide by 1.5" tall U-channel, .250 thick. I got them for $4 total. I welded the U-channel (flat side out) to the cleaned mount section that's riveted to the frame.
You're probably wondering how I plan to cushion this mount. It's real easy, I bought an Energy Suspension Cab Mount Kit (part# 34137, around $50) for a HALF TON. The bushings that normally attach to the mounts on a half ton will now go into the modified C-20 mount. I took the front mounts and swapped them out (they are the same between the half ton and the three quarter ton). I took the bushings for the aft mount and placed it and the flat washer on top of the mount arm and determined where the arm needed to be located. It's going to sit lower than it was originally, due to the thickness of the bushing. Once I liked where it was positioned, I welded the "arm" to the u-channel. I order to bolt this all together, you have to do a few things. First, the 1/2" x 5" long bolt in the Energy Suspension kit will not work. The nutplate in the cab floor on the C-20s is a 7/16", so you have to go to the bolt shop and get a 7/16" coarse x 5" bolt. Get a Grade 8, it's good insurance. Secondly, the Energy Suspension kit has a steel sleeve that has to insert into the upper and lower bushing. Unfortunately, the attach hole in the C-20 mount is slotted and needs to be enlarged to fit the sleeve. A die grinder works great for this. Once it was all welded and the hole was enlarged, I trimmed of the extra steel for the arm (the curly-Q section) to make it look a little more aesthetic. Here it is all finished (please note that the bolt is not ran down tight in this picture):
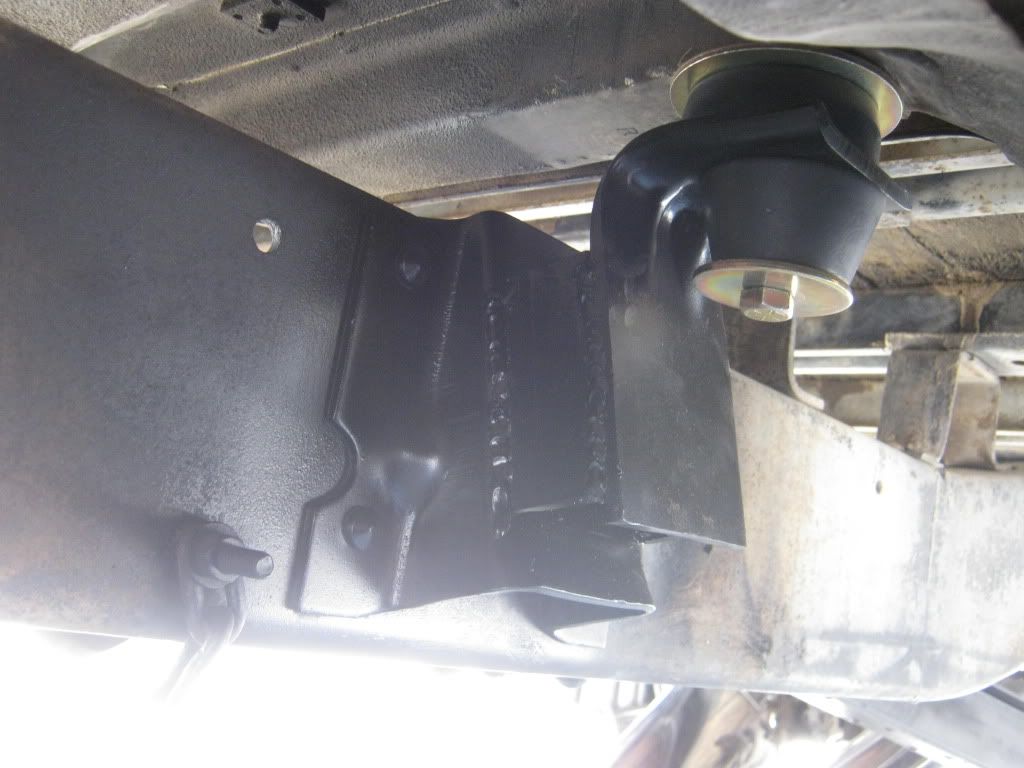
No more sagging!!!!
So, all total, I re-bushed all the cab mounts and fixed the problematic aft mounts for $58 (bushing kit, steel, and new 7/16" bolts).

 03-15-2012, 11:54 AM


 Threaded Mode