
|
Register or Log In To remove these advertisements. |
|
|
|
|||||||
 |
|
|
Thread Tools | Display Modes |
 04-01-2013, 07:08 PM
|
#26 |
|
Registered User
Join Date: Mar 2013
Location: Perth, Western Australia
Posts: 141
|
Re: My 1950 Chev Pickup 3600 Project
Cheers guys. No nasty surprises yet. I know there will be one (or more) but so far so good!
Posted via Mobile Device |

|

|
|
04-06-2013, 05:21 AM
|
#27 |
|
Registered User
Join Date: Mar 2013
Location: Perth, Western Australia
Posts: 141
|
Re: My 1950 Chev Pickup 3600 Project
Few bits and pieces done today while I'm waiting for my drums and shoes to come back. Been let down a little bit by The shop doing the work and the service hasn't been any where as good as when they did my wheel cylinders. Disappointing.
Got the carpet in and it just needs some tidying, stretching out, some carpet strip for the edges and some rubber boots around the gear shift and pedals etc which are on order. Fiddly job and more cutting than I expected. Wire brushed, sanded and painted the brake area and made up a battery bracket out of some scrap galvanised square tube I had laying around. 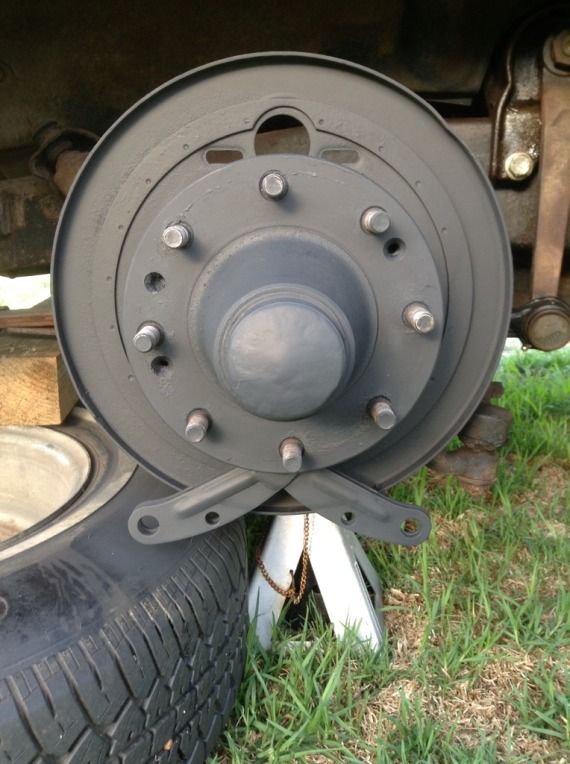 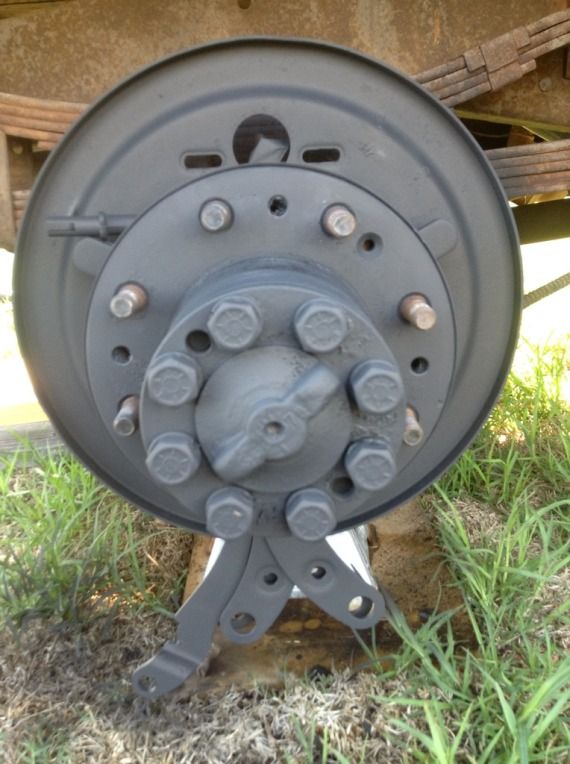 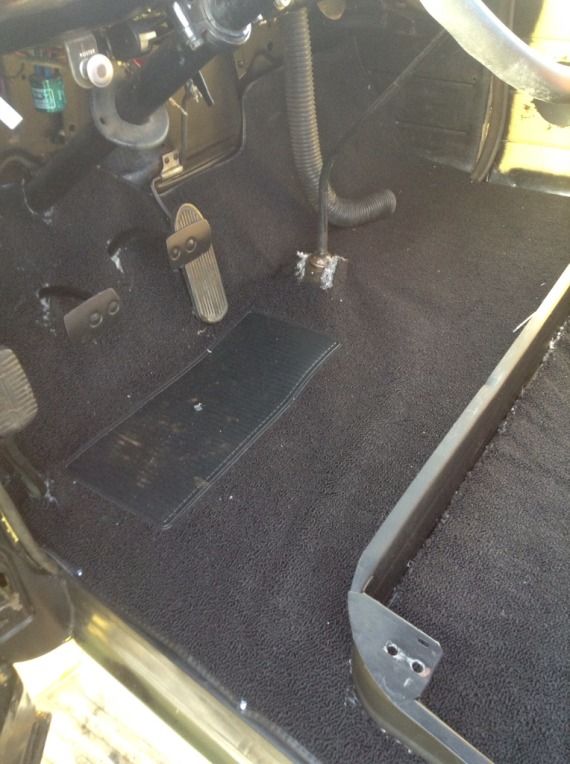 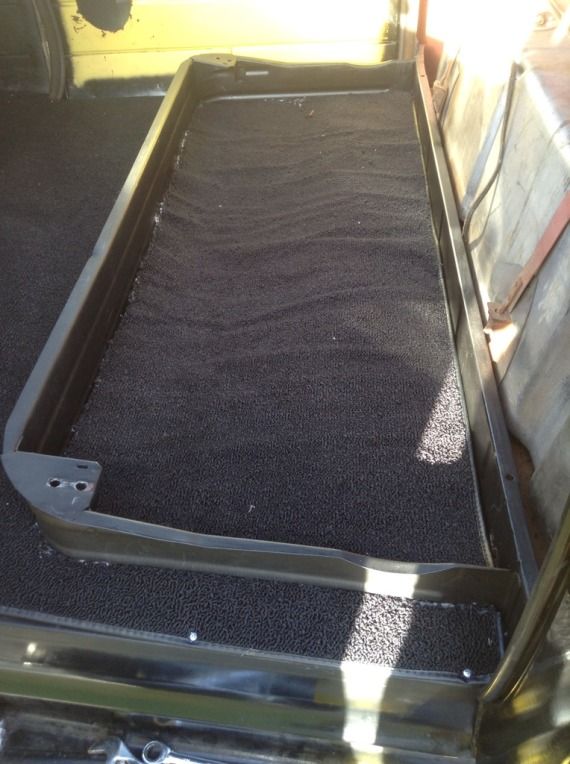 Posted via Mobile Device |
|
|
|
|
05-09-2013, 04:49 AM
|
#28 |
|
Registered User
Join Date: Mar 2013
Location: Perth, Western Australia
Posts: 141
|
Re: My 1950 Chev Pickup 3600 Project
Little bit of progress that pics don't suit posting really.
Had huge frustrations with one rear drum not wanting to fit over the new brake shoes/pads. After just about giving up and taking the shoes back in to have them shaved, myself and a mate had one last play. For those that are doing the same, remember to make sure the emergency brake lever is not only adjusted all the way out but also not hanging up on the rear of the shoe pins as mine was. Only held the lever in slightly but just enough to push the shoes out so that the drum wouldn't slide on. The drums are a very snug fit on the rear with a little bit of drag. Hoping this will be OK and not cause everything to heat and seize. Any thoughts?? Also got the electric wiper motor fitted and adjusted right. Now that's a fiddely job! Posted via Mobile Device |
|
|
|
|
05-12-2013, 03:51 AM
|
#29 |
|
Registered User
Join Date: Mar 2013
Location: Perth, Western Australia
Posts: 141
|
Re: My 1950 Chev Pickup 3600 Project
Good and bad today on the truck and unfortunately the bad outweighed the good by far!
Got a little job done that took a few hours and a steady hand. Far from perfect because the emblem is pretty old and pitted but it is much neater and will do for now. Before:   After:   Now the bad. Had the Father in Law around who is a glazier and has experience with windscreens etc. I bought new front and rear rubbers as the old ones were a little old and the windscreen rubber had a split that I could see some rust behind. Well the rear window was no issue and is in, the front, both sides broken/cracked!!  Not happy but it needed to come out as there was rust where the crack in the rubber was and it would have got worse for sure. He also has the right glass at home and will cut some new windows for me tomorrow. I treated the rust with rust converter and then painted with rust kill. The rest of the metal windscreen lip is in perfect shape which was a nice surprise.   After treatment:   Sometimes it's like 1 step forward and two steps back but all you guys that have built/repaired old trucks know that feeling I'm sure! Posted via Mobile Device |
|
|
|
|
05-12-2013, 04:41 AM
|
#30 |
|
Registered User
Join Date: Mar 2013
Location: Perth, Western Australia
Posts: 141
|
Re: My 1950 Chev Pickup 3600 Project
On the subject of window rubbers. Should the rubber strip or bead lock (not sure what its called) be on the outside or the inside of the rear window?
The long strip that you insert to lock the rubber seal in place. I have it on the outside but I notice that on the inside curves, the edges are a little bunched or loose for want of a better term. Maybe this will settle?? Not sure if it makes a difference but want to have it set the right way. Posted via Mobile Device |
|
|
|
|
05-12-2013, 06:43 AM
|
#31 |
|
Registered User
Join Date: Apr 2012
Location: Gilbert, Arizona
Posts: 454
|
Re: My 1950 Chev Pickup 3600 Project
the beed lock is designed to go on the outside... especially if you have the chrome looking kind. I have heard of some guys putting it on the inside because they wanted a cleaner look on the outside. I put mine on the outside.
|
|
|
|
|
05-12-2013, 07:00 AM
|
#32 |
|
Registered User
Join Date: Mar 2013
Location: Perth, Western Australia
Posts: 141
|
Re: My 1950 Chev Pickup 3600 Project
Thanks Mike.
Posted via Mobile Device |
|
|
|
|
05-12-2013, 11:07 AM
|
#33 |
|
Registered User
Join Date: Jul 2011
Location: Auburn ca.
Posts: 2,886
|
Re: My 1950 Chev Pickup 3600 Project
Nice progress on a nice truck.
|
|
|
|
|
05-13-2013, 07:01 AM
|
#34 |
|
Registered User
Join Date: Mar 2013
Location: Perth, Western Australia
Posts: 141
|
Re: My 1950 Chev Pickup 3600 Project
Good day on the truck with no bad this time.
Got the new wind windscreen fitted with no issues. I guess the up side of breaking the old glass is that the new one looks sensational without a scratch to be seen. The rubber from Classics fit great and was very pliable. I guess it helped to have someone who knows what they are doing show me the ropes. Also fitted the new window winder repair kit, masked up the inside of the doors ready for paint tomorrow and sanded and painted all the interior wimdow trim ready to fit up. Getting there! Posted via Mobile Device |
|
|
|
|
05-14-2013, 03:41 PM
|
#35 |
|
Registered User
Join Date: Nov 2012
Location: Post Falls, Idaho
Posts: 1,757
|
Re: My 1950 Chev Pickup 3600 Project
Great looking truck!!
|
|
|
|
|
05-14-2013, 04:49 PM
|
#36 | |
|
Senior Member
  Join Date: Nov 2008
Location: Glendora, CA
Posts: 6,336
|
Re: My 1950 Chev Pickup 3600 Project
Quote:
With the wheels and tires mounted you should still be able to spin the wheel. If it stops immediately when you let go, the brake shoes-to-drums is too right. It oughta drag audibly and slow down, then stop after a moment. Just not immediately. You don't wanna glaze those newly turned drums or the shoes. What color are you doing the interior? Rattle can or spray gun job? Can't wait to see the Before & Afters. Nice truck! Posted via Mobile Device |
|
|
|
|
|
05-15-2013, 01:50 AM
|
#37 |
|
Registered User
Join Date: Mar 2013
Location: Perth, Western Australia
Posts: 141
|
Re: My 1950 Chev Pickup 3600 Project
Cheers Dan,
The brake drum on the drivers side rear is a little tight. We will see how we go. I like the chocolate brown/tan interiors and will one day do a full and proper job. For now it's about stripping back and getting things neat and tidy - and working as they should. Took the old 80s looking door trim off, sanded, painted and added new door cards. Just need to throw some speakers into the ugly holes that a PO cut. Before:  After:   Posted via Mobile Device |
|
|
|
|
05-15-2013, 03:18 AM
|
#38 |
|
Registered User
Join Date: Apr 2012
Location: Gilbert, Arizona
Posts: 454
|
Re: My 1950 Chev Pickup 3600 Project
that looks nice and clean. good job. what material are the door panels made out of? I am doing a similar thing, but did not realize there is a slight bend to the door in that location. My homemade door panels do not want to lay flat at the top with only the three screws holding it there.
|
|
|
|
|
05-15-2013, 06:12 AM
|
#39 |
|
Registered User
Join Date: Mar 2013
Location: Perth, Western Australia
Posts: 141
|
Re: My 1950 Chev Pickup 3600 Project
They are just card door trims that have a vinyl type pattern with a metal frame that the card slots into all the way around. It fits pretty well but card is just card. No high tech or high quality material.
They were cheap though. I bought them from Classics. You buy the cards separate to the frames and I also bought the screw set for a couple of bucks. The card obviously bends to shape nicely and I just leaned on the frames to get them to sit right on the curves. Makes it all nice and neat for not much money while I plan out the full interior rebuild (and save money for it). Posted via Mobile Device |
|
|
|
|
05-15-2013, 06:49 AM
|
#40 |
|
Registered User
Join Date: Mar 2013
Location: Perth, Western Australia
Posts: 141
|
Re: My 1950 Chev Pickup 3600 Project
Broken speedo cable replaced with brand new one. All up and working now. That's about all the legal stuff for rego done I think.
Here's the old one:  Just want to do a full service, change fluids and I'll book in next week for an inspection. Hoping they won't require an engineers report for bigger engine and maybe collapsible steering column. That would suck. Posted via Mobile Device Last edited by Dodger; 05-15-2013 at 06:57 AM. |
|
|
|
|
05-15-2013, 09:33 AM
|
#41 |
|
Registered User
Join Date: Jul 2011
Location: Auburn ca.
Posts: 2,886
|
Re: My 1950 Chev Pickup 3600 Project
coming along nicely Dodger.

|
|
|
|
|
05-17-2013, 10:32 AM
|
#42 |
|
Registered User
Join Date: Mar 2013
Location: Perth, Western Australia
Posts: 141
|
Re: My 1950 Chev Pickup 3600 Project
Started painting the wheels today. Happy with the result although not sure with the one I've put back on the truck yet. Will post a pic when I yet them all done.
A white wall will make all the difference I think. Hard to paint chrome wheels but lots of scuffing with a wire wheel, etch primer, surfacer primer x 3 coats and a top coat x 3. Only a temp tidy up until I get new rims and white walls.    Found a slight coolant leak and it doesn't look like its from the radiator hoses. Explains why my coolant level has been dropping over time. It maybe coming from the water pump but I'm not sure. I know little about these motors (or any for that matter) and I'm not sure how to positively I'd that the leak is from the water pump. Will pull it out tomorrow and have a better look. Not too much to replace but would rather not spend if I don't have to. Thought I'd replace the hoses anyway but they are a nightmare to find as well. Different ends going from the 50 radiator to the later SBC means different diameter ends. Anyone have ideas on this? Posted via Mobile Device |
|
|
|
|
05-18-2013, 07:28 AM
|
#43 |
|
Registered User
Join Date: Mar 2013
Location: Perth, Western Australia
Posts: 141
|
Re: My 1950 Chev Pickup 3600 Project
Got one side of the painted wheels on today. Not sure about them yet. All a bit black with the tyres and rims together maybe. Will have to see if I get used to them. White walls may break it up nicely I think.
 Pulled the water pump and whilst I can't tell absolutely if it is stuffed, there is a noise when I spin it and no resistance at all. There is no play in the bearings but at $100 I thought I'd be safe and throw a new one in. My pet hate is a hot running engine so I'll avoid that at all costs! Old one:  Old and new parts:  Thermostat housing and thermostat are old and disgusting. Will replace them as well. Flushed everything out and seems to be all clean. Back together tomorrow. Posted via Mobile Device |
|
|
|
|
04-16-2015, 03:21 AM
|
#44 |
|
Registered User
Join Date: Sep 2011
Location: Wollongong, Australia
Posts: 1
|
Re: My 1950 Chev Pickup 3600 Project
Hey Dodger,
Just found this thread - nice truck! How did you go with rego? Any updates? Cheers |
|
|
|
|
| Bookmarks |
|
|


 Linear Mode

