
|
|
|
 03-26-2012, 05:00 AM
|
#1 |
|
Registered User
Join Date: Jul 2006
Location: the netherlands europe
Posts: 4,335
|
Re: '66 Sunbeam Minx Project - F20C/6sp/4-link/Discs...
i will read the article
i allso like to see if youre exaust works and how it will sound , the info i had has been quite a few years old from the days that grinding out ports on stock heads . high rize manifolds , yellow accel coils unburned gasses out the exaust and lumpy idle where the norm in dragracing , these things change over the years as more test data comes in
__________________
i got a job again and having fun at it too idea's for the trucks and the order of things to do are taking shape and get closer to being realized , a few more months and i be able to start building for real i complete 2 of the trucks intoo running fashion one custom and one basicly stock the thirth will be sacrificed for parts |

|

|
|
03-26-2012, 04:19 PM
|
#2 |
|
Registered User
Join Date: May 2009
Location: Lechlade, UK
Posts: 12
|
Re: '66 Sunbeam Minx Project - F20C/6sp/4-link/Discs...
WOW. Your attention to detail is impeccable. This thing is a work of art and I have enjoyed all 40 something pages of watching you take metal and blend it in. I just entered the fab world and have a lot to learn, but would love to watch how you blend sheet metal into the body. That is a skill that I would like to master. Sure would help on the finishing side!
Enough of me rambling! subscribes!! 
__________________
Michael 2002 Blazer 6.0 swap in action
|
|
|
|
|
03-26-2012, 05:28 PM
|
#3 |
|
Registered User
 Join Date: May 2011
Location: Missoula, MT
Posts: 934
|
Re: '66 Sunbeam Minx Project - F20C/6sp/4-link/Discs...
Seriously FF! Ya had to tell us this little nugget of info about exhaust tuning, FML!!! Now, I have to start doing research and find out everything I can about tuning exhaust, just when I thought I was gonna have a productive day at work. My boss is gonna hate you.
Great work and thanks for the knowledge! |
|
|
|
|
03-27-2012, 01:54 AM
|
#4 | |||
|
Registered User
Join Date: Aug 2005
Location: Hillsboro Oregon
Posts: 6,449
|
Re: '66 Sunbeam Minx Project - F20C/6sp/4-link/Discs...
Quote:
Quote:
Quote:
 Just tell him how much faster you'll get to work with a properly tuned exhaust Just tell him how much faster you'll get to work with a properly tuned exhaust You sound like me; When I get the bug for something I exhaust all resources until I'm satisfied. |
|||
|
|
|
|
03-27-2012, 11:42 AM
|
#5 | |
|
Registered User
Join Date: Feb 2007
Location: Marana, Arizona
Posts: 3,416
|
Re: '66 Sunbeam Minx Project - F20C/6sp/4-link/Discs...
Quote:
All about being satisfied. Take exhaust choices. The reality is the best mufflers vs. really good muffler are just a few HP. I doubt anyone can feel 3 HP. But a car guy is going to get the best because it pleases him (or her). and every little bit helps < car guy mentality
__________________
"I feel the need for speed!"... as soon as I am done with my nap. |
|
|
|
|
|
03-28-2012, 12:16 AM
|
#6 | |
|
Still Learning
Join Date: Jul 2009
Location: Central Oklahoma
Posts: 10,108
|
Re: '66 Sunbeam Minx Project - F20C/6sp/4-link/Discs...
Quote:
|
|
|
|
|
|
03-28-2012, 02:31 AM
|
#7 | |
|
Registered User
Join Date: Feb 2012
Location: Olympia, WA
Posts: 300
|
Re: '66 Sunbeam Minx Project - F20C/6sp/4-link/Discs...
Quote:
 Thanks for the DEETS, though! I'll try to follow these steps next time around! |
|
|
|
|
|
03-28-2012, 07:40 AM
|
#8 |
|
Registered User
Join Date: Jun 2006
Location: Indiana
Posts: 4,859
|
Re: '66 Sunbeam Minx Project - F20C/6sp/4-link/Discs...
Just WOW! The fine detail is amazing. Like everyone else, i can hardly wait to see this finished, BUT the down side is, fewer updates on this car. I will really miss that. Good thing there are at least 2 more projects waiting.
__________________
'70 GMC C1500 LWB Power disc brakes. WooHoo! Posi 6 Lug Dana 60 |
|
|
|
|
03-28-2012, 01:14 PM
|
#9 | ||
|
Registered User
Join Date: Aug 2005
Location: Hillsboro Oregon
Posts: 6,449
|
Re: '66 Sunbeam Minx Project - F20C/6sp/4-link/Discs...
Quote:
Quote:
 And no worries on continued projects. Here's the current fleet:
Rescue Day: 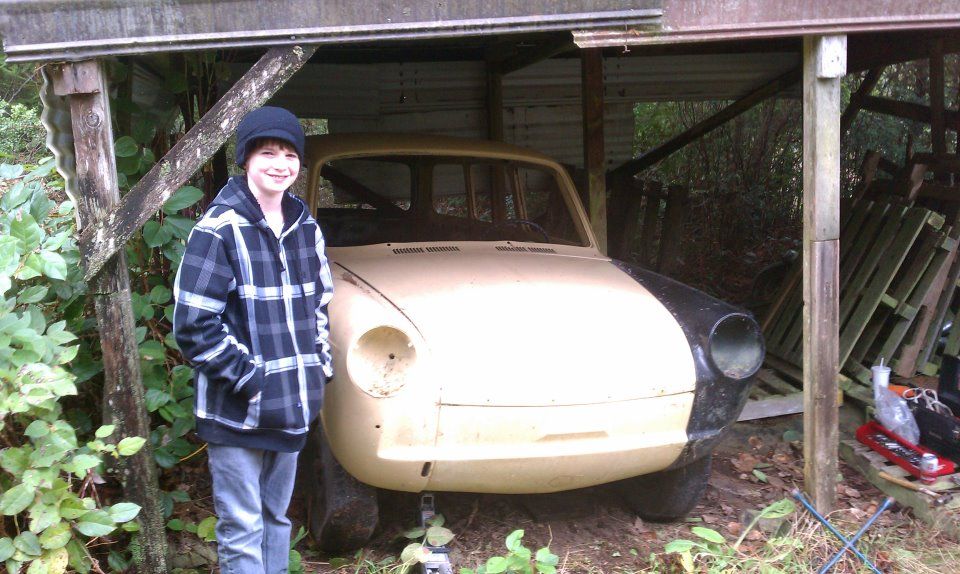 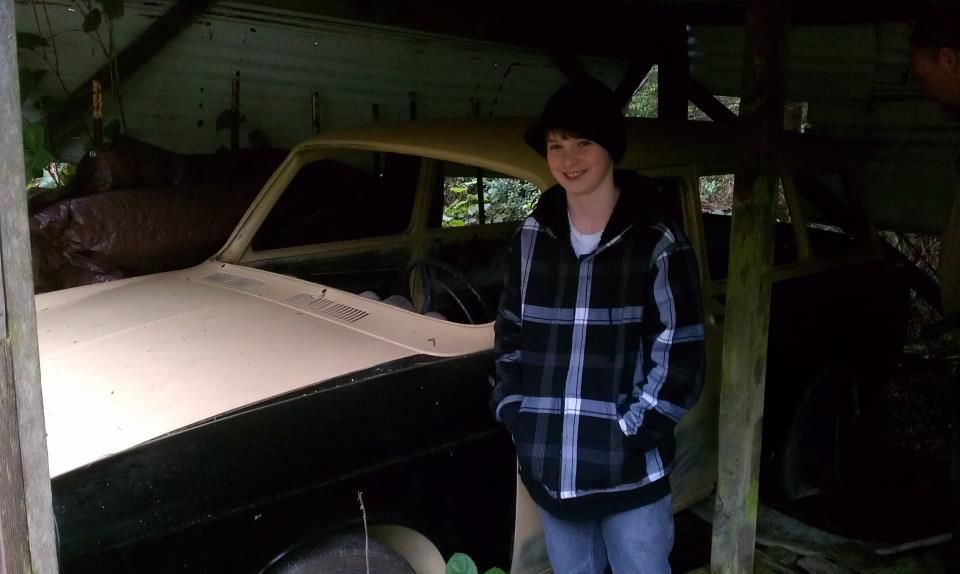 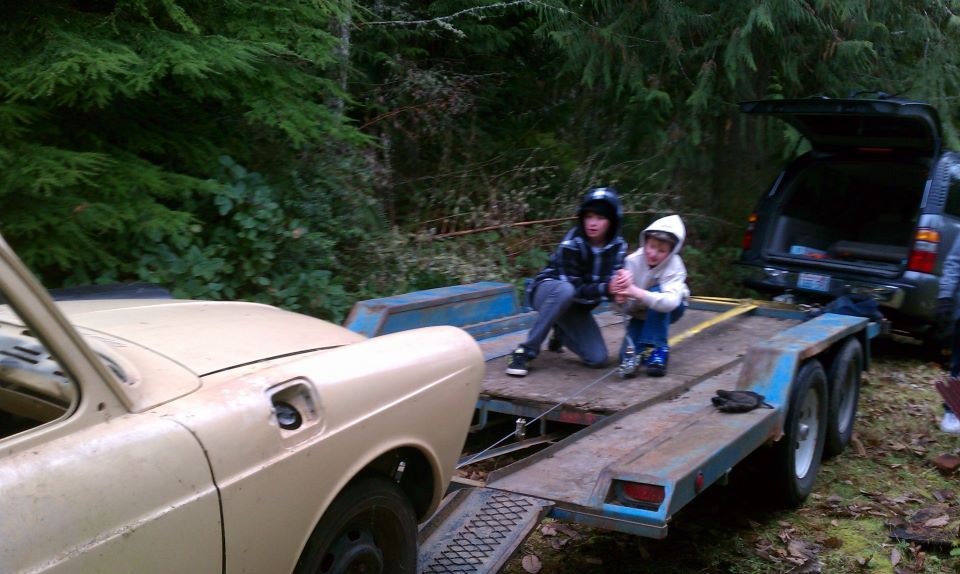 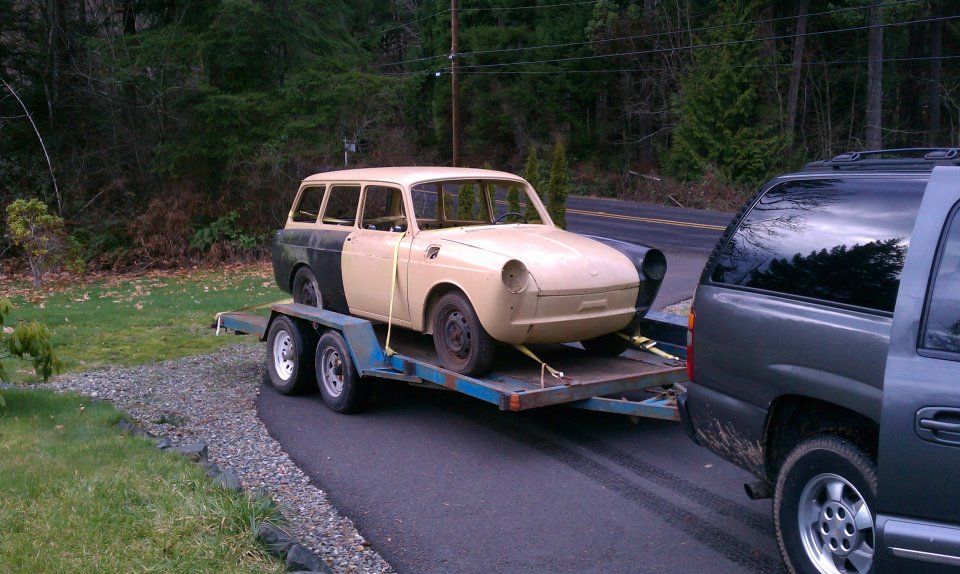 All these boxes of parts and a full interior came with: 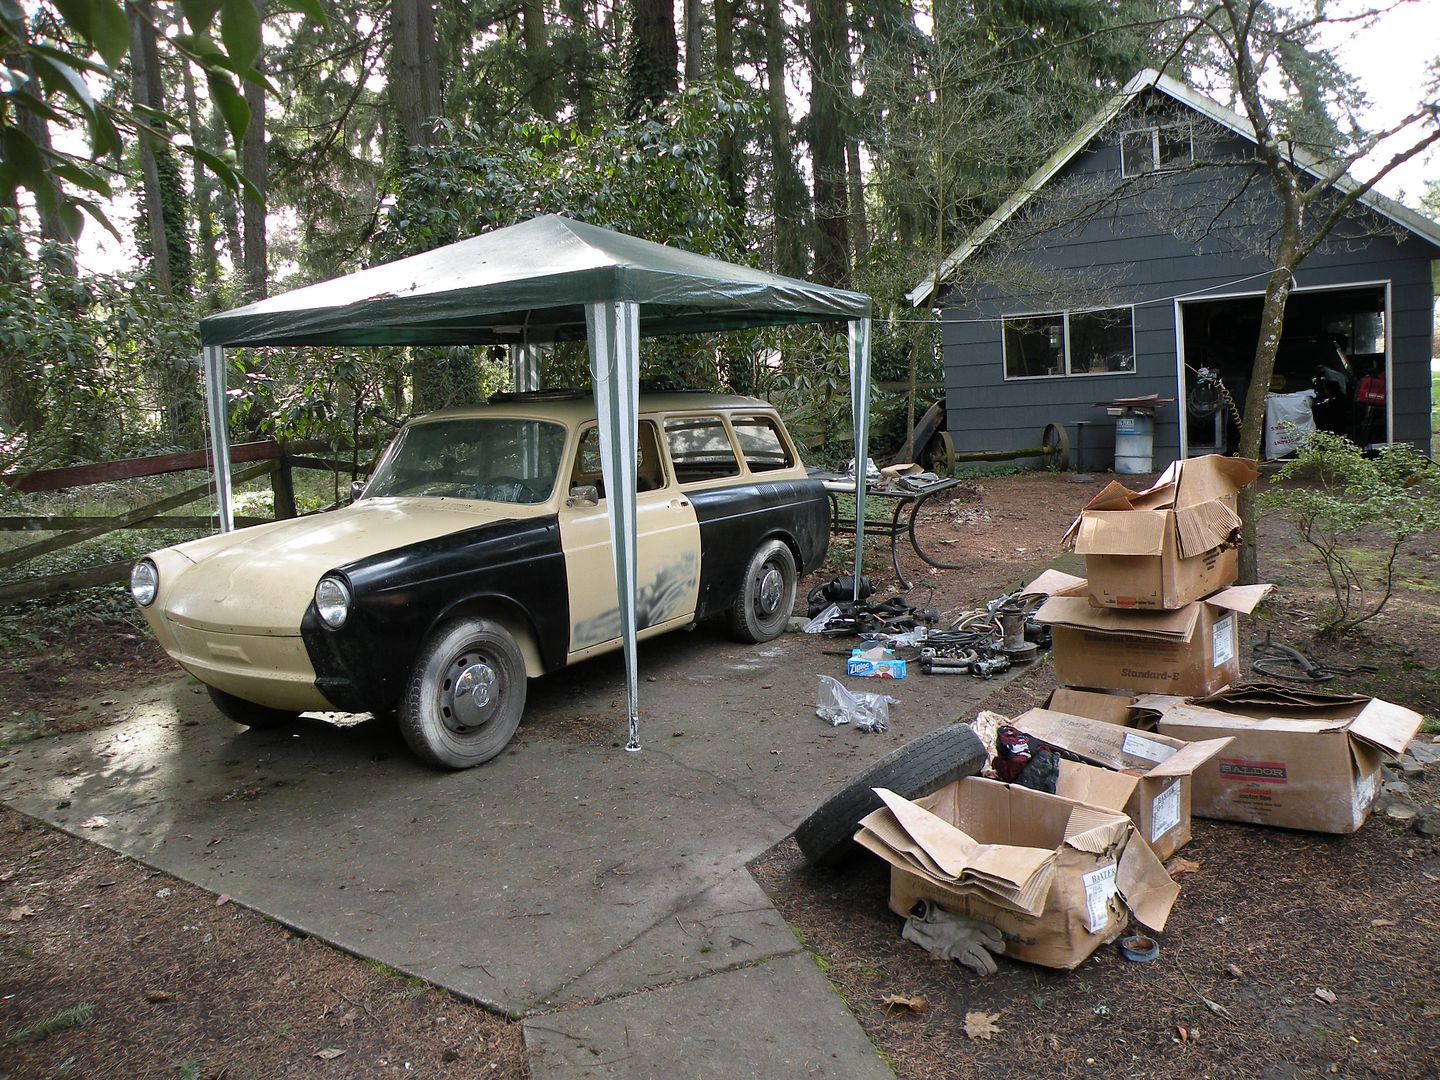 "There's yer problem right there..." 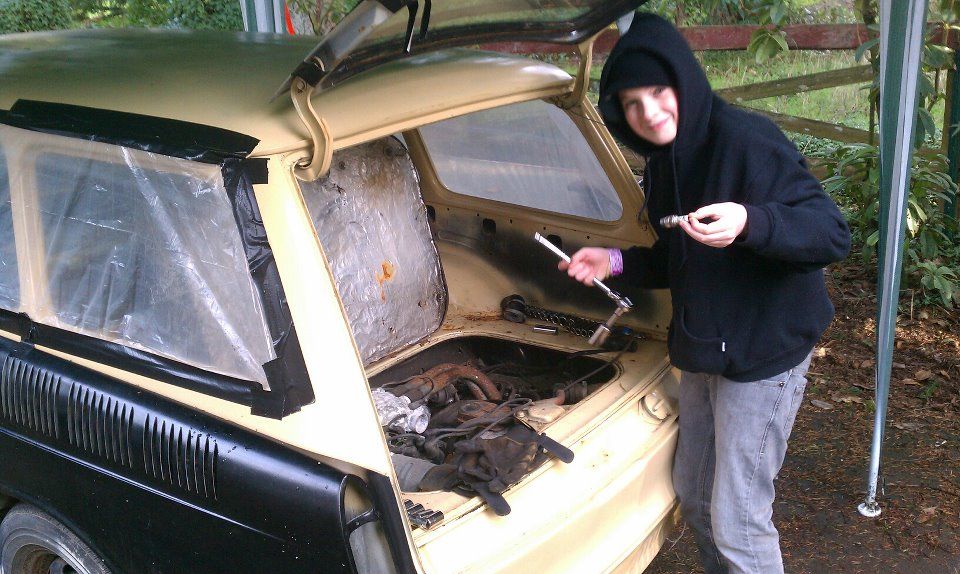
|
||
|
|
|
|
03-28-2012, 01:30 AM
|
#10 |
|
Registered User
Join Date: Aug 2005
Location: Hillsboro Oregon
Posts: 6,449
|
Re: '66 Sunbeam Minx Project - F20C/6sp/4-link/Discs...
I'm not really picky about brand. Dewalts seem to last longer, but I'm not above a few from HF every now and then.
|
|
|
|
|
03-28-2012, 01:35 PM
|
#11 |
|
67cheby
 Join Date: Sep 2008
Location: siloam springs ar 72761
Posts: 17,890
|
Re: '66 Sunbeam Minx Project - F20C/6sp/4-link/Discs...
luv me a little Square back action....I AM IN !
|
|
|
|
|
03-28-2012, 01:48 PM
|
#12 | |
|
Registered User
Join Date: Aug 2005
Location: Hillsboro Oregon
Posts: 6,449
|
Re: '66 Sunbeam Minx Project - F20C/6sp/4-link/Discs...
Quote:
|
|
|
|
|
|
03-28-2012, 01:53 PM
|
#13 | |
|
Registered User
Join Date: Mar 2007
Location: Ben Wheeler,Texas
Posts: 992
|
Re: '66 Sunbeam Minx Project - F20C/6sp/4-link/Discs...
Quote:
__________________
05 2500HD 6.0 excab 69 LWB-Gone but not forgotten! 68 Dodge Charger 383/727 69 Dodge Charger-440/4spd |
|
|
|
|
|
03-28-2012, 02:10 PM
|
#14 |
|
Registered User
Join Date: Jun 2010
Location: Vancouver Island BC
Posts: 652
|
Re: '66 Sunbeam Minx Project - F20C/6sp/4-link/Discs...
Nice Father/Son project, always liked the type 3's, the look on his face says it all.
...and a little inspiration.
__________________

|
|
|
|
|
03-28-2012, 04:09 PM
|
#15 | |
|
67cheby
Join Date: Sep 2008
Location: siloam springs ar 72761
Posts: 17,890
|
Quote:
|
|
|
|
|
|
03-28-2012, 04:50 PM
|
#16 | ||||
|
Registered User
Join Date: Aug 2005
Location: Hillsboro Oregon
Posts: 6,449
|
Re: '66 Sunbeam Minx Project - F20C/6sp/4-link/Discs...
Quote:
But I have demonstrated the ability to keep it simple before (once), with my 64.Quote:
Quote:
Quote:

|
||||
|
|
|
|
03-28-2012, 02:52 PM
|
#17 |
|
Still Learning
Join Date: Jul 2009
Location: Central Oklahoma
Posts: 10,108
|
Re: '66 Sunbeam Minx Project - F20C/6sp/4-link/Discs...
Lucky kid you've got there. Congrats on adding to the herd
Posted via Mobile Device |
|
|
|
|
03-29-2012, 12:18 PM
|
#18 |
|
Registered User
Join Date: Jul 2006
Location: the netherlands europe
Posts: 4,335
|
Re: '66 Sunbeam Minx Project - F20C/6sp/4-link/Discs...
maibe put these on there
 it looks like they done a lot of work to the car allready , just hope its still complete , buing the small parts can add up in a hurry
__________________
i got a job again and having fun at it too idea's for the trucks and the order of things to do are taking shape and get closer to being realized , a few more months and i be able to start building for real i complete 2 of the trucks intoo running fashion one custom and one basicly stock the thirth will be sacrificed for parts |
|
|
|
|
03-29-2012, 03:00 PM
|
#19 | |||||||
|
Registered User
Join Date: Aug 2005
Location: Hillsboro Oregon
Posts: 6,449
|
Re: '66 Sunbeam Minx Project - F20C/6sp/4-link/Discs...
Quote:
 Quote:
 I love the notchbacks. In fact I have a saved search for them on CL and eBay I love the notchbacks. In fact I have a saved search for them on CL and eBay  The SB is very solid. The body is ready for sanding and paint; it's that straight. The only rust on the whole car is under the battery. Easy fix. The SB is very solid. The body is ready for sanding and paint; it's that straight. The only rust on the whole car is under the battery. Easy fix.Quote:
Quote:
This is gonna depend on his level of motivation. I told him I will only work on it when he does. So far so good.Quote:
Quote:
|
|||||||
|
|
|
|
03-30-2012, 01:23 AM
|
#20 | |
|
Registered User
Join Date: Feb 2012
Location: Olympia, WA
Posts: 300
|
Re: '66 Sunbeam Minx Project - F20C/6sp/4-link/Discs...
Quote:
That's how I grind my welds, but my welds are very messy. Just have a wirefeed welder. Bake the part before powdercoating? I read that a convection oven is best. Do you use a convection oven? Is powdercoating primer necessary when the metal is sufficiently rough? Also read that some powdercoating paints are more porous than others. I got the MATTE BLACK from Harbor Freight. It was the only black they had. Not sure how good it is, but if it lasts 4-5 times as long as paint I'll be happy! |
|
|
|
|
|
03-30-2012, 06:43 PM
|
#21 | |
|
Registered User
Join Date: Dec 2008
Location: on a rock in the pacific
Posts: 554
|
Re: '66 Sunbeam Minx Project - F20C/6sp/4-link/Discs...
Quote:
if you're looking for other places to pick up powder from, i like colombia coatings, pendry powder coating, and i'm yet to order from rosey's powder coating.
__________________
63 4 door Chevy II - NOVACATION (Updated 08/23/09) 65 Morris minor Traveler 77 Chevy Longbed. 93 Corolla JDM 20V Swap Daily Driver (Updated 07/16/09) Powder coating Hawaii Domestic Violence Awareness Show 5/3/09  Hawaii Rod and Custom Show 4/18 Hawaii Rod and Custom Show 4/18
Last edited by Jvsapp; 03-30-2012 at 06:54 PM. |
|
|
|
|
|
03-30-2012, 10:51 AM
|
#22 |
|
Registered User
Join Date: Jul 2006
Location: the netherlands europe
Posts: 4,335
|
Re: '66 Sunbeam Minx Project - F20C/6sp/4-link/Discs...
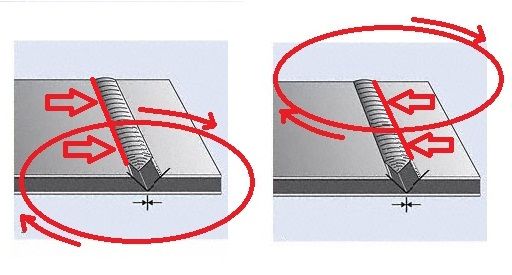
he means that when you want to hit the top of the circle going clockwize intoo the groove when you want to get extra penetration intoo the steel on the left side and the hit with the bottom of the circle going clockwize for the left side
if i get the gas for my welder im going to try it , nathan from porterbuild showed it to me this way too but i gues it takes practice to run realy nice welds the way he does them
__________________
i got a job again and having fun at it too idea's for the trucks and the order of things to do are taking shape and get closer to being realized , a few more months and i be able to start building for real i complete 2 of the trucks intoo running fashion one custom and one basicly stock the thirth will be sacrificed for parts |
|
|
|
|
03-30-2012, 01:43 PM
|
#23 | ||
|
Registered User
Join Date: Aug 2005
Location: Hillsboro Oregon
Posts: 6,449
|
Re: '66 Sunbeam Minx Project - F20C/6sp/4-link/Discs...
Quote:
Quote:
|
||
|
|
|
|
03-30-2012, 06:15 PM
|
#24 | |
|
Registered User
Join Date: Dec 2008
Location: on a rock in the pacific
Posts: 554
|
Re: '66 Sunbeam Minx Project - F20C/6sp/4-link/Discs...
Quote:
the pre-baking the parts allows the metal to out gas. any impurities in the metal will move to the surface when the metal is heated. ESPECIALLY with aluminum. i find somewhere around 350-400 degrees for 15-20 min is normally sufficient. if there is any oil residue it will bake off. as for cleaning with alcohol after that's an extra step to ensure cleanliness. any bit of oil, even from your hands will affect the finished product. the primer step adds one more layer of protection. they sell good out gas killer primer powders out there. if you want your powder to go on smooth that's the best way to do it. also powder can be treated like paint afterwards. you can cut and buff it like you would a automotive finish. it all depends on how thick you lay it too. if your part is steel and you take it straight from the blaster, blow it off and right into the oven, most times you can get away with just using powder directly on it. aluminum if it's sat around for a while outside in the elements i would ALWAYS pre-bake. i've had some jobs that were nightmares. stripping powder off a part that out gassed is a PITA. like they say do it once do it right. if you wanna see some of what i've done check out my link in the sig.
__________________
63 4 door Chevy II - NOVACATION (Updated 08/23/09) 65 Morris minor Traveler 77 Chevy Longbed. 93 Corolla JDM 20V Swap Daily Driver (Updated 07/16/09) Powder coating Hawaii Domestic Violence Awareness Show 5/3/09 Hawaii Rod and Custom Show 4/18
|
|
|
|
|
|
03-30-2012, 02:50 PM
|
#25 |
|
Registered User
Join Date: Jul 2006
Location: the netherlands europe
Posts: 4,335
|
Re: '66 Sunbeam Minx Project - F20C/6sp/4-link/Discs...

__________________
i got a job again and having fun at it too idea's for the trucks and the order of things to do are taking shape and get closer to being realized , a few more months and i be able to start building for real i complete 2 of the trucks intoo running fashion one custom and one basicly stock the thirth will be sacrificed for parts |
|
|
|
 |
| Bookmarks |
|
|


 Hybrid Mode
