
|
 12-30-2009, 07:46 PM
|
#126 | |
|
FarmBoy.
Join Date: Feb 2005
Location: Rhinelander, WI
Posts: 1,103
|
Re: '67 Chevy II Build - Betty.
Well, a bit of an update until I can get the batteries charged for the camera.
Did some welding and grinding and pounding and fitting today. Currently have my inboard spring mounts positioned so they're square to each other. Welding the trailing arm crossmember in a bit better so I don't have to worry about it moving on me - again. I also decided to go with different springs. The stock truck springs, while they'd perform fine for me, are too wide. At around 7 to 7 1/2 inches across, they rub against frame rails and belly pans. So, I grabbed a set of front springs from an '71 Olds Delta 88 out back, since they were just laying there. With these, I'll have to change my mounting system, but I can also cut them to any length I want, since they aren't pig tailed. They're also 5 1/2 inches across, so that saves me some room in that aspect and makes it a bit easier to fit them in. Nothing is set in stone, of course, as I'm still just trying things out before I weld it all in for good. Looking back, maybe I should've left it the way it was with the trailing arms way in. It would've saved me alot of hassle...haha. But whats the fun in that? -Sam.
__________________
1969 GMC C1500. long fleet. 307. 3 on the tree. 3.07 gears. Oliver green. Bent and bruised. Daily Driver. Quote:
http://67-72chevytrucks.com/vboard/s...d.php?t=242993 |
|

|

|
|
01-04-2010, 03:14 PM
|
#127 |
|
Registered User
Join Date: Dec 2008
Location: on a rock in the pacific
Posts: 554
|
Re: '67 Chevy II Build - Betty.
if you looking for longer springs, check out a 89-96 caprice/impala. i gave a set from one friend to another friend and it helped his olds with the squat issue. allowed the rear to sit higher. giving it the classic prostreet rake look.
looking forward to more pics... 
__________________
63 4 door Chevy II - NOVACATION (Updated 08/23/09) 65 Morris minor Traveler 77 Chevy Longbed. 93 Corolla JDM 20V Swap Daily Driver (Updated 07/16/09) Powder coating Hawaii Domestic Violence Awareness Show 5/3/09  Hawaii Rod and Custom Show 4/18 Hawaii Rod and Custom Show 4/18
|
|
|
|
|
01-07-2010, 07:19 PM
|
#128 | |
|
FarmBoy.
Join Date: Feb 2005
Location: Rhinelander, WI
Posts: 1,103
|
Re: '67 Chevy II Build - Betty.
Ok, as promised and much delayed. Pics!
The oldsmobile springs and the keepers I fabbed up for them. 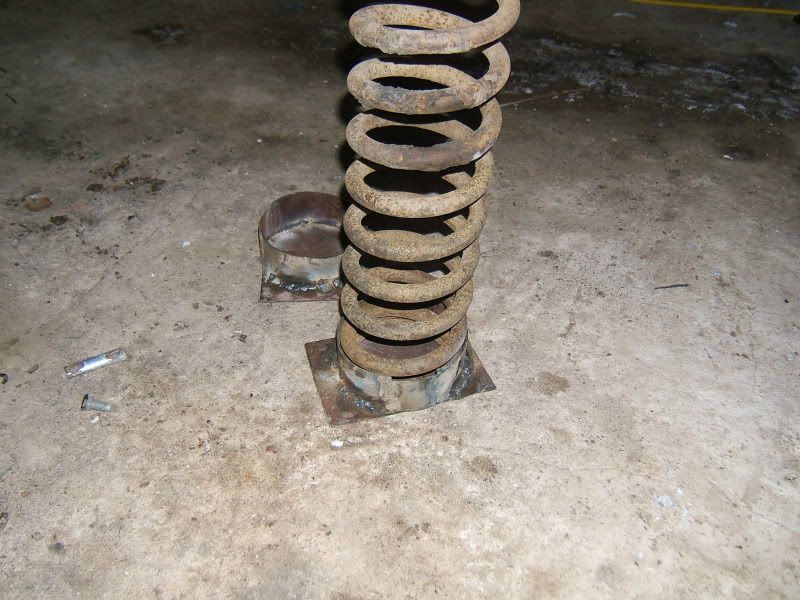 However, after laying under the car for a good 10 minutes, I saw that I had made a mistake. And before I went and changed all the thigns I had opriginally planned for, I had to try something out. So I dirty tacked a chunk of tubing in as a crossmember for the upper spring mounts. Hit my inboard mounts on the trailing arms a bit, and slapped the truck spring back in. Just for ****s and giggles. lo and behold...  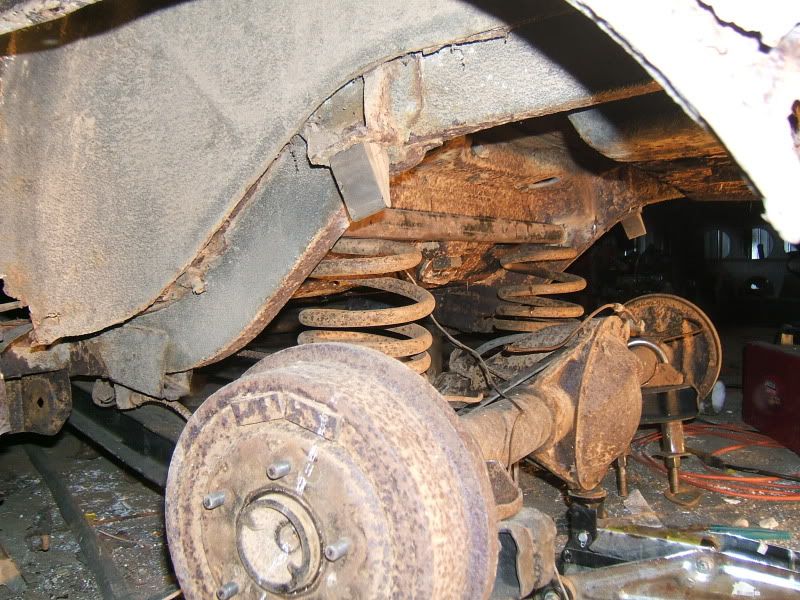 The truck springs DO work. The springs aren't bolted in, as I have to do final tuning, squaring, measuring, etc. 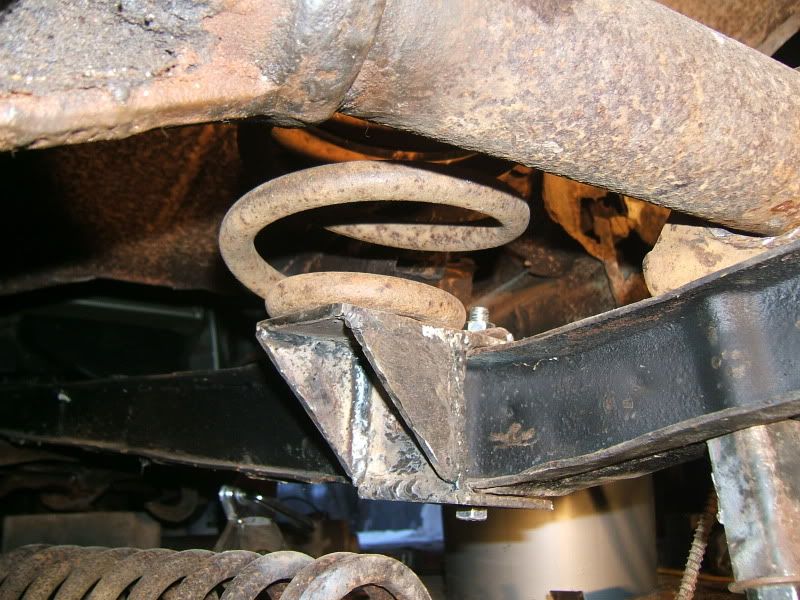 But, the main point is, is that it works. And from the way the axle went up until the car go light on the jack stands, it looks like it'll settle nicely for a stance in the rear. So, essentially, I spent 2-3 days screwing around with a side project that does nothing for the progress of my car. Ah well, it was fun I suppose? haha. Also, a great addition to my progress: 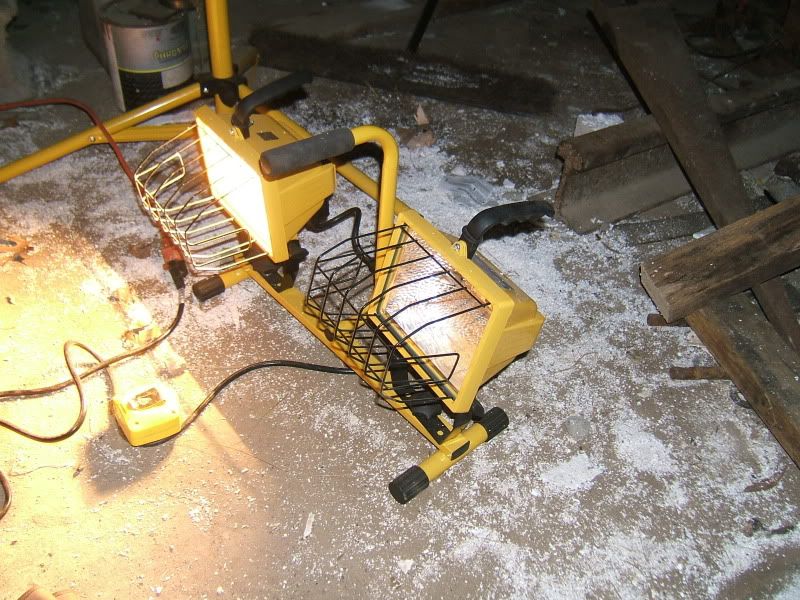 Halogens are amazing. They're bright. And warm, which comes in handy for cold fingers. haha. And thats where she sits as of now. I think I'm pretty set with which direction it's going to go in with the rear suspension now. Which is very comforting. I'll try to get some more done soon, I promise...  -Sam.
__________________
1969 GMC C1500. long fleet. 307. 3 on the tree. 3.07 gears. Oliver green. Bent and bruised. Daily Driver. Quote:
http://67-72chevytrucks.com/vboard/s...d.php?t=242993 |
|
|
|
|
|
01-07-2010, 10:19 PM
|
#129 | |
|
Registered User
Join Date: Dec 2008
Location: on a rock in the pacific
Posts: 554
|
Re: '67 Chevy II Build - Betty.
Quote:
also where did you score the railroad track?
__________________
63 4 door Chevy II - NOVACATION (Updated 08/23/09) 65 Morris minor Traveler 77 Chevy Longbed. 93 Corolla JDM 20V Swap Daily Driver (Updated 07/16/09) Powder coating Hawaii Domestic Violence Awareness Show 5/3/09 Hawaii Rod and Custom Show 4/18
|
|
|
|
|
|
01-07-2010, 11:04 PM
|
#130 |
|
gets board easy.......
Join Date: Mar 2009
Location: Colorado Springs
Posts: 717
|
Re: '67 Chevy II Build - Betty.
man, i forget how lucky we are out here, not much rust? i like the truck are set up but it looks like the front arems are closer than factory trucks
|
|
|
|
|
01-08-2010, 01:39 PM
|
#131 | |
|
FarmBoy.
Join Date: Feb 2005
Location: Rhinelander, WI
Posts: 1,103
|
Re: '67 Chevy II Build - Betty.
Jvsapp - I'm going to try to do something like the screw jack set up. I think it'll allow me alot of adjustability. I'm still in the process of figuring that one out though...haha. It's just metal and welding, so it can't be all that hard.
And as far as the railroad iron...it's just always been here. haha, it makes a good anvil nonetheless. Signs point to my grandpa and uncle heisting it off of a obsolete line that ran around here. 63chevyII - It could be a lot worse. Well, a little bit worse, haha. I'll deal with it all as the time comes...rust doesn't scare me! It probably should...but nonetheless. And the truck arms are the same width in the front as off of a 67-72 truck. The stock crossmember was used. I just moved them closer in the back to allow for a larger tire to fit on. No progress as of yet. I have to go get some more supplys. I.e., cutting and grinding wheels. And then we'll see if I can't throw some more together. -Sam.
__________________
1969 GMC C1500. long fleet. 307. 3 on the tree. 3.07 gears. Oliver green. Bent and bruised. Daily Driver. Quote:
http://67-72chevytrucks.com/vboard/s...d.php?t=242993 |
|
|
|
|
|
01-08-2010, 06:23 PM
|
#132 |
|
gets board easy.......
Join Date: Mar 2009
Location: Colorado Springs
Posts: 717
|
Re: '67 Chevy II Build - Betty.
cool, maybe it was just the pics.
Ive been using GTO springs in the back of C-10's, if that helps, they are real short and strong |
|
|
|
|
01-20-2010, 12:26 PM
|
#133 | |
|
FarmBoy.
Join Date: Feb 2005
Location: Rhinelander, WI
Posts: 1,103
|
Re: '67 Chevy II Build - Betty.
Thanks 63chevyII, I'll remember that.
And just a quick update. I have not in fact fallen off the face of the earth, just been sick. A cold hit me hard after burning midnight oil in the garage, so I had to take a break for a couple days. Then I went to the Ice Drags on Saturday, which I'll start a new thread for the pics. But, progress is coming, don't you worry. Just waiting for a few things to fall into place, and then I'm calling the rear suspension done until it needs to be finished up. It'll let me move on to other things that need to be addressed - like sheetmetal. Haha. So, stay tuned all, things might actually work out. -Sam.
__________________
1969 GMC C1500. long fleet. 307. 3 on the tree. 3.07 gears. Oliver green. Bent and bruised. Daily Driver. Quote:
http://67-72chevytrucks.com/vboard/s...d.php?t=242993 |
|
|
|
|
|
02-01-2010, 01:42 PM
|
#134 | |
|
FarmBoy.
Join Date: Feb 2005
Location: Rhinelander, WI
Posts: 1,103
|
Re: '67 Chevy II Build - Betty.
Well, finally have some pics for you guys.
 New springs! Well, new to my at least. They're out of a early 90's Buick Roadmaster Wagon, I beleive. It only had 61 miles on it, so, needless to say, they're pretty fresh. They squat really nice, and should make for a much smoother ride. As long as I don't have alot of sway, etc, for cornering/handling, i'll be fine. 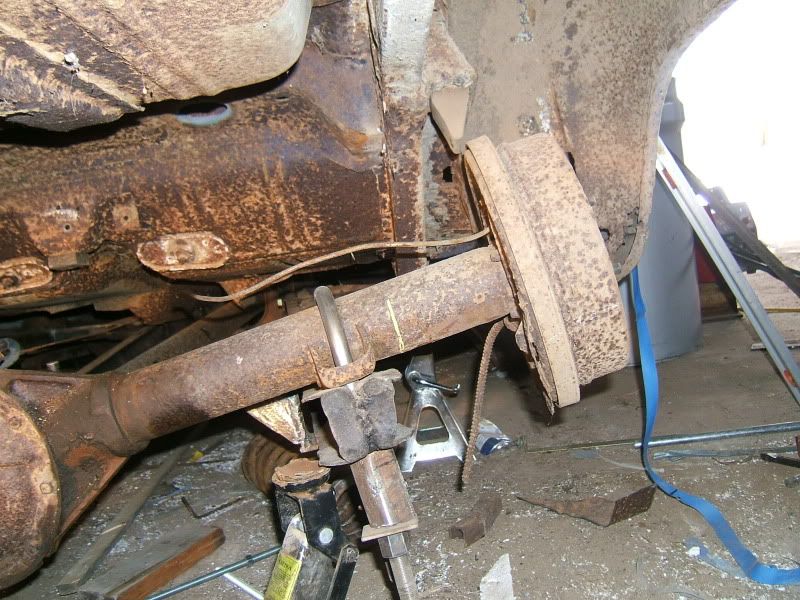 Roughly 15 inches of travel side to side. And that'd only because my floor jack doesn't go up any higher. The front end was unaffected by this - it stayed planted on it's blocks, leaving me to beleive that there is no binding taking place. And I thought I took pics of my bracing, but appaently I didn't. I'll try to get some when I head back out after lunch. But, regardless, things are progressing, I promise. haha. And I'll be sure to keep you all posted. -Sam.
__________________
1969 GMC C1500. long fleet. 307. 3 on the tree. 3.07 gears. Oliver green. Bent and bruised. Daily Driver. Quote:
http://67-72chevytrucks.com/vboard/s...d.php?t=242993 |
|
|
|
|
|
02-19-2010, 03:11 AM
|
#135 |
|
Registered User
Join Date: Dec 2008
Location: on a rock in the pacific
Posts: 554
|
Re: '67 Chevy II Build - Betty.
looks good sam. i've been mia for a while... kinna got busy with life and making $ to pay my taxes
 just got a bunch of powdercoating jobs to get done.... just got a bunch of powdercoating jobs to get done....
__________________
63 4 door Chevy II - NOVACATION (Updated 08/23/09) 65 Morris minor Traveler 77 Chevy Longbed. 93 Corolla JDM 20V Swap Daily Driver (Updated 07/16/09) Powder coating Hawaii Domestic Violence Awareness Show 5/3/09 Hawaii Rod and Custom Show 4/18
|
|
|
|
|
02-19-2010, 11:48 AM
|
#136 | |
|
Chicks build stuff too!
Join Date: Feb 2010
Location: Antelope, CA
Posts: 140
|
Re: '67 Chevy II Build - Betty.
Quote:
AHHHHH rust. When I bought the Caddy in November it looked perfect and then started tearing it apart..and the rust appears.. lol. Needless to say, I have rust repair now.. but ur right, it's just metal.. just time consuming. lol.. Badass project.
__________________
Christina Petitioning Nor*Cal NO REGRETS www.myspace.com/baggedc10 Projects: 1979 GMC High Sierra C10- Bodydropped on 24's Build Thread: http://67-72chevytrucks.com/vboard/s...d.php?t=387546 1965 Cadillac CoupeDeVille- Bagged on 22's Build Thread: http://67-72chevytrucks.com/vboard/s...d.php?t=387548 |
|
|
|
|
|
02-20-2010, 12:19 AM
|
#137 |
|
HickTown
Join Date: Apr 2009
Location: ANDOVER, Kansas
Posts: 355
|
Re: '67 Chevy II Build - Betty.
damn can't wait for the finished product
__________________
1993 Ford Mustang Vert w/ 2.3 1969 Chevy C/10 w/350 1968 Chevy C-20 w/250 1976 Dodge Aspen W/ 225 2000 Toyota Tundra w/4.7 1987 Dodge Ram D-100 w/360 255/70-15 ___________ (oo)══╬══(oo) ‾‾‾‾‾‾‾‾‾‾‾ |
|
|
|
|
02-20-2010, 06:50 PM
|
#138 | |
|
FarmBoy.
Join Date: Feb 2005
Location: Rhinelander, WI
Posts: 1,103
|
Re: '67 Chevy II Build - Betty.
Jvsapp - No worries mate. I know the feeling. Best of luck with the powdercoating operation and life in general.
Christina - it IS just metal! Everyone is afraid of rust, as they should be, but it's something that has got to be dealt with when restoring a car that was used as a car. Culp - you and me both man. Life has gotten the best of me the past couple of weeks, so no substantial updates as we speak. My apologies all. I've been working on families and friends cars the past 2 weekends, with a head gasket and a exhaust rerouting. But the major thing is my girlfriend is going to Nepal for 3 months, and flies out on the 26th. So, just trying to spend as much time with her as possible before she leaves. There'll be plenty of nights in the garage after that. No worries though, I fully plan on making major headway on this project. Things seem to be falling into place, so it's only a matter of time, measuring, and welding before the rear suspension is finalized, and then on to the rest of it. I'll keep you all posted, and thanks again for the support! -Sam.
__________________
1969 GMC C1500. long fleet. 307. 3 on the tree. 3.07 gears. Oliver green. Bent and bruised. Daily Driver. Quote:
http://67-72chevytrucks.com/vboard/s...d.php?t=242993 |
|
|
|
|
|
03-02-2010, 12:57 AM
|
#139 | |
|
FarmBoy.
Join Date: Feb 2005
Location: Rhinelander, WI
Posts: 1,103
|
Re: '67 Chevy II Build - Betty.
Well, an update for the ol' girl.
I'm working on setting up the panhard and the upper shock mounts as of now. For the lower shock mounts, I'm using the stock ones, just turned around so the shocks are behind the axle. Looks like it'll work just fine to me. For the panhard, I have to make a drop piece for the upper mount, and fabricate a bolt on for the lower to attach to the driver side trailing arm u-bolt. Pics will help to explain this, and hopefully tomorrow I can get most of it mocked up. Otherwise, I'm just trying to get this stuck finalized and the kinks worked out of it before I do some final welding and then blow it all apart. I want to clean the frame rails and everything else up really well before I get to welding it all in. I'd also like to actually paint my components so they're not just hanging out under there all rusty, but I suppose that can wait until I finish everything under the car and do some undercoating, etc. Now I just have to get a hold of the local sheetmetal place, so I can get some sheets and get to work fixing my frame rails and getting ready to patch the living hell out of the floor boards... But at least thats fairly straight forward. Maybe? -Sam.
__________________
1969 GMC C1500. long fleet. 307. 3 on the tree. 3.07 gears. Oliver green. Bent and bruised. Daily Driver. Quote:
http://67-72chevytrucks.com/vboard/s...d.php?t=242993 |
|
|
|
|
|
03-02-2010, 02:26 PM
|
#140 | |
|
FarmBoy.
Join Date: Feb 2005
Location: Rhinelander, WI
Posts: 1,103
|
Re: '67 Chevy II Build - Betty.
Alright, just about got the lower panhard mount figured out. I just need to head to town and get a drill bit big enough to handle the job of drilling out my 1/4 inch plate to ahole that'll accept the diameter of the u-bolt.
So, until then, and since theres nothing to take pics of, here are some high quality paint based diagrams! 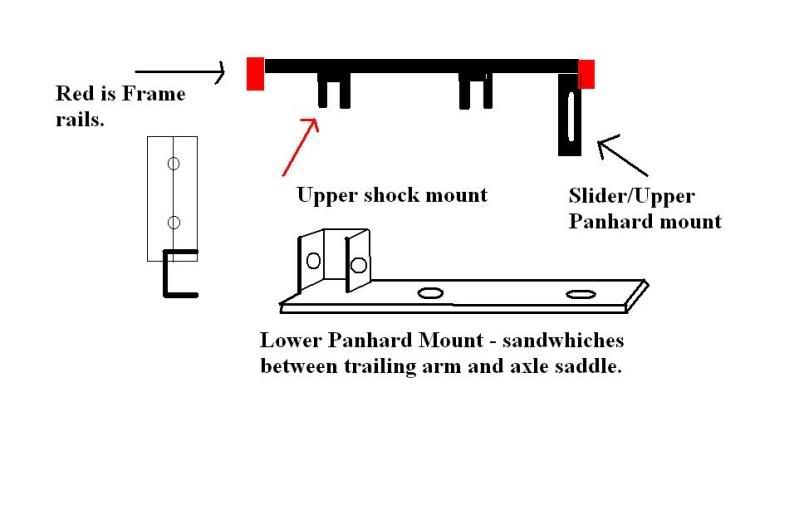 I considered scanning all of my freehand sketches and ideas as I try to figure out the kinks in this, but paint made it a bit easier to draw straight lines. So, thats where she sits now. I'll try to get a bit more done today to show how the shocks and panhard are going to be. I'm close to finalizing all of the tack welding, and then blow it apart, repair the frame rails, etc. and get on with it! Huzzah! -Sam.
__________________
1969 GMC C1500. long fleet. 307. 3 on the tree. 3.07 gears. Oliver green. Bent and bruised. Daily Driver. Quote:
http://67-72chevytrucks.com/vboard/s...d.php?t=242993 |
|
|
|
|
|
03-03-2010, 07:55 PM
|
#141 | |
|
FarmBoy.
Join Date: Feb 2005
Location: Rhinelander, WI
Posts: 1,103
|
Re: '67 Chevy II Build - Betty.
Alright, actual pics now instead of drawings. Excuse the poor quality - they're off my phone.
I cut out the trunk pan because, well, it was trashed. And now it allows me a lot more access to my suspension. It'll make it SO much easier to clean up the metal, re-do my frame rails, and do final welding on it. 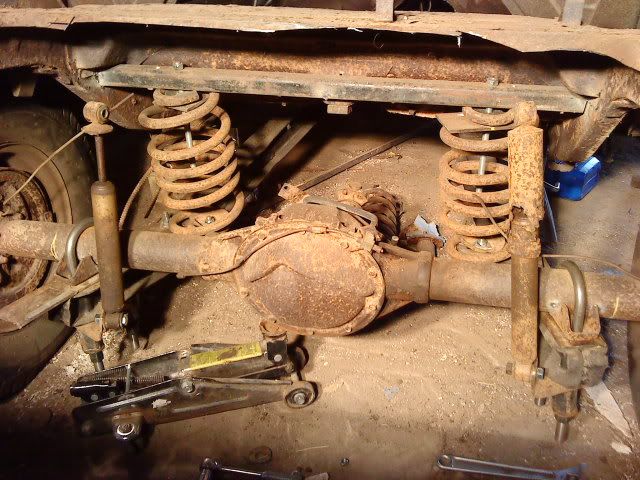 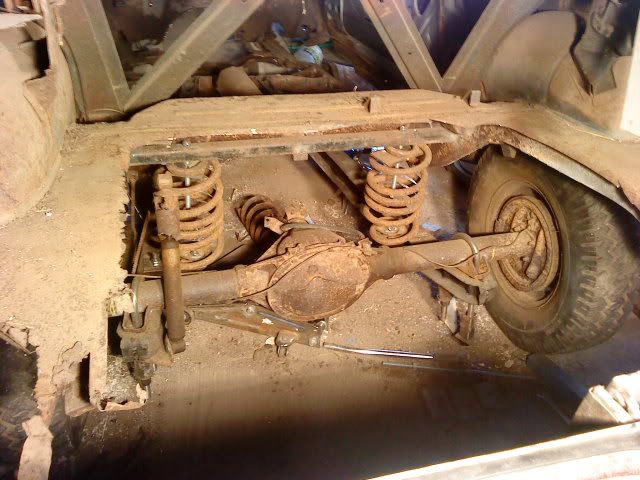 So now, I'm trying to set up my panhard, since I finally got my spacers drilled out. I'm using a drag link I bought for my '69 K20, but never used. It's long, round, strong, and I happened to already have it. So voila, it'll get used. Now just to figure out the ends and such, and we're home free. I may just end up using the stock ends, but there are better options. They just cost money, haha. I think I'm going to end up ordering a 4x8 sheet of 16 gauge for my floor and trunk, and a few other patches that I'll need it for. It's $55, plus tax, through a local metal shop. And that's about where it sits as we speak. I'll be sure to keep you posted as I try to get some more done on this wreck. -Sam.
__________________
1969 GMC C1500. long fleet. 307. 3 on the tree. 3.07 gears. Oliver green. Bent and bruised. Daily Driver. Quote:
http://67-72chevytrucks.com/vboard/s...d.php?t=242993 |
|
|
|
|
|
03-05-2010, 02:17 PM
|
#142 | |
|
FarmBoy.
Join Date: Feb 2005
Location: Rhinelander, WI
Posts: 1,103
|
Re: '67 Chevy II Build - Betty.
And to continue with some things:
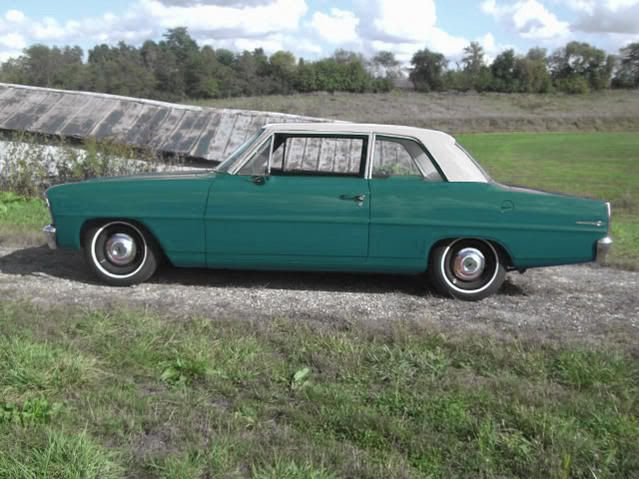
I haven't made any progress, but just so I keep everything in one place for references sake, I had some photoshop done by the guys on the board, and this is what came out of it. original pic: 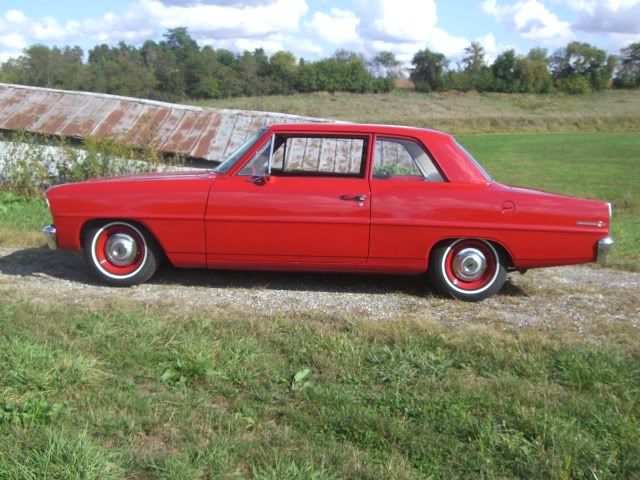 renderings: 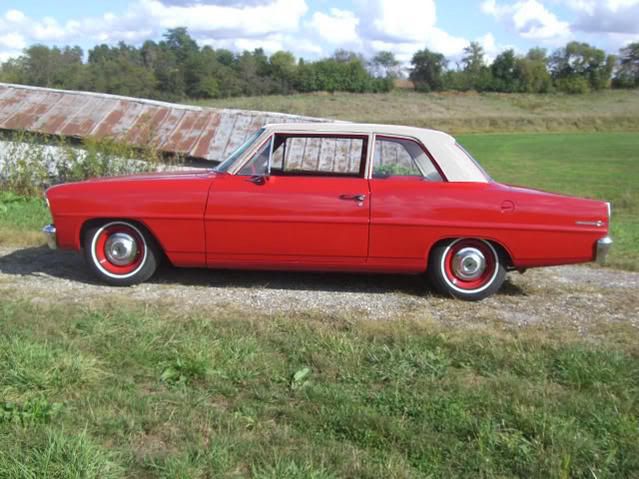 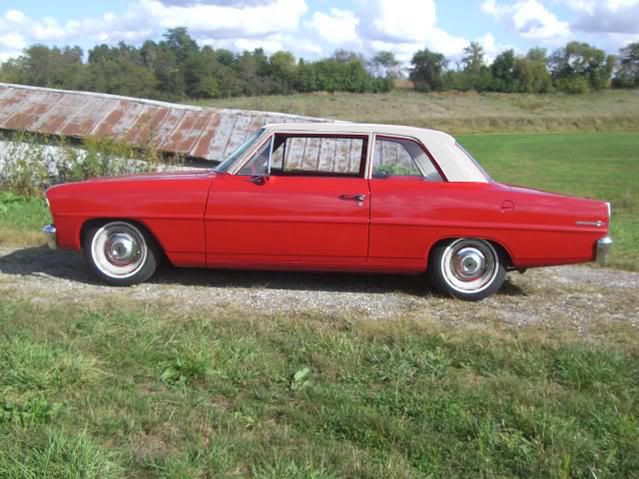 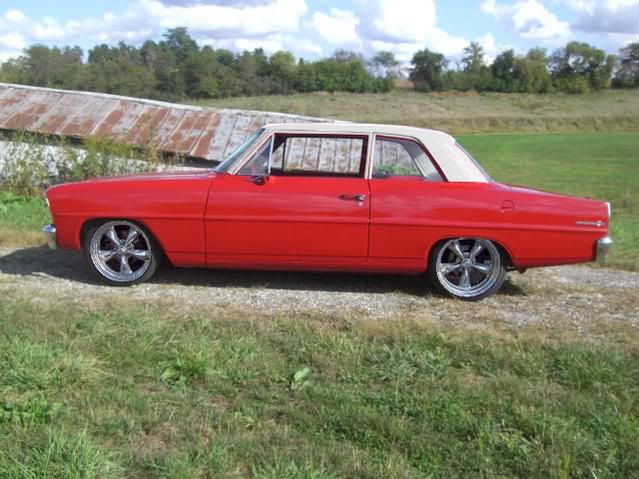 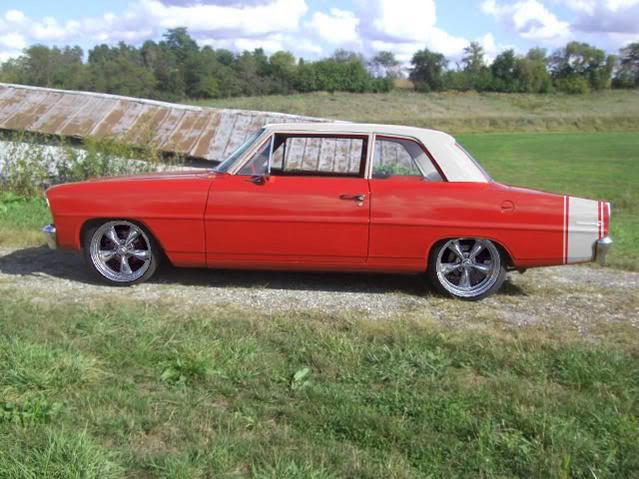
__________________
1969 GMC C1500. long fleet. 307. 3 on the tree. 3.07 gears. Oliver green. Bent and bruised. Daily Driver. Quote:
http://67-72chevytrucks.com/vboard/s...d.php?t=242993 Last edited by samwise68; 03-05-2010 at 02:21 PM. |
|
|
|
|
|
03-05-2010, 02:18 PM
|
#143 | |
|
FarmBoy.
Join Date: Feb 2005
Location: Rhinelander, WI
Posts: 1,103
|
Re: '67 Chevy II Build - Betty.
More:
    It certainly opens up some option for this little sedan, thats for sure. Now just to make it solid so it can look close to one of these pics... ...back to the garage. Let's hear it! -Sam.
__________________
1969 GMC C1500. long fleet. 307. 3 on the tree. 3.07 gears. Oliver green. Bent and bruised. Daily Driver. Quote:
http://67-72chevytrucks.com/vboard/s...d.php?t=242993 |
|
|
|
|
|
03-09-2010, 12:55 AM
|
#144 | |
|
FarmBoy.
Join Date: Feb 2005
Location: Rhinelander, WI
Posts: 1,103
|
Re: '67 Chevy II Build - Betty.
In an effort to actually get something done on my car, I've made progress!
I broke down and bought some links for my panhard. It's a top link for a 3-point hitch for a tractor and implements. But, ya know what, it was fairly cheap and it'll work. And honestly, thats what matters to me.  So I cut my drag link off. 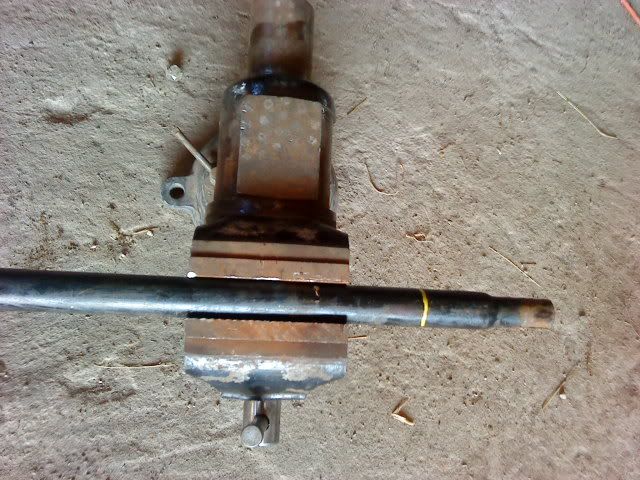 I then cut the link part of the ends off, so I could weld the ball and coupling to a 3/4 inch bolt. Then I welded a 3/4 inch nut on to my drag link, and voila, an adjustable panhard!  Only one end adjusts, the other is just welded solid. However, I have roughly 4-5 inches of adjustment on the threads. it goes from roughly 39 inches to about 44 inches. So, that should give me more than enough adjustment if and/or when I adjust my rear ride height. Now I just need to cut two stirrups for it to mount on the plate I have bolted between my axle and drivers side trailing arm, and then design the upper panhard mount/upper shock mount bar..unit...thing. I'm thinking a crossmember with the upper shock mounts welded on to it, of course. then, having a perpendicular piece of tubing drop down off the frame rail and this crossmember (braced of course) that would act as the upper mount of the panhard. It'll either have a slot for adjusting the panhard with ride height, etc, or just a series of holes to move it up and down. As long as it's pretty close to parallel, I don't think it'll be an issue. And that's where it stands as of now. I'm hoping tomorrow I can get my lower and upper mounts figured out, and then it's on to bigger and better things after some welding and grinding. I'll keep you all posted. -Sam.
__________________
1969 GMC C1500. long fleet. 307. 3 on the tree. 3.07 gears. Oliver green. Bent and bruised. Daily Driver. Quote:
http://67-72chevytrucks.com/vboard/s...d.php?t=242993 |
|
|
|
|
|
03-09-2010, 02:03 AM
|
#145 | |
|
Registered User
Join Date: Dec 2008
Location: on a rock in the pacific
Posts: 554
|
Re: '67 Chevy II Build - Betty.
Quote:
looks good so far sam. i was looking for a coil over setup that i've seen on truck arms that mounts to the back side of the arm. that might work for you. then you can weld in a cross member for the mount in the back. possibly tie the mount into the gas tank mount as well. BTW what are you planning on doing for the gas tank? my friend been using 60's mustang gas tanks for his 49 merc and 52 chevy because he can build up a box inside the trunk and it drops down and bolts to the box from inside the trunk. here's a peek. it's a used tank that had a smash. low budget http://808speedshop.com/SHOP%20PROJE...%20MERCURY.htm
__________________
63 4 door Chevy II - NOVACATION (Updated 08/23/09) 65 Morris minor Traveler 77 Chevy Longbed. 93 Corolla JDM 20V Swap Daily Driver (Updated 07/16/09) Powder coating Hawaii Domestic Violence Awareness Show 5/3/09 Hawaii Rod and Custom Show 4/18
|
|
|
|
|
|
03-09-2010, 09:38 PM
|
#146 | |
|
FarmBoy.
Join Date: Feb 2005
Location: Rhinelander, WI
Posts: 1,103
|
Re: '67 Chevy II Build - Betty.
Jvsapp -
I have no idea yet what I'll use for a gas tank, since my stock one has some pinholes in it. I'd rather not weld it, especially if it'll just rot through again. So, kinda up in the air yet. I'll definitely look into a drop in style tank like that though - he does some amazing work! And the coilovers would work awesome. I just don't think I have them in my budget at this time. Maybe later if I revamp it, or put arms under another project down the road - it would greatly simplify the set up. I have a feeling I'm really copying the Hotrods to Hell set up...which isn't a problem for me. I just don't want to get into any infringement nonsense if I ever write an article and try to get it published in a magazine. We'll worry about that when the time comes though, haha. Today I got the lower panhard mount fabbed up and tacked onto my extension plate. I'm in the process of working on the adjustable upper mount right now, and hopefully can finish it up tomorrow. I'll be sure to take a bunch of pics, don't worry. With a real camera even! and not my phone. I took the springs out and pushed the rear end up to the belly pan, to check my tire clearance at the back of the rocker. It looks like I have about 1-2 inches, which concerned me. But I can always gouge it out a bit if need be when I get my final tire size. The F78's under it now are roughly 26 inches tall, which should be about max for a street tire. I just need to find a converter and see where about that lands me in modern tire size - then onto finding a wider tire to put under it. After I get the kinks ironed out, I'll do some cleaning, fab up my rear frame rails, and get to burning metal. Then the next thing on the list is a mini tub to the frame rails. There isn't much there to begin with, so why not? haha. I'll be sure to keep you all posted. -Sam.
__________________
1969 GMC C1500. long fleet. 307. 3 on the tree. 3.07 gears. Oliver green. Bent and bruised. Daily Driver. Quote:
http://67-72chevytrucks.com/vboard/s...d.php?t=242993 |
|
|
|
|
|
03-10-2010, 12:07 AM
|
#147 |
|
Registered User
Join Date: Dec 2008
Location: on a rock in the pacific
Posts: 554
|
Re: '67 Chevy II Build - Betty.
sam i don't see how they can say you copied their work. i mean they copied what GM out out back in the 60's and what's on every nascar currently. so i doubt there will be any copyright infringement. they won't go after a small fry trying to save $ using original GM parts.
my friend is an artist... he chopped the merc himself with no prior chopping experience. learned alot on that one. here's a link to the 52 he used the same gas tank in. brand new instead of used though. http://808speedshop.com/GALLERY.htm keep up the good work and keep us posted.
__________________
63 4 door Chevy II - NOVACATION (Updated 08/23/09) 65 Morris minor Traveler 77 Chevy Longbed. 93 Corolla JDM 20V Swap Daily Driver (Updated 07/16/09) Powder coating Hawaii Domestic Violence Awareness Show 5/3/09 Hawaii Rod and Custom Show 4/18
|
|
|
|
|
03-10-2010, 03:56 PM
|
#148 | |
|
FarmBoy.
Join Date: Feb 2005
Location: Rhinelander, WI
Posts: 1,103
|
Re: '67 Chevy II Build - Betty.
Very true - I pretty much am a small fry just using stock GM parts. hahah.
And yes, your friend is an artist. Cripes, that chop is amazing... With luck, I'll start welding everything together today. Not trying to get my hopes up, but things are working out well. The batteries are charging in the camera, and I'm heading back out. edit: Ok, I lied. Ended up losing a piece to my grinder, so that set me back until I could cannibalize one off an old grinder that the brushes are worn out in. But, I did get the crossmember for the upper shock mount mocked up, along with the upper panhard mount pretty much finished and tacked in. The batteries didn't finish cahrging either, so I had to use the phone...  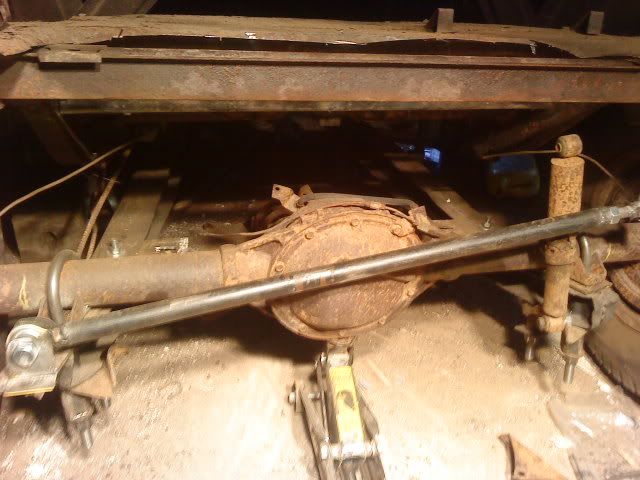 And that's where she sits tonight. I've got some homework I need to catch up on, but hopefully I can get another chunk done on 'er tomorrow. I'll keep you all posted. -Sam.
__________________
1969 GMC C1500. long fleet. 307. 3 on the tree. 3.07 gears. Oliver green. Bent and bruised. Daily Driver. Quote:
http://67-72chevytrucks.com/vboard/s...d.php?t=242993 Last edited by samwise68; 03-10-2010 at 08:53 PM. |
|
|
|
|
|
03-11-2010, 08:25 PM
|
#149 | |
|
FarmBoy.
Join Date: Feb 2005
Location: Rhinelander, WI
Posts: 1,103
|
Re: '67 Chevy II Build - Betty.
Alright, got a bit more done today.
I got the upper shock mounts done and welded onto my crossmember, which will also tie into the upper panhard mount. Cut down the stock shock mounts. 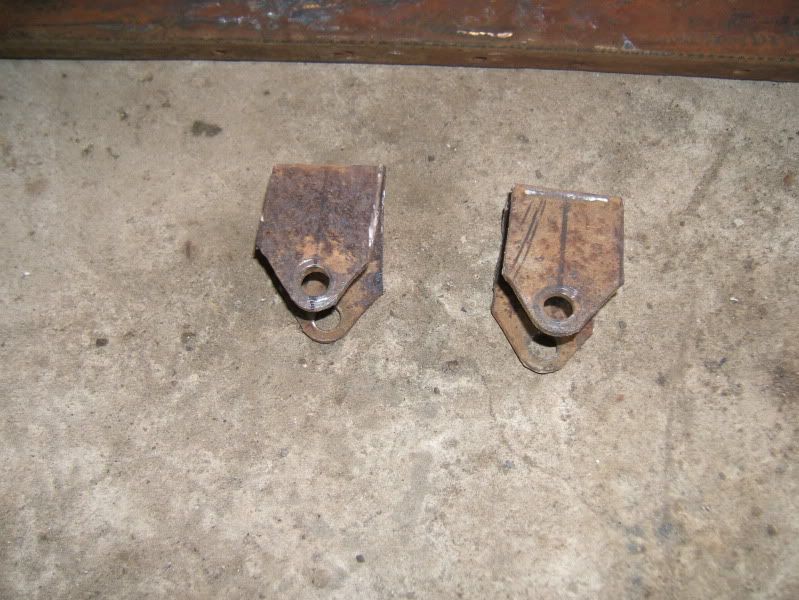 Welded onto my cross member. It's actually a bed rail from a '69 K20 stepside. The bed was junk, and I happened to wander past it and thought, "Ah hah! That'll work!" So, voila.  I also took a pic of tires for comparison. From left to right it's as follows: F78-14 (came on the car) 205/70R15 (old tire off my parents Lumina) 235/75R15 (tire off my truck...which would explain the baldness) 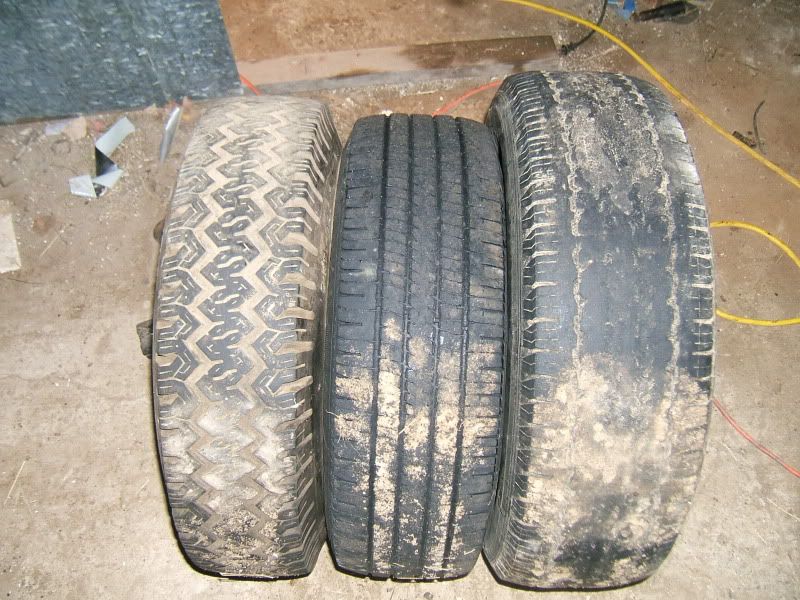 I'd like to be able to fit a 235 under the car, but I think it might be a little too tall, so I'll probably try to find a 225 and squeeze it in. I'm not worried about width, as long as I can find like a 15x7 or a 15x8 rim, with around 4-4.5" backspacing. Then we'll be cookin'! I also unbolted the rear end, and rolled that out of the way. Took off my crossmember that acts as an upper spring mount. 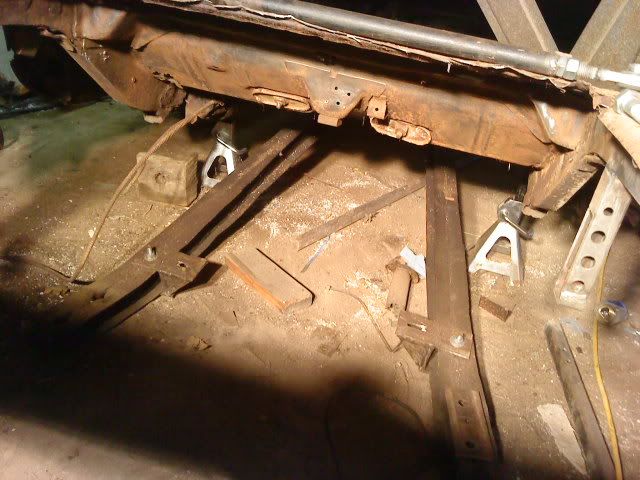 Then I started to wire wheel. Just trying to clean up as much of the rust as possible, along with find other problem areas in the belly pan. Any chance I can get to slow the rust down, along with doing it properly, I will attempt to seize. I'd really prefer not to half ass this one, ya know? And that's where she sits again tonight. I'm hoping to get back at it tomorrow, and hopefully this weekend I can claim completion on the fabrication of the rear suspension. What joyful day that'll be! Well, I'm off to play catch up with homework.. -Sam.
__________________
1969 GMC C1500. long fleet. 307. 3 on the tree. 3.07 gears. Oliver green. Bent and bruised. Daily Driver. Quote:
http://67-72chevytrucks.com/vboard/s...d.php?t=242993 |
|
|
|
|
|
03-14-2010, 11:57 PM
|
#150 | |
|
FarmBoy.
Join Date: Feb 2005
Location: Rhinelander, WI
Posts: 1,103
|
Re: '67 Chevy II Build - Betty.
Well, things didn't get as far along as I wanted them too.
Upon further examination of the frame rails, there are some pinholes that I'm taking care of right now. So, just getting back into the ryhthm of welding sheetmetal again. That'll come in handy real quick like, Hah. The driver side is by far the worse, and when it's done I might take a pic for you all. I'd rather not though, because it's going to be pretty ugly. Strong, clean, and safe, but ugly... I also did some more reasing over on stevesnovesite.com about minitubbing. Followed a guys thread where he did a very very stock appearing minitub. Alot of work, but very worth it. I thought about it, and then realized that stock doesn't mean much to be at this point, so as soon as the frame rails are done and my crossmembers are welded back in, we're gonna hack the living hell outta whats left of the wheel tubs. Bwahahaha. It should turn out alright, and I'll be sure the rear seat still fits back there. But, it sure won't be anything I want to show off too much. This is my beater hot rod. I don't particularly mind if it's a little rough around the edges, especially in places no one will see. As long as it's straight, sound, and safe - I'll roll it. So that's where it sits as of now. I'll try to get some more done tomorrow. -Sam.
__________________
1969 GMC C1500. long fleet. 307. 3 on the tree. 3.07 gears. Oliver green. Bent and bruised. Daily Driver. Quote:
http://67-72chevytrucks.com/vboard/s...d.php?t=242993 |
|
|
|
|
 |
| Bookmarks |
|
|


 Linear Mode

